![[Childcare] Wind chime craft ideas](https://i.ytimg.com/vi_webp/kPZHeAecFTo/maxresdefault.webp)
[Childcare] Wind chime craft ideas

How about making wind chimes—one of the symbols of summer—as a seasonal craft activity?
This article introduces wind chime craft ideas that are useful in early childhood education.
While many wind chimes are made of glass, here we’ve gathered ideas that use kid-friendly materials like plastic bottles, paper cups, and construction paper.
You’ll find lots of variations, such as wind chimes featuring animals kids love, wind chimes with tanzaku strips that can double as Tanabata decorations, and wind chimes with bells that jingle when they sway.
Give your favorite wind chime a try!
[Childcare] Wind Chime Craft Ideas (1–10)
Paper wind chime
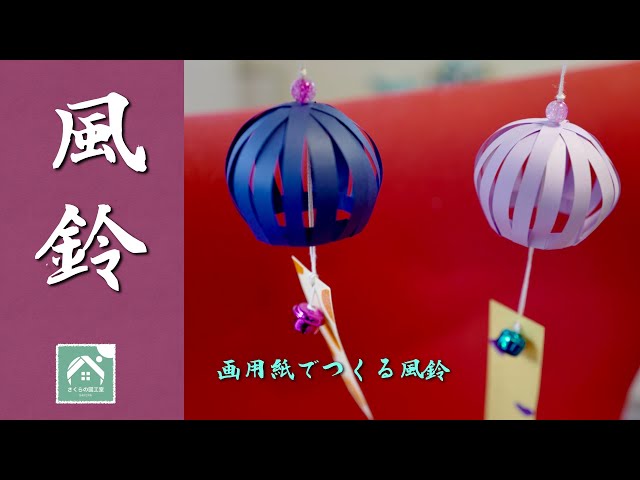
Let’s make a three-dimensional paper wind chime that produces a clear sound.
A recommended way to create a 3D shape is to cut construction paper into long, thin strips, arrange them like flower petals spreading out radially, and form them into a sphere.
It might be nice to use construction paper in various colors, too.
Once the shape is done, thread a string through it and attach a bell and a tanzaku (paper strip) to finish! Try decorating the tanzaku by drawing pictures, adding stickers, or gluing on construction paper cut into your favorite shapes.
It’s a bit of detailed work, but it helps children develop concentration, so give it a try.
Making wind chimes with blow painting
https://www.instagram.com/p/CfGyd-YhqZw/Let’s make wind chimes using paper colored with the blow-painting technique.
Blow painting is a painting method where you drop paint diluted with water and then blow through a straw over it to transform it into various patterns.
The expression changes depending on how you blow and which colors you combine, so feel free to experiment creatively.
Shape the blow-painted paper into a three-dimensional form, thread a string through it, and attach a strip and a bell to finish.
You could even color the strip with blow painting as well.
Each child will end up creating a completely different piece!
Footprint Wind Chime Art
https://www.instagram.com/p/Ce0Xr57paiz/How about making a wind chime that shows your children’s growth at a glance using their footprints? For the bowl-shaped top of the wind chime, decorate a PET bottle cut to about one-third, or a pudding/gelatin cup, with stickers and more.
Use the children’s footprints for the wind chime’s tanzaku (the hanging strip).
It’s fun to choose summery motifs—make red and green footprints to look like watermelon, or blue footprints to look like fish.
Combine them with the top part of the wind chime and you’re done.
If you make one every year, you’ll be able to see how much your children grow from year to year!
Wind chimes made with mini potted plants

How about making a wind chime with a mini flowerpot? Choose a pot that has a hole in the bottom.
Decorate the pot by sticking on stickers or painting and drawing with paints or pens suitable for the pot’s material.
After threading a string through, also thread something that will make sound.
A bell works, but anything that makes a sound when it touches the pot is fine—add something small that can serve as a charm, like a button.
Finally, attach a tanzaku (a small paper strip), and you’re done! The sound will vary depending on the charm inside, so enjoy the differences.
Rocket wind chime

Let’s try making a cool rocket-shaped wind chime! Use the bottom part of a plastic bottle cut in half, and attach parts made from origami or construction paper, such as the rocket’s pointed tip and fin-like pieces.
For the strip that hangs down, you can attach a regular tanzaku, or use a tanzaku shaped like the flames that blast out when a rocket takes off.
You can also add a spiral-cut strip of paper to express the motion of flying into space.
Try adding space-themed decorations like stars and glitter to enhance the cosmic vibe.
paper-mâché wind chime

Let’s try making a wind chime by pasting paper onto a base, like a papier-mâché craft! Thin paper such as tissue paper is recommended.
Tear the tissue paper into small pieces and randomly stick them onto a water balloon coated with glue.
Mixing different colors of tissue paper will make the piece more colorful and fun.
Once the paper is pasted and completely dry, pop the balloon inside.
After removing the balloon, make a hole at the top, thread a string through it, and create a loop for hanging.
Attach a bell and a paper strip (tanzaku) to the string that comes out at the bottom, and you’re done! Please have the teacher handle the steps of popping the balloon and making the hole at the top of the wind chime.
Origami wind chime
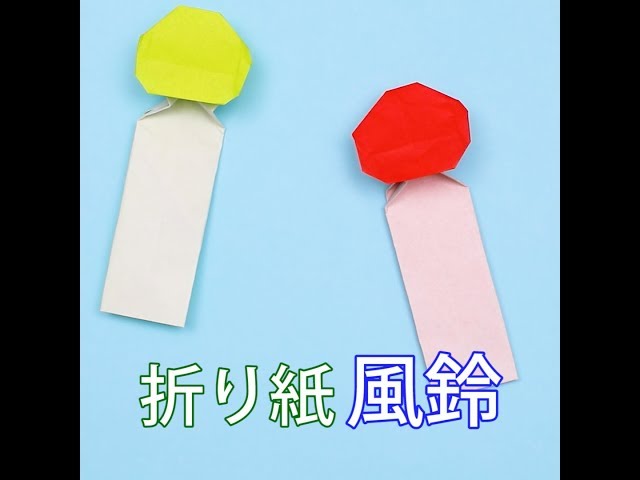
Here’s how to make a wind chime using a single sheet of origami paper.
Because there are many detailed steps, it might be perfect for a class of five-year-olds.
When you start, keep in mind that the base color of the origami will become the wind chime, so choose bright colors or patterned paper.
Since there are folding steps involved, it may be difficult to follow just by looking at a sample.
To support the children and help them complete the project, we recommend working in small groups.
Once they get the hang of it, you can make lots and decorate the classroom or hallway!