[For Seniors] Enjoy May: A Collection of Seasonal Craft and Wall Decoration Ideas


We’re introducing crafts and wall decoration ideas that are perfect for May and capture the spirit of the season.
With cherry blossom season over, this is packed with recommendations for anyone struggling with May wall display ideas.
We also feature plenty of craft ideas related to Children’s Day, so if you’d like to make a gift for your grandchild, please take a look.
Even if they seem difficult, many of these ideas are actually simple—just cutting and pasting.
We hope you’ll give these easy crafts and wall decorations a try—they’re great for older adults to enjoy casually, too.
- [For Seniors] May-Themed Wall Decoration Ideas Full of Seasonal Flair
- [For Seniors] Introducing May-themed Origami!
- [For Seniors] Enjoy Koinobori Indoors: Wall Decoration Ideas Collection
- [For Seniors] Easy Koinobori Crafting: A Collection of Fun Ideas Using Various Materials
- For Seniors: Snacks to Make in May That Capture the Season
- [For Seniors] May Calendar Craft: Motifs that color May, such as Children's Day (Tango no Sekku), Mother's Day, and seasonal flowers
- [Childcare] Let's make and display in May! Wall Decoration Craft Ideas
- [For Seniors] Recommended Events for May: A Roundup of Ideas That Get Everyone Engaged
- [For Seniors] Enjoy at Day Service: A Roundup of May Craft Ideas
- [For Seniors] Enjoy Cherry Blossoms Indoors: Wall Decoration Ideas
- [For Seniors] Color Your Care Facility’s Spring: Wall Decoration Ideas
- [For Seniors] Spring Wall Decorations: A Collection of Ideas to Brighten Up Your Room
- For Seniors: Simple and Lovely Crafts – A Collection of Take-Home Project Ideas for Day Service
[For Seniors] Enjoy May: A Collection of Craft and Wall Decoration Ideas to Feel the Season (21–30)
A large koi-shaped streamer made of cardboard and origami

A large carp streamer made by combining cardboard and colored paper—the key is how the layered colors convey a fun atmosphere.
The trick is to cut the colored paper into scale shapes; since you’ll deliberately mix the colors, use the uniform shape to create a cohesive look.
Paste those scale pieces onto cardboard cut into the shape of a carp streamer, attach the facial parts, and it’s done.
Incorporating patterned origami paper will make it even more colorful and lively, so that’s recommended as well.
Samurai Boy’s Day doll wreath

Here’s a cute craft idea for a Boys’ Day (Gogatsu Ningyo) wreath.
Thread thin wire through craft pom-poms to make the wreath.
The doll parts are also made from pom-poms.
You can place an origami samurai helmet on the doll’s head as well.
Attach the finished doll to the wreath to complete it.
You can make everything with items sold at 100-yen shops, so preparation should be easy.
A wreath made of round pom-poms is irresistibly cute.
Older adults may also find themselves feeling warm-hearted as they create such an adorable piece.
Chirimen craft: Koinobori (carp streamers)

Because of its distinctive texture, chirimen fabric strongly evokes a traditional Japanese atmosphere.
This piece uses that Japanese-feeling fabric to make a koi nobori (carp streamer), clearly emphasizing that it’s a Japanese event.
The key point is the scale pattern; using it well gives the koi nobori a luxurious look.
Layering various fabrics to add volume further enhances the splendor when they’re displayed together.
It also seems fun to think about what shapes would best bring out the qualities of chirimen.
carp-streamer ornament

Use an MDF board covered with felt as the base, and insert bamboo skewers and toothpicks so they stand upright.
Roll craft bands into circles and glue them; attach carp streamers made from construction paper and origami inside.
Let’s also make pinwheels with craft bands.
Next, prepare double-sided origami paper to make iris flowers and helmets.
Finish by decorating the base: put the carp streamers and pinwheels on the bamboo skewers, and the irises and helmets on the toothpicks.
For the carp streamers’ eyes, using googly eye stickers adds movement and extra cuteness!
Two-color felt koi-nobori

Let’s make a carp streamer with felt that gives a warm, cozy feel.
Once you’ve prepared felt in different colors for the body, cut both pieces into a “V” shape with a 5 cm width.
After cutting, apply glue to both ends and stick them together, then make two slits along the crease so they’re the same width.
Stack the two pieces so that the slitted sections form a lattice pattern, and use the initially glued area to create the face and tail fin.
For the eyes, use eye stickers, and wrap a thinly cut strip of white felt around the mouth.
A hanging decoration of carp streamers made with yarn
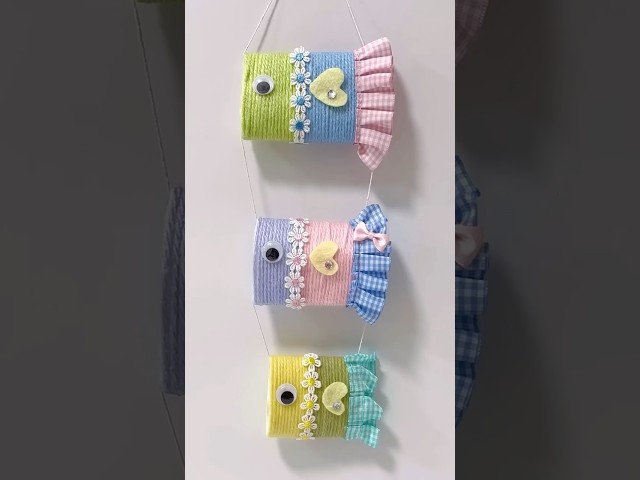
A soft-looking carp streamer made with yarn—this craft creates a cheerful vibe through playful color combinations.
For the base, use a kitchen paper tube: cut it, apply double-sided tape, and attach the yarn.
The key is to stick the yarn on without gaps; once the tube is wrapped so it doesn’t show, add decorations to finish.
It’s also recommended to line up versions with different colors, sizes, and decorations to make the display even more fun.
Climbing koi-nobori

Shall we make a carp streamer you can also enjoy flying? We’ll use a paper cup, a straw, round stickers, and kite string.
First, cut out the bottom of the paper cup.
Then gently flatten the rim and cut a triangle with scissors to make the tail fin.
Inside the cup, stick two short, vertical pieces of straw facing each other.
Use round stickers to add the eyes and scales.
For the scales, cut the stickers in half.
Thread the kite string through the straws and you’re done! Hook the looped part of the string onto a high spot and set the carp streamer lower down.
By moving the string alternately left and right, friction will make the carp streamer rise!