[Day Service] Craft Ideas for Seniors to Make in October

Autumn is full of delicious foods and is a comfortable season to spend time in, so it’s easy to make progress with your hobbies.
Many seniors may also be looking forward to enjoying the beautiful autumn leaves.
In this article, we introduce recommended craft ideas for October.
We’ve gathered many ideas, including decorations themed on maple leaves—the quintessential symbol of autumn—pumpkin decorations perfect for Halloween, stylish pieces that can be displayed as interior decor, and craft ideas useful for recreational activities at day service centers.
If you’d like, give them a try!
- For Seniors: Easy Crafts Recommended for October
- [For Seniors] Wall Decorations to Enjoy October
- [Day Service] Handmade Autumn Crafts: Take-Home Project Ideas
- Recommended November craft ideas for day service centers
- Useful in care facilities! Ideas for autumn wall decorations
- [For Seniors] Simple crafts that feel like autumn: a fun creative activity
- [For Seniors] Let’s Get Excited with Halloween Crafts! Fun and Easy Decoration Ideas
- [For Seniors] Fall Wall Decoration Ideas
- [For Seniors] Recommended for September! Craft Idea Collection
- Simple, Recommended Autumn Crafts for Seniors
- [For Seniors] Autumn Origami to Enjoy in October
- [For Senior Care Facilities] Easy! September Craft Ideas to Feel the Autumn Season
- [For Senior Care Facilities] Feel the Autumn! Collection of Maple Leaf Wall Decoration Ideas
[Day Service] Craft ideas for seniors to make in October (21–30)
Grape decoration made with paper cores

We will introduce a cute, three-dimensional grape decoration made using a toilet paper roll core.
Prepare scissors, craft scissors, a toilet paper roll core, tissue paper (flower paper), origami paper, glue, and a ruler.
Cut the toilet paper roll and create the base for the grapes.
Prepare 1–2 sheets of tissue paper, and the key point is to shape one side into a rounded form by puffing it out inside the toilet paper roll core.
Using the same method, make six grape berries.
Apply glue to the sides of the grapes and attach them together to form a grape cluster.
Twist brown tissue paper to make the stem, and attach the leaves you cut with the craft scissors.
Your grape decoration is complete.
hanging Halloween decorations

Here’s a hanging pumpkin decoration I recommend for anyone who wants to make a three-dimensional Halloween ornament.
Prepare one sheet of orange construction paper and cut it into strips about 1 cm wide.
Gather the strips together and punch holes at the top and bottom.
Thread them onto a chenille stem (pipe cleaner) with one end bent so it won’t slip off.
Twist the pipe cleaner at the point where the paper forms a half-circle, then fan the strips out and shape them into a pumpkin.
The pipe cleaner will be the vine, so curl it into spirals.
Attach facial features made from black construction paper, tie a thread to hang it, and you’re done!
Halloween letter garland

Here’s a Halloween letter garland that will instantly boost the festive vibe when you hang it in your room! Both the garland base and the letter pieces are made entirely from origami paper.
First, fold the top and both side edges of the base origami 2 cm inward.
Make a slit in the center of the bottom edge, then open it outward to align with the bottom corners to form the garland shape.
For the letters, cut another sheet of origami into four strips.
Fold the two long edges toward the center line, then shape them into letters.
Once you’ve made all the letters for “HAPPY HALLOWEEN,” attach them to the base one by one, string the garland on a cord, and hang it up!
Felt Halloween wall hanging decoration
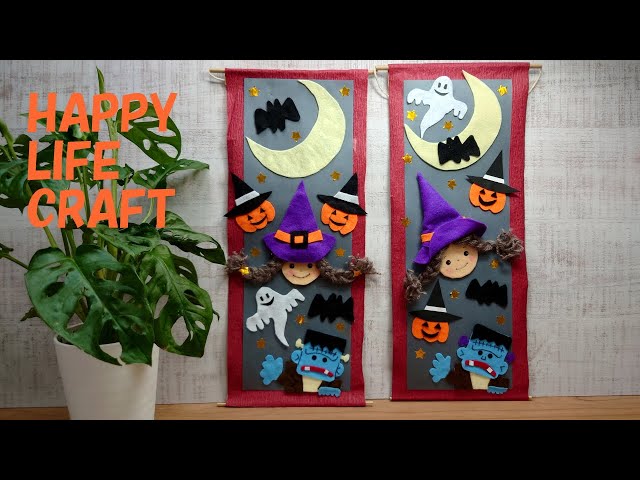
Let’s make a Halloween-themed wall hanging using felt.
For the base, adhere cardboard to reversible crepe paper and attach bamboo skewers at the top and bottom to create a scroll-like look.
Then, finish by gluing on parts made from felt and yarn.
The parts featured in this idea are the moon, bats, a witch, a jack-o’-lantern, Frankenstein, and a ghost.
Any Halloween-style motif will work, so you might enjoy designing your own original version.
Felt Halloween decorations
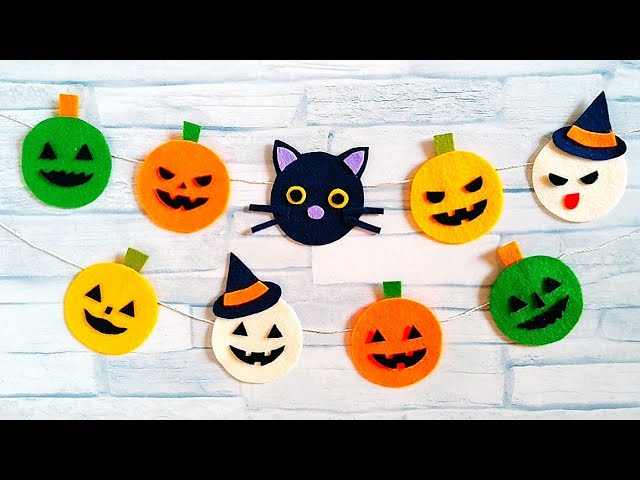
Here’s a DIY idea for a Halloween garland using felt from a 100-yen shop.
Basically, you’ll cut out pieces from the felt and glue them together.
The examples include a pumpkin, ghost, and black cat, but feel free to use any Halloween-themed motifs you like, such as a witch or a bat.
Once finished, attach the pieces to a string at equal intervals and hang them up to decorate your room.
It’s helpful to have templates when cutting out the parts, so make them in advance using thick paper.
Crescent moon × black cat × honeycomb pumpkin

A moon adorned with flowers and pumpkins… and a black cat standing there gives this wall decoration a truly mysterious feel.
This idea comes with templates, so start by downloading and printing them out.
Basically, you’ll cut out the pieces according to the templates and glue them together.
The honeycomb pumpkins and flowers are made three-dimensional by combining several parts.
There are many pieces, but the steps are simple, so take your time and complete it bit by bit.
Swirling Paper Ghost

The idea of having the ghost’s bottom part as a spiral is really cute.
First, draw a picture of the ghost on white paper.
Think of a snail as your reference—the idea is to draw a snail but make its face a ghost’s face.
Once you’re done, cut away the unnecessary parts around it with scissors, and carefully cut out the spiral section.
Punch a hole in the ghost’s head and hang it with string; the cut spiral will drop downward in a circular shape, making a very striking decoration.
Attach it to a stick and it becomes a portable item too!