It's fun to spin! A collection of DIY toy ideas

What I’d like to introduce this time is a fun handmade toy that’s entertaining when you spin it.
We’ve gathered lots of ideas for toys you can make from familiar materials like paper cups and paper plates, as well as from recyclables like empty boxes and plastic bottle caps.
Once they’re finished, they’re full of clever mechanisms that make you want to spin them again and again! You can get the other materials at 100-yen shops or home improvement stores, so be sure to find a toy you like, make it, and have fun playing with it!
- Moving! Spinning! Flying! Fun handmade toys made with rubber bands
- Made with toilet paper rolls! Exciting and fun easy handmade toys
- Made of paper! A fun collection of DIY toy ideas you can play with
- Fun for elementary school kids! A collection of craft ideas using plastic bottle caps!
- [DIY] A Collection of Handmade Moving Toy Craft Ideas
- Fun and easy toy ideas made from empty Yakult bottles
- Let's make toys with paper cups! Simple and fun handmade toys
- Make It with Pipe Cleaners! A Collection of Simple, Fun, and Playable Toy Ideas
- [For Kids] Spins in the wind! A collection of recommended DIY pinwheel ideas
- Handmade toys with cardboard! DIY game ideas that will captivate kids
- Kids and adults alike will be captivated! A collection of DIY marble run ideas
- Let's make toys with straws! Easy and fun DIY toys
- [Let’s Make and Play!] Handmade Toy Ideas You Can Create Yourself
Spin it around and have fun! A collection of handmade toy ideas (1–10)
Kaleidoscope made with translucent origami

Let’s make a kaleidoscope that reveals a beautiful world when you turn it! Take a mirror-like sheet, score it from the back at 2.8 cm intervals, fold it into a triangle, and secure it with clear tape.
If the mirror surfaces face inward, you’ve got it right.
Slide it into a plastic wrap core that’s been cut in half—the size will fit perfectly! Next, cut a circle from a clear plastic sheet to match the diameter of the core.
Sand the edges to make them smooth.
Make a hole in the center for a bamboo skewer to go through, then decorate it with your favorite drawings or translucent origami.
Align it with the inner triangular corners and tape it across the sides to finish.
It’s exciting to imagine what kind of world you’ll see when you peek inside!
Spinning round and round: little pig, raccoon dog, fox, and cat.

Here’s an idea for a spinning toy that makes endless tag games fun.
Prepare two paper plates, one straw, and a few sheets of colored paper of your choice.
First, make a hole in the center of one paper plate that’s just big enough for the straw to pass through.
On the other paper plate, leave the outer rim and cut out the upper half of the inner circle.
Cut a piece of colored paper to the same size as the inner circle and draw any illustrations you like.
Snip the end of the straw into several slits to make “octopus legs,” then insert it from the back through the hole in the first plate.
Secure the slitted part with clear tape.
Attach the illustrated colored paper to the part of the straw that’s sticking out, then glue on the paper plate with the window cut out—and you’re done! If you stick on illustrations of a little pig, a raccoon dog, a fox, and a cat, you can keep playing shiritori forever!
Picture-matching toy made from empty boxes

Here’s how to make a spinning picture-changing toy.
Prepare two empty cylindrical snack boxes, colored construction paper, string, and a pen.
First, cut out the bottom of one box.
Then cut down the side vertically, shrink it slightly to make a smaller circle, and tape it with cellophane tape.
Make several slits around the top edge and fold them inward.
Next, wrap the tube with your favorite color of construction paper, and attach the cut-out bottom piece to the tabs you folded in.
Wrap the other box with colored paper as well.
Once it’s covered, cut out a window of any size with a craft knife, and insert the first tube—now it’s complete.
If you punch holes in the bottoms of both boxes and thread a string through, it won’t come apart easily.
Decorate with stickers or drawings and have fun!
Fun when you spin them! A collection of handmade toy ideas (11–20)
Spin dance with magnets
@fuki_fukisato I made a mysterious toy that spins round and round using the power of magnets. I don’t really know why it spins…! If anyone knows the details, please tell me in the comments!#HandmadeToys#LivingWithKids#LifeWithKidsworkFond of crafts#StayHomeTimeParentingChildcare#kids#handmadeHandmade creationstranslation Childcare #Kindergarten #Nursery school Translation
♬ Cute heartwarming BGM(1490583) – sanusagi
Would you like to make a mysterious toy using magnets? All you need is one round plastic magnet, one regular magnet, a tissue box, and a popsicle stick.
Wrap the tissue box with colored construction paper and glue it on, then cut a slit in the wider side just big enough for the popsicle stick to fit.
Next, tape the regular magnet to the end of the popsicle stick with cellophane tape.
The orientation of the magnets is important—attach it so that the round plastic magnet will attract, not repel.
Finally, insert the magnet-tipped popsicle stick into the slit you cut, place the round plastic magnet on top, and you’re done! If you move it left and right, it spins around, so it would be fun to stick a ballerina or an animal on top of the magnet!
Spins well! A top like a Beyblade
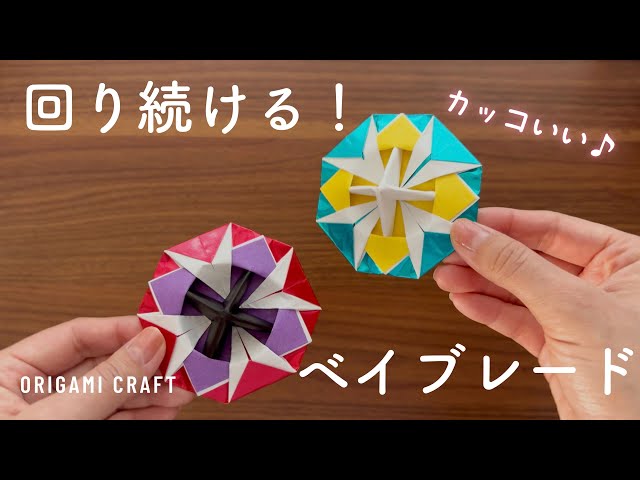
A Beyblade that you can easily spin just by pulling a ripcord is appealing not only for how it works but also for its cool design.
When you finish making this origami Beyblade, it will also have a cool pattern.
You’ll make three parts: the outer body, the inner body, and the handle.
The design section is created by folding the outer body.
First, fold the left and right edges of the origami to meet at the center, then fold the top and bottom edges the same way.
Next, open the top and bottom pockets into boat shapes, and then open the left and right sides of the boats into squares.
From there, keep flipping the paper over while making creases to change it into a diamond shape and form the pattern.
The inner part and the handle can be made with the “zabuton” (cushion) fold, so if you like, try making it and have fun playing with it.
A spinning top with a helmet-like shape

An origami spinning top you can make and play with! Please prepare three sheets of your favorite origami paper.
The inside of the top and the handle can be made simply by repeating the “zabuton” fold.
The outer part adds helmet-like decorations along the edges, so the steps are a bit more detailed, but if you can fold a crane by yourself, you should be able to complete it without any problem.
In the end, you’ll assemble the parts you made to finish a single top.
Using different colors of origami paper for each part lets you enjoy the color effects when it spins.
Be sure to have fun with top battles, too!
Let’s blow and play! How to fold a blow-top (spinning top you spin by blowing)

This is a fun blow-top origami that spins when you blow on it.
First, prepare two square sheets of origami paper, and place one with the colored side facing down.
Fold it in half into a triangle, then fold it into a triangle once more.
Open it up, then fold it in half into a square and continue with the “zabuton” (cushion) fold.
Using the closed side as the axis, fold up the left and right edges on both sides.
Fold down the triangles on the two faces.
Make two of these and fit them together.
Try blowing on it with a “fuu—.” Blow strongly or gently and enjoy the differences in how it spins!