Let's make a handmade tissue case: a collection of stylish and easy ideas

Tissues are an essential part of our everyday lives.
In this article, we’ll show you how to make stylish and easy-to-use handmade tissue cases for both box tissues and pocket tissues!
Using materials like fabric, felt, craft bands, and wire, you can easily create a custom piece that matches your room’s decor.
We’ll also introduce no-sew tissue case ideas, so it’s perfect to make with your children as a fun craft project.
Try making your very own ideal tissue case.
- [Handmade] Delightful Handmade Fabric Accessories to Receive
- [For Elementary School Kids] Craft Ideas Using Tissue Boxes
- [Easy] DIY Water Bottle Cover: How to Make a Stylish, Portable Case
- Let's make a handmade smartphone case! A collection of simple and cute ideas
- Stylish and Easy! DIY Wall Decoration Ideas
- [Easy and Simple] Popular DIY Ideas You Can Make with Materials from 100-Yen Shops
- [Easy] Practical craft ideas. Great for beginners too!
- DIY mask case ideas: introducing designs and how to make them.
- [Crafts] Cute! Handmade Drawstring Pouch Idea Collection
- [Grown-up Cute] Easy Handmade Ideas for Miscellaneous Goods and Interior Accessories
- [Handmade] Recommended Motifs and Crafting Ideas for DIY Chopstick Rests
- Handmade ideas for a maternity and child health handbook case: an easy-to-make multi-purpose case
- [Beginner Friendly] Easy Craft Ideas You Can Do
Let's make a handmade tissue case: A collection of stylish and easy ideas (1–10)
Make it with Perler beads! Sumikko Gurashi tissue case
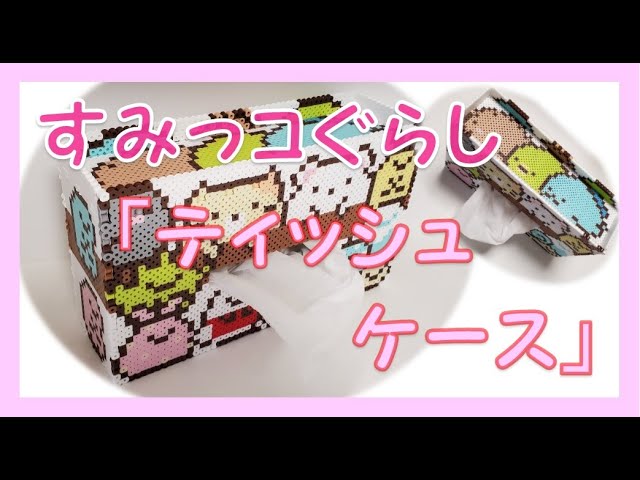
How about using Perler beads—kids’ all-time favorite—to make a tissue box cover featuring Sumikkogurashi, a character beloved by children? Arrange the beads on the six faces—the four sides, top, and bottom—according to the character design, then fuse them with an iron.
Once you’ve made all six panels, simply snap them together.
You can use it with either boxed tissues or loose tissues.
With this design, the case stands upright for easy tissue dispensing, and the top surface can also serve as a small tray for accessories.
Only two seams! Tissue case with a back pocket

This is a method for making a tissue case by folding a rectangular piece of fabric and sewing just two spots on the sides.
If you start by measuring the fabric carefully and pressing the folds well with an iron, all that’s left is to sew the two sides, so even those who aren’t confident in sewing should find it easy.
Following the ironed creases, place the fabric right sides together, sew the sides, then turn it right side out and it’s done.
Since there’s so little sewing, you can make it by hand without a sewing machine.
There’s also a pocket on the back, making it practical, too.
Make it with wire! Stylish tissue case

Here’s how to make a tissue case that looks like wire art.
You’ll need wire, pliers for bending the wire, and nippers for cutting it.
Wire art can feel a bit intimidating, but you can get all the materials at a 100-yen shop, so it’s easy to give it a try.
Just follow the pattern to bend and cut the wire as needed.
Even pack tissues without a box will look very stylish if you put only the tissues inside! It could be a great summer vacation craft project, too.
Let's make a handmade tissue case: A collection of stylish and easy ideas (11–20)
A foldable, portable tissue case

We’re going to make a tissue case—not for pocket tissues, but for standard-size tissues.
What’s more, it can be folded in half, so even though it holds full-size tissues, it’s a great little item that’s very compact to carry.
You’ll need a 28 cm square piece of fabric, a loop, and fabric for a covered button.
The sewing is all straight seams, so you can hand-sew it even without a sewing machine.
If hand-sewing, use a half backstitch for strength.
Regular buttons are cute too, but using a covered button gives it a nice, cohesive look.
You can buy a kit for making covered buttons at a 100-yen shop.
Tissue Case Made with Craft Bands

Why not try making a handmade tissue cover with craft bands? Craft bands are made of paper, and you create the piece by weaving them like a basket.
The result has a natural, basket-like, rustic look! Prepare 10 meters of craft band, then split it into bands of different lengths and widths as specified in the video.
It looks fun to weave the bands together while using glue.
It might be a task that requires patience, but keep the finished piece in mind and enjoy the process! Since it’s paper, it’s lightweight and easy to try.
Just one seam! Pocket tissue case with a lid

A pocket tissue case with a flap that makes you want to ask, “Can you really make it with just one seam?” What’s more, it not only has a flap but also an extra pocket, so it looks very practical.
Prepare the outer and lining fabrics, draw the lines following the pattern, press crisp creases with an iron, layer the two pieces of fabric, sew in a U-shape, then turn it right side out—and you’re done! The folds may seem a bit tricky, but it’s fine if you follow along with the video.
It’s so easy that you can make plenty and they’ll make great gifts!
Crocheted Tissue Case

We’re introducing a tissue case made with eco-friendly handmade T-shirt yarn.
You can make T-shirt yarn yourself from worn-out T-shirts or cut-and-sew tops, but store-bought is fine too.
In this video, we’ll crochet a cover for a tissue pack that doesn’t come in a box.
Knitting and crocheting little by little is highly recommended as a stay-at-home activity or hobby.
Once you get the hang of it, it’s a repetitive process you can do mindfully, which might even help relieve stress! The tissue cover has a nice weight, making it practical and cute—give it a try!