
Let's make a handmade tissue case: a collection of stylish and easy ideas

Tissues are an essential part of our everyday lives.
In this article, we’ll show you how to make stylish and easy-to-use handmade tissue cases for both box tissues and pocket tissues!
Using materials like fabric, felt, craft bands, and wire, you can easily create a custom piece that matches your room’s decor.
We’ll also introduce no-sew tissue case ideas, so it’s perfect to make with your children as a fun craft project.
Try making your very own ideal tissue case.
Let's make a handmade tissue case: A collection of stylish and easy ideas (1–10)
Cat-shaped pocket tissue case

Let’s make a cute cat-shaped pocket tissue case! With slightly rounded corners, a round face with perky little ears popping out, and round eyes, this adorable cat tissue case is sure to delight children.
It might seem difficult, but if you make the ears first, the rest is sewn all at once with right sides together, so it’s not that hard.
The “eyes” are actually snap buttons, so they fasten securely and are practical, too.
If you change the shape of the ears, you might even be able to make other animals!
No sewing! A pocket tissue case made with the “Sewing Expert” glue stick

Let’s make a pocket tissue case without sewing! You might wonder, how is that possible without sewing? Did you know there’s glue made for fabric? This sewing adhesive won’t come off if you let it dry thoroughly, and it’s even fine in the wash.
Since you just stick together the parts you would normally sew, it’s very simple.
Apply the glue along the folds you’ve pressed with an iron, making sure it doesn’t ooze out, and let it dry completely for 24 hours—that’s it.
It’s easy and safe without needles or thread, so even small children can join in and have fun making it.
Hanging vertical tissue case
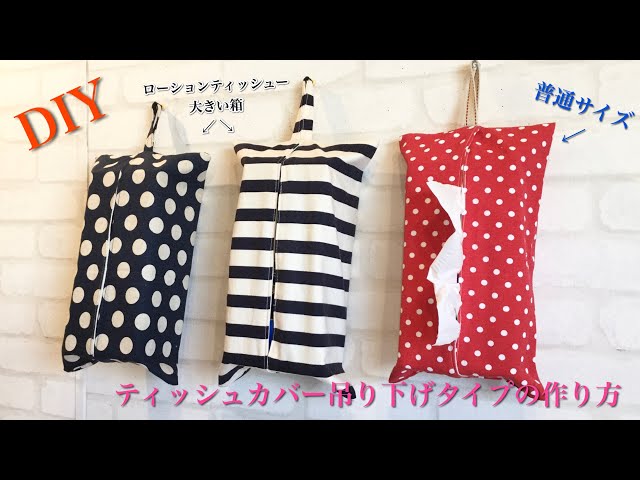
We’ll show you an easy way to hand-make a hanging-style tissue cover.
All you need is your favorite patterned fabric and a lining—just place the fabrics together and sew! With these simple steps, you can quickly make a tissue cover you’ll love.
Even if you’re not confident at sewing, just cut the fabric to the right size, prepare the pieces, and then fold and sew while watching the video—before you know it, you’ll be done.
There are two sizes: one for compact, everyday tissue boxes and one for larger, premium tissue boxes.
It might be great for the car, too.
Pocket tissue case with trash bin!

A tissue case with a built-in trash bin—and the tissue case is double-sided, so you can put wet wipes on one side as well.
All you need are your favorite fabric and some nylon fabric.
It’s designed to be water-resistant, so it’s fine to throw away used wet wipes.
It’s a good idea to repurpose nylon from an old eco bag.
Tissues and wet wipes go on the two sides, and the space in between serves as the trash bin.
The trash bin can also be securely closed at the opening, so you can use it with confidence.
Drawstring-type tissue case

A lot of households probably use boxless packs of tissues, right? But left as they are, they don’t look very nice.
How about making a drawstring-style tissue case that’s perfect for those boxless tissues? You can set it down and use it like normal, and since it’s a drawstring with a cord, you can also hang it on a wall, which is handy.
It’s very easy to make, so it might be fun to change things up and make a few using different fabrics.
Mobile pocket with tissue case

Why not try handmaking a portable pocket with a built-in tissue case—perfect for getting ready for preschool or elementary school? You can make it easily from a single piece of fabric! It’s compact, but the boxed bottom gives it depth, so it’s convenient for holding thicker items like terry handkerchiefs.
It also comes with clips to attach the pocket to clothing! Since it uses one piece of fabric, the key points are pressing the fold lines with an iron and creating the boxed corners.
Be careful not to mix up the folds.
If you’re thinking of making handmade accessories for school entrance season, be sure to check this out.
Just wrap it in a furoshiki! Tissue box cover

This is a no-sew tissue box cover that you can make simply by wrapping it with a furoshiki or similar cloth.
Place a box of tissues in the center of the cloth, fold in the shorter sides of the box first, then fold the longer sides toward the box, align the corners of the fabric, and tie them together.
Since all you do is fold and tie the corners, it’s perfect even for those who say, “I’m clumsy and can’t sew!”—you’ll have an easy, original tissue cover in no time.
If you don’t have a furoshiki at home, try using a bandana or a large handkerchief—about 50 cm works well!