[For 3-year-olds] Winter craft activities and bulletin board decoration ideas for use in childcare

In winter, there are many ways to have fun with children—big events like Christmas, New Year’s, and Setsubun, as well as chances to experience the changing climate and nature through snow and ice.
Many teachers may be thinking about incorporating that wintry feeling into their art and craft activities as well.
So this time, we’re introducing craft ideas to make in winter with three-year-olds.
We’ve gathered a wide range of ideas, from those related to winter events to themes unique to the season—like snowmen and mittens.
We’ve selected activities that will spark children’s interest and curiosity, so please try using them in your childcare setting.
Because the children’s creations are treated as works, we use the term “制作” (seisaku, ‘creation/work’) in the text.
- [Childcare] Recommended for 3-year-olds! Craft activity ideas
- [Childcare] Recommended for 3-year-olds! Origami ideas with a winter theme
- [For 3-year-olds] Perfect January Winter & New Year Crafts! A Collection of Fun, Hands-On Ideas
- December craft ideas! A collection of childcare activities to enjoy with Christmas and winter themes
- [For 3-year-olds] December Christmas Crafts! A Collection of Fun Handmade Ideas
- [Age 3] Let’s Make It at Nursery or Kindergarten! A Collection of Christmas Craft Ideas
- [For 4-year-olds] Enjoy February! A Collection of Craft Ideas
- [For Toddlers] A Big Collection of Craft Ideas to Enjoy at Christmas [Part 3]
- [Childcare] Perfect for December wall displays! A collection of Christmas tree ideas
- [For 1-year-olds] Fun to make! A collection of winter craft activity ideas for use in childcare
- [November] Enjoy with 3-year-olds! Craft activity ideas recommended for autumn
- Ideas for Easy Winter Origami Crafts That Even 2-Year-Olds Will Love
- Ideas for Winter-Themed Crafts and Bulletin Board Projects for 5-Year-Olds
[For 3-year-olds] Winter craft activities and wall display ideas you can use in childcare (111–120)
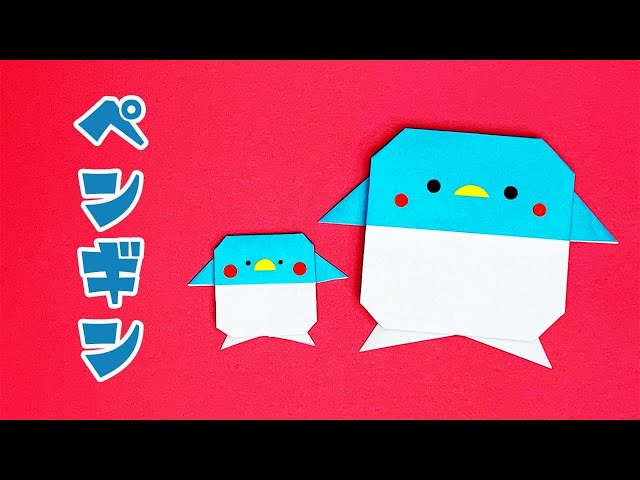
Peekaboo Penguin

Here’s a super cute way to fold a penguin that’s perfect to attach to letters or cards! First, place the origami paper with the back side facing up and fold it into a triangle twice to make crease lines.
Lift one corner up to just slightly before the center line, then fold both edges of the lifted section upward at a slight diagonal.
Fold both corners of that folded section inward.
Turn it over so the white side is facing you, and fold along the center line twice to shape the face.
Next, use a 2.5 cm piece of origami paper to make the hands.
Start with a basic “zabuton” fold, then fold both corners diagonally to shape the hands.
Make two of these.
Finally, glue the hands on, and add eyes and a mouth with round stickers or similar—done!
[For 3-year-olds] Ideas for winter crafts and wall decorations usable in childcare (121–130)
a round and laid-back penguin
This is an easy and cute origami penguin.
First, turn the paper over and make two creases by folding it in half both ways into a square.
Fold one edge down to align with the center crease.
Flip it over, then fold the left and right edges to the center line.
Open the colored corner and squash-fold it.
Fold the bottom edge up to the center to make a crease, open it once, then fold the bottom tip inward along that crease.
Fold the corners to form the feet.
Fold the protruding colored corner to suggest the hands.
Finally, round off the colored tip to finish! Decorate it cutely with round stickers or a pen.
penguin ornament
Let me introduce a cute penguin ornament that looks adorable wherever you place it.
Prepare one sheet of origami paper, a felt-tip pen, and glue, and let’s get started.
We’ll fold it using the basic crane method, but for the parts where you puff up the paper, it’s best to go slowly and provide support while folding.
Open up the origami, and while puffing it along the crease lines, tuck it in to form the penguin’s body.
Folding this section evenly will make the ornament stable when displayed.
Finish by making the wings, beak, and feet.
Even just lining them up and looking at them makes for charming penguin ornaments.
Cute and easy penguin
Let me introduce an origami penguin with an adorable round shape.
After making a triangular crease, fold so that both ends become parallel.
Turn the paper over, fold the corners halfway toward the center, then fold them in half once more.
Fold both ends diagonally to form the penguin’s wings and body.
Adjust the shape, draw the penguin’s facial expression, and it’s complete.
By drawing varied expressions, you can create many different penguins.
Give it a try and have fun making them!
Paper-tearing collage Shishimai (lion dance)
Let’s make a traditional New Year’s good-luck decoration, the shishimai (lion dance), out of origami.
Start by attaching the facial parts onto a piece of red paper, then use crumpled tissue paper to create a three-dimensional mane.
Use white construction paper to represent the body, and glue on small torn pieces of origami paper in a collage style.
Since a shishimai’s body features a green karakusa (arabesque) pattern, using green origami or patterned green origami will make it look more authentic.
Attach the black leg parts, and your shishimai is complete.
Fluffy Yarn Valentine
@soramame.sensei #CapCutThreading (a cord/strap through a hole)Valentine's Day# developmental support (ryōiku)Educational toy
♬ A cute pop song like Valentine Kiss(964024) – TEtoTE_Music
Threading fluffy yarn is so much fun! Here’s a heart-shaped gift craft that’s perfect for 3-year-olds.
First, cut construction paper or cardstock into a heart shape.
If you draw a large heart, it’s a great chance to practice using scissors.
Next, punch holes along the edge of the heart with a hole punch.
Once the holes are made, thread yarn through any hole you like.
It’s done when you randomly lace colorful, thicker yarn through the holes! A radiating pattern looks cute too.
Thicker yarn is easier to thread, so prepare something your child can handle easily.
Christmas tree made with natural materials
How about making a Christmas tree using pinecones, acorns, and twigs you’ve collected in the yard or at the park? It’s a Christmas craft idea that kids can make with excitement! The method is very simple: decorate a triangle-cut piece of cardboard with natural materials and beads using wood glue.
In addition to natural items, it would also turn out beautifully if you add various materials purchased from a 100-yen shop.
When handling glue, using disposable stirrers or ice cream sticks will make it safer.
It’s a wonderful idea that lets children enjoy their free and creative thinking!