Recommended for elementary school kids! A collection of fun craft ideas for 2nd graders

Second-grade elementary school students are full of imagination and start becoming interested in playing with friends and making things.
Their dexterity improves, and they begin to show interest in colors and shapes.
This stage in elementary school is an important time for learning the joy of turning their own ideas into tangible forms.
Through crafts, they develop creativity and concentration.
They also gain confidence by experiencing success.
Here, we introduce craft ideas that second graders can enjoy making.
Adults can have fun together too, so please give them a try!
- Recommended for elementary students! A collection of fun craft ideas for 3rd graders
- [Indoor Activities] A Collection of Craft Ideas Recommended for Elementary School Students
- Recommended for elementary school students! A fun collection of craft ideas for first graders
- Recommended for elementary students! A collection of fun craft ideas to make for 6th graders
- Recommended for elementary schoolers! A fun collection of craft ideas for 5th graders
- [For 2nd Graders] Make it with everyday materials! Irresistibly engaging ideas for independent research projects
- Recommended for Elementary Students! A Collection of Fun Craft Ideas for 4th Graders
- Recommended for lower elementary school students! A collection of plastic bottle craft ideas made with everyday materials.
- [For Elementary School Students] A Fun Collection of Paper Clay Craft Ideas
- Crafts you can make with 100-yen shop items! A collection of fun project ideas that elementary school kids will love
- Simple yet amazing crafts: craft ideas that elementary school students will want to make
- Crafts parents and kids can enjoy together. Recommended craft ideas to keep children entertained.
- [For Elementary School Kids] Handmade Toy Craft Ideas
Recommended for Elementary School Kids! Fun Craft Ideas for 2nd Graders (41–50)
Stone painting

During summer vacation, there are times when you go out with your family to rivers or mountains, right? When you do, why not try picking up stones and making art with them? Of course, stones you’ve collected from around your neighborhood are fine, too.
First, paint the stones you’ve prepared with white acrylic paint.
This small extra step will help your work turn out beautifully.
Then, use acrylic paints to create animals, plants, and more by adding color.
If you also use items like pipe cleaners or empty cans, you can make pieces that look very realistic.
Please use this as a reference and give it a try!
Let’s make a cardboard pochette
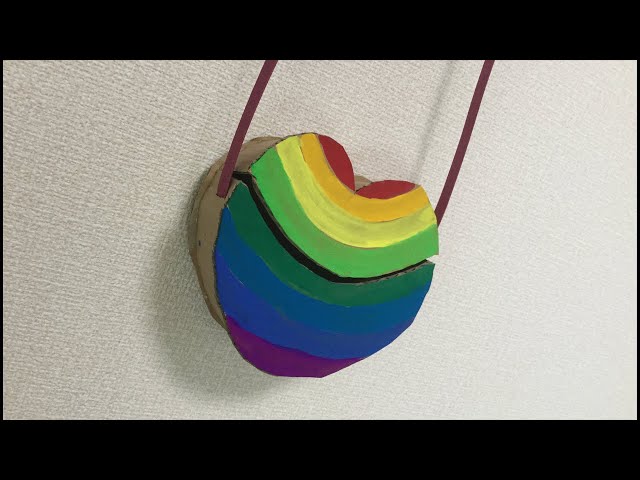
Here’s an introduction to making a pochette using cardboard.
Do you have cardboard boxes at home from parcel deliveries or from purchases at the supermarket? If you have some on hand, you can make a pochette simply by cutting it into shape, folding it, and assembling it.
Cardboard has lines where the inside is hollow.
The key is to keep those lines in mind when you cut.
If you want to create curves in your cardboard parts, cut across those lines.
Doing so will expand your creative possibilities.
Designing the pochette itself is sure to be an enjoyable time, too.
Bird call making

As a craft project perfect for children who love nature observation, I recommend making a bird call.
Prepare a hand-sized wooden branch and drill a small hole in the center.
Screw in a metal part called an eye nut, and when you twist it so the wood and metal rub against each other, it produces a sound like birdsong.
Real birds may sometimes respond to this sound, so trying it out in a park after making it is part of the fun.
The volume and pitch change depending on the type of wood and the depth of the hole, so by experimenting and recording the differences, you can enhance the quality of the project as an independent study.
It’s a hands-on idea that lets kids connect with nature while sparking curiosity about how sound works.
Let’s play with paper blocks!

Prepare some construction paper and try playing with paper blocks.
Using long, narrow strips of construction paper, make triangles, circles, and squares, then assemble them into artworks.
By folding or curling the narrow strips, you can express a variety of shapes.
Attaching the parts you’ve made with glue or clear tape and combining them will broaden the range of your creations even more.
As children think about shapes and combine them to make pieces, they can expand their imaginations.
You can also mount the combined works on construction paper for display.
For pieces with movement, hanging them with thread is also recommended.
A one-of-a-kind toy clock in the world

The idea is to make a clock using a clock movement and a board, then attach various toys to it.
You can get a clock movement at a 100-yen shop or a handmade goods store, and you can buy the board for the clock face at a home improvement store.
First, draw diagonal lines on the board to find the center point, and mark where to drill the hole for the movement.
Next, use a protractor to decide where to place the numbers on the clock.
After drilling the hole and painting if you like, it’s time to decorate the face.
Use a hot glue gun to attach the toys however you like.
Finally, secure the clock movement in the hole, and you’re done.
Arrange your favorite toys with style and create a wonderful clock!
Handmade shaker coaster

Introducing original handmade “shaker” coasters that capture the feel of the seasons.
Gather styrofoam board, background design paper, a clear file, plastic sheet, double-sided tape, beads or seashells, and sand, and let’s get started.
First, decide what kind of coaster you want to make.
Cut the styrofoam board to create the coaster base.
Attach the base pieces together for the bottom section.
Apply masking tape around the edges, add seashells and sand inside, then seal it with the lid using double-sided tape—and you’re done! Give it a try!
Insect interior

This is an idea for turning insect specimens into stylish interior decor.
When you think of specimens, you might picture them in a box, but what we’re introducing here uses a jar.
You’ll need a jar with a cork lid, an acrylic sheet, and an insect specimen.
The process is simple: first, cut the acrylic sheet to a size that fits inside the jar.
Next, make a slit in the cork lid, insert the cut acrylic sheet, and secure it with adhesive.
Finally, attach the insect specimen to the acrylic sheet and close the lid to finish.
Using a clear acrylic sheet makes it look as if the insect is floating inside the jar, creating a very chic look.