Fun for 3-year-olds! Easy and enjoyable flower origami ideas

Origami flowers that even 3-year-olds can easily enjoy.
Origami helps develop concentration and creativity by using the hands, so it’s recommended to incorporate simple flower origami into childcare activities.
As children fold, using different colored papers and varying shapes naturally nurtures their sense of color and expressive skills.
The flower folds are simple, and children can create pieces they feel proud of, giving them a sense of accomplishment.
Be sure to enjoy it together with the kids and make lots of lovely flowers.
- [Origami] Simple Origami Ideas to Feel the Spring with 3-Year-Olds
- Perfect for first-timers! A collection of origami that’s super popular with kids as young as three!
- Recommended for preschoolers! A collection of origami ideas perfect for April
- [Childcare] Simple origami ideas for kids, perfect for spring
- Origami Butterfly Ideas That Are Easy for 3-Year-Olds
- For Age 3: Have Fun Making with Your Child! A Collection of Easy Dinosaur Origami Ideas
- [Preschool] Recommended for 3-year-olds! Easy-to-make fall origami craft ideas
- [For 3-year-olds] Easy-to-make origami rabbit ideas collection
- [Age 3] Simple summer origami ideas. A roundup of classic summer motifs.
- [Origami] Easy spring-themed origami ideas to enjoy with 4-year-olds
- [Childcare] Recommended for 3-year-olds! Origami ideas with a winter theme
- Enjoy August with preschoolers using origami! A collection of summer-perfect ideas
- Easy for 3-year-olds! A collection of cute bear origami ideas
Fun for 3-year-olds! A collection of easy and enjoyable flower origami ideas (1–10)
[Origami] Tulip
![[Origami] Tulip](https://i.ytimg.com/vi/CKsHEe8P1aI/sddefault.jpg)
When you think of flowers you often see in spring, tulips come to mind.
There’s also a famous children’s song about them, so kids are probably familiar with tulips too.
This time, let’s make a tulip with origami.
We’ll use two sheets of origami paper: one for the flower and one for the leaf.
First, for the flower, fold the paper into a triangle, then fold it into a triangle once more to crease it.
Open it back to the first triangle.
Using the center line as a guide, fold both corners inward at a slight diagonal, then flip it over and fold the left, right, and bottom corners inward.
For the leaf, also fold the paper into a triangle, then fold the top corner down to align with the bottom edge.
Flip the paper top-to-bottom, fold it in half horizontally, then unfold.
Next, fold the lower left and right edges in to meet the center line.
Finally, attach the flower to the leaf, and you’re done.
Aligning corners and making diagonal folds can be a bit tricky, so take your time and work carefully.
Plum Blossom Ornament

Here’s an idea for making a “Plum Blossom Ornament” with origami.
There’s a cutting step, so please have scissors ready.
Fold the origami paper into a triangle and align the top corner with the center of the base.
At this point, press only the center to make a crease mark, then unfold without making a full fold.
Fold the top corner down to meet the crease mark, then fold the left and right corners up toward the corners of the folded-down triangle.
Flip the paper over, bring the left and right edges to the center, and fold neatly so that the left side is on the bottom.
Fold up the triangle on the back and return it to its original position, draw a cutting line, cut along it, and you’re done!
Perfect for decoration! Tulips

Here’s an idea for making a tulip using two sheets of origami paper.
You’ll make the flower and the stem/leaves separately, and each part takes only five folds.
For the flower: fold the paper into a triangle twice, then unfold one fold.
With the image of crossing the left and right corners along the center line, fold them up and overlap.
Tuck the bottom corner slightly to the back to finish the flower.
For the stem and leaves: take the other sheet, fold it into a triangle once and open it.
Fold the two left edges along the crease you just made.
Fold the paper in half along the first crease, turn the narrow pointed end upward, and fold up the bottom part to complete the stem and leaves.
Glue them together and use as wall decorations, etc.
Fun for 3-year-olds! A collection of easy and enjoyable flower origami ideas (11–20)
If you make it larger, it can go on the wall too! Dandelion origami
Make it larger and you’ll have a showy dandelion that works as a wall decoration.
Cut origami paper to create petals and glue them in place while shaping them.
Increasing the number of petals adds more volume.
Draw patterns on a rectangular piece of origami paper, cut it out, and use it to represent grass.
By layering and connecting additional petals, you’ll achieve a three-dimensional finish.
Varying the colors and sizes will instantly brighten up a space—an idea enjoyable for both kids and adults.
It can also be used as a seasonal display.
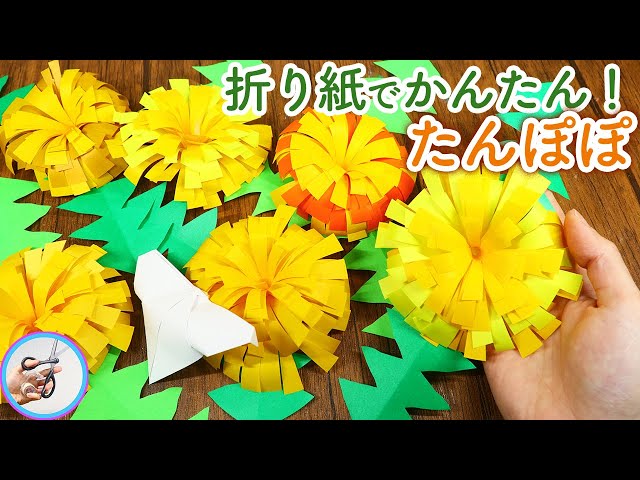
Fun to roll! Dandelion origami

This is a voluminous dandelion origami made by rolling strips.
The petals spread out radially, giving a glamorous look.
Fold the origami paper in half and cut it, then fold each piece in half again.
Apply glue to the edge, join to form a ring, and make fine 5 mm cuts to create the petals.
Roll another piece of paper to make the stem, and fold and snip it to finish the leaves.
Wrap the petals around the stem and fluff them out for added dimension—it also works well as interior decor.
Combining yellow and orange will make it even more vibrant.
Tulip Origami You Can Make with Two Sheets of Origami Paper!

Here’s an origami tulip idea where valley folds are the key.
First, make creases to divide the paper into a 4×4 grid.
Once the creases are set, place the paper color side up, fold the bottom edge up to meet the topmost crease, then fold it back down at the bottommost crease.
Do the same with the top edge.
Flip the paper over again, turn it vertically, then fold the bottom edge up along the lowest crease.
Pull the left and right corners downward to open the pockets and squash them flat.
Fold both corners into triangles, then fold the remaining center section forward.
Fold the two corners of that section into triangles as well to form three petals.
Make a wrap fold along the top edge to match the crease, then fold the corners to round them off, and you’re done.
Use another sheet of origami paper to make the stem and leaves.
Tulip

Let’s make tulips—children’s favorite spring flowers—easily with origami.
All you need is origami paper in your favorite color for the flower, green origami paper for the leaves, and some tape.
The folding method is simple enough for a three-year-old, so try making lots in different colors.
Despite being surprisingly simple, the result is a plump, adorable shape with a real, finished look.
Use them as wall decorations or stick them onto construction paper—kids are sure to love them.