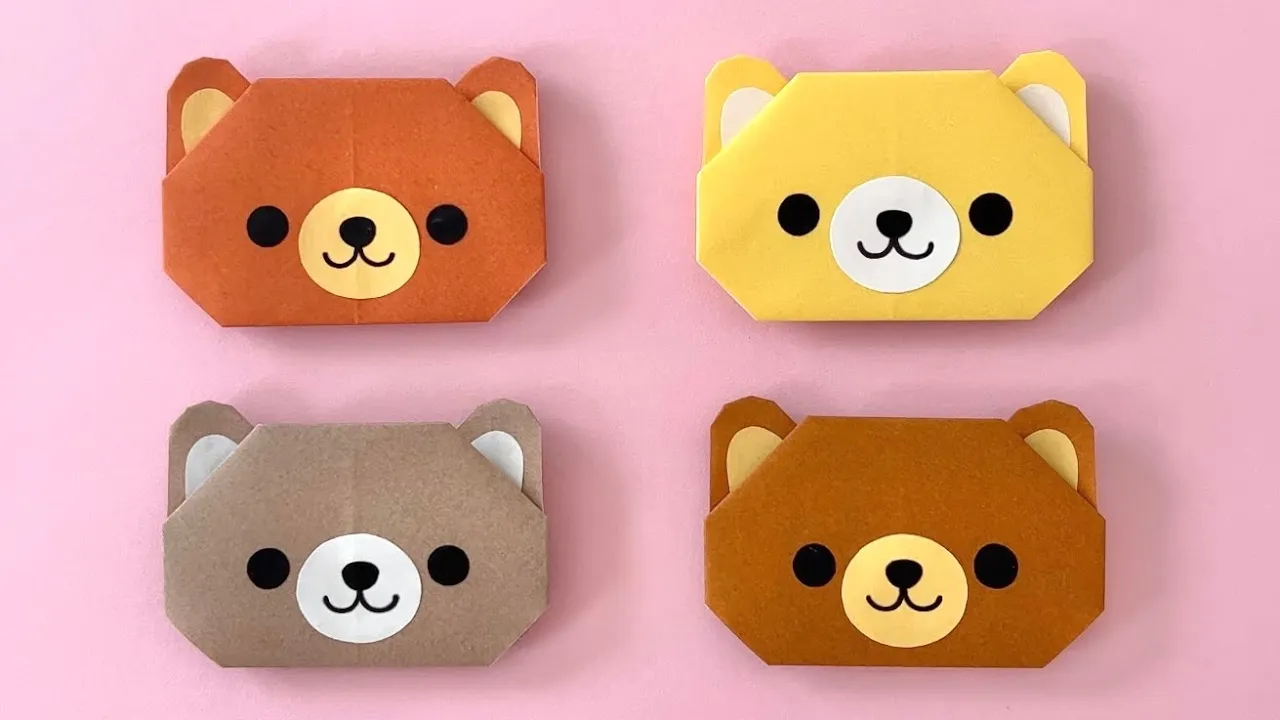
Easy for 3-year-olds! A collection of cute bear origami ideas

Three-year-olds are at an age where they start trying new things.
Origami for three-year-olds begins with getting used to the feel of the paper and the motions of folding.
Here, we’ll share some simple bear origami ideas that are perfect for three-year-olds.
By drawing faces or adding stickers, children can create their own unique bears.
Simply changing the color of the paper also brings out individuality, so it’s highly recommended.
Please use this as a reference and let children enjoy origami with touches that suit them!
Easy for 3-year-olds! A collection of cute bear origami ideas (1–10)
The easiest way to fold an origami bear

Let’s make a bear with a simple folding method.
First, fold the origami paper into a triangle.
Then fold the left and right corners up to meet the top corner.
Flip the paper top to bottom, and fold the left and right corners you just folded downward up diagonally toward the outside.
Fold them with bear ears in mind.
Fold the top, bottom, left, and right corners inward, and also fold the ear tips inward to round them off.
This part requires some fine work, so please give them a little help.
Turn the origami over to the front, and draw the face using stickers or a pen—done!
Cute polar bear

I’ll show you how to fold a cute polar bear using white origami paper.
Fold the paper in half into a square twice to make creases, then turn it over and fold corner to corner to make more creases.
Fold along the creases to make a triangle.
Fold the top corner down just a little.
Lift only the top layer of the right corner and fold its edge to line up with the top-left corner.
Do the same on the other side.
Fold the left and right corners in to meet at the center of the bottom edge.
Once the corners are folded, the face is done.
Next is the body.
Fold it using the “boat” method, turn it over, and fold one side to suggest an arm.
On the other side, open it up and squash-fold it to suggest a leg.
Finally, attach the head and body with clear tape and you’re done! Draw a cute face with a pen or add stickers if you like.
A bear that becomes a finger puppet

Here’s how to fold a cute bear that can also be used as a finger puppet! Fold the paper in half into a triangle, fold down both corners along the edge, then fold them up diagonally.
Fold so that the center tip becomes flat.
Next, fold the top layer inward.
Fold both ends diagonally.
Fold the ear sections diagonally.
Fold up the bottom tip, and once you draw the face, it’s complete! You can draw the face with a pen or use round stickers—both are super cute, so I recommend them.
Try different ideas! It becomes three-dimensional when you insert your finger inside, so you can also play with it as a finger puppet.
Bear message card

Perfect for a gift! Here’s how to fold a cute bear message card.
Fold the paper in half twice to make creases.
Fold the top edge down to the crease, then flip it over and fold the left and right edges to the creases.
Next, fold the center slit to align with the left and right edges.
Fold the top and bottom of both sides to the creases, then fold inward along the creases.
After folding the corners, flip it over and fold the bottom edge up so it slightly overlaps the color boundary.
Fold the corners back to suggest hands, tuck them under the chin area, and hook them in place.
Finally, draw the face and your message with a pen, and you’re done!
How to fold a bear using two sheets of origami paper

Let’s make a bear’s head and body with two sheets of origami paper.
After folding the paper into a triangle, fold the two bottom corners across so they align with the left and right edges.
As if you were making a paper cup, stack and fold neatly.
Take the front sheet of the top triangle and tuck it inward, leaving a little of the bottom part showing, then flip the origami top to bottom.
Fold up the corners you stacked earlier diagonally outward to make the ears.
Fold down the remaining top edge, then fold the ear sections inward to match the folded-down corners.
Tuck in the tips to round the ears.
Turn the paper over, then roll the remaining bottom triangle up twice to complete the bear’s face! For the body, fold the origami paper into a square twice, squash the pocket into a triangle, and then fold the left and right corners on both the front and back straight in to meet the center line.
Easy and cute bear origami method
https://www.instagram.com/reel/DB5r3RDSWzZ/Here’s an origami bear idea that’s finished in seven folds! First, fold down the top edge of the paper about 4 centimeters.
Then, fold the left and right corners of the folded section diagonally upward to the outside to make the ears.
Fold both sides of the ears slightly inward, then tuck the bottom left and right corners inward.
Flip the paper over, and the bear’s face will appear.
Add the finishing touches by drawing the face with stickers or a pen.
By changing the color of the paper and the facial expression, you can create lots of different bear variations.
A cute full-body bear

This is a cute origami bear for decoration.
Prepare two sheets of origami paper.
First, place the paper with the colored side facing up.
Fold it in half into a square twice to make creases, then turn it over and fold corner to corner to make creases.
Fold along the creases into a triangle.
Fold the top corner down just a little.
Take only the top layer of the right corner and fold the edge to align with the top left corner.
Fold the other side the same way.
Fold the left and right corners to meet at the center of the bottom edge.
Once the corners are folded, the face is complete.
Next, make the body.
Follow the same steps up to squashing into a triangle.
Fold the bottom edge up to meet the top corner, then open the corner downward and squash it.
Fold so that the corners meet.
Fold it in half, then tuck in the corners to form the legs.
Finally, glue the head and body together to finish.