Let’s make it with 3-year-olds! Fun handmade toy ideas


Let’s make and play with handmade toys together with your three-year-old!
Making your own toys lets children experience the joy of creating original pieces and gives them a sense of satisfaction and accomplishment—there are so many benefits.
So this time, we’ve gathered ideas for DIY toys recommended for three-year-olds.
Everything uses familiar materials and involves simple tasks with few steps, making them easy for three-year-olds to try.
Have fun drawing freely, adding decorations, and creating a one-of-a-kind special toy together.
- [Childcare] Recommended for 3-year-olds! Craft activity ideas
- Toddler-approved fun! DIY toy ideas for 2-year-olds
- Let's play with paper cups! Crafts and indoor play
- Let's make toys with straws! Easy and fun DIY toys
- [For 3-year-olds] A roundup of craft ideas to enjoy in summer! Introducing various motifs and techniques
- [Childcare] Recommended for 3-year-olds! Play ideas everyone can enjoy
- Irresistible for 3-year-olds! A collection of fun Halloween craft ideas to make
- Let's make toys with milk cartons! Easy and fun DIY crafts!
- Age 4: Simple and Fun! Handmade Toy Ideas
- Craft activity ideas that parents and children can enjoy together during a preschool observation day
- [Nursery/Kindergarten] Crafts you can play with after making them
- [Childcare] Easy! Make a DIY target game. Playful craft and fun game
- [November] Enjoy with 3-year-olds! Craft activity ideas recommended for autumn
Let’s Make It with 3-Year-Olds! Fun DIY Toy Ideas (1–10)
fluffy ghost

Let’s make a fluffy 3D ghost with a pop-out face! First, decorate a paper cup with stickers and markers.
Next, draw the ghost’s facial expression on a clear plastic bag, poke a hole in the cup, and insert a straw through it.
Pull the bag over the straw, blow air into it to inflate, and you’re done.
The fun part is watching the ghost’s face gradually puff up.
You can prepare lots of sticker varieties or adjust the size of the bag for different effects.
It’s a hands-on craft idea that lets kids learn through play while using their fine motor skills.
paper plate Frisbee

Let’s make an original frisbee by arranging paper plates! Since you can use free ideas like illustrations and decorations, it’s also great for training children’s imaginations.
First, draw lines to divide the paper plate into eight sections and mark points at the top, bottom, left, and right.
Next, draw any illustration you like in the center of the plate.
Finally, cut along the lines with scissors, then fold the sections with points upward and the others downward to finish.
Try making this item that you can play with both indoors and outdoors!
Bowling

Introducing a DIY toy you can make with everyday materials.
It’s a simple bowling game that even small children can enjoy—perfect for getting everyone excited together.
No special supplies are required.
Just gather common items you already have at home or can find at a dollar store, like paper cups, colored paper, newspapers, and tape, and you can make it and start playing right away.
There’s no complicated tool-making or difficult crafting steps, so adults and kids can have fun creating together and sharing ideas as they play.
Another great point is that you can play anytime, anywhere with the toys you’ve made.
Let's Make It with 3-Year-Olds! Fun DIY Toy Ideas (11–20)
Spinning octopus

How about making a “Whirly Kite” that’s easy to put together and spins in a curious way? You’ll need colored pens and kite string, colored construction paper, scissors, a hole punch, and so on.
First, draw lines to divide the paper into three equal horizontal strips and cut along the lines.
Don’t cut off the ends—leave them connected to make one long, narrow strip.
Punch holes at both ends and thread the string through.
Then draw whatever pictures you like and create your own cute, original kite.
When it catches the wind and lifts, the kite spins around in a fun way that will keep kids entertained without getting bored.
Bunbun top (whirligig)

How about making a bunbun-goma—a classic whirling toy that spins with a satisfying buzz—using a milk carton? First, open the milk carton and cut off the bottom.
Cut out another piece from a milk carton in the same size.
Draw lines to mark the center, then draw any design you like on the white side.
Glue the two pieces together, and use an awl to make two holes in the center to thread a piece of twine through.
It helps to tape the end of the twine with cellophane tape to make threading easier.
It’s an old-fashioned toy that lets you enjoy not only the sound but also the changing patterns as it spins.
binoculars
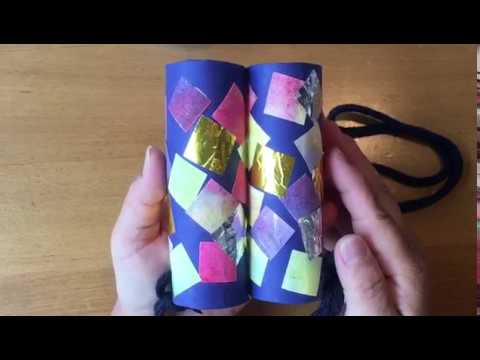
Why not try making binoculars out of toilet paper tubes? Since the process uses scissors and glue, it’s perfect for helping three-year-olds practice their crafting skills.
First, cut a rectangular piece of paper to fit around the toilet paper tube.
Next, put some glue on your hands and stick the paper on in order.
Once you’ve wrapped the paper around both tubes, attach them together and add a string—that’s it! Kids can use them while strolling around the kindergarten or nursery yard, or take them along to the park or on a walk.
It’s a great craft idea to get little hands moving.
yo-yo

Yo-yos are great for kids who want to play with sounds! They’re easy to make: put acorns or other small items into two bowl-shaped cups, stick them together, and secure them with tape.
You can use nuts you picked up outside or things you have at home like plastic beads.
Try putting different items inside and enjoy how the sounds change.