Let’s make it with 3-year-olds! Fun handmade toy ideas


Let’s make and play with handmade toys together with your three-year-old!
Making your own toys lets children experience the joy of creating original pieces and gives them a sense of satisfaction and accomplishment—there are so many benefits.
So this time, we’ve gathered ideas for DIY toys recommended for three-year-olds.
Everything uses familiar materials and involves simple tasks with few steps, making them easy for three-year-olds to try.
Have fun drawing freely, adding decorations, and creating a one-of-a-kind special toy together.
- [Childcare] Recommended for 3-year-olds! Craft activity ideas
- Toddler-approved fun! DIY toy ideas for 2-year-olds
- Let's play with paper cups! Crafts and indoor play
- Let's make toys with straws! Easy and fun DIY toys
- [For 3-year-olds] A roundup of craft ideas to enjoy in summer! Introducing various motifs and techniques
- [Childcare] Recommended for 3-year-olds! Play ideas everyone can enjoy
- Irresistible for 3-year-olds! A collection of fun Halloween craft ideas to make
- Let's make toys with milk cartons! Easy and fun DIY crafts!
- Age 4: Simple and Fun! Handmade Toy Ideas
- Craft activity ideas that parents and children can enjoy together during a preschool observation day
- [Nursery/Kindergarten] Crafts you can play with after making them
- [Childcare] Easy! Make a DIY target game. Playful craft and fun game
- [November] Enjoy with 3-year-olds! Craft activity ideas recommended for autumn
Let’s Make It with 3-Year-Olds! Fun Handmade Toy Ideas (41–50)
basket

Why not try making a basket out of construction paper? First, make a loop from a strip of construction paper.
Then prepare eight strips that are half the length of the paper used for the loop.
Cross two strips to form a plus sign and attach their ends to the outside of the loop.
Cross another two strips and attach them to fill the gaps.
Attach the remaining four strips in the same way, but this time, attach them to the inside of the loop.
Prepare two long strips and weave them through the gaps between the papers attached to the loop, alternating over, under, over.
Finally, add a handle and you’re done!
vinyl tape ball
@chii_1514m Bouncy pom-pom yo-yo made from a plastic bag ✩.*˚#Kindergarten#Nursery school#Production videoHow-to video#Production Video
♪ Original song – Chi☺︎ – Chi☺︎
Bouncy and fun! Introducing the Vinyl Tape Ball.
Here’s what you’ll need: ribbon or sequins, a plastic bag, vinyl tape, and a rubber band.
To make it, put sequins or other decorations into the plastic bag, inflate it with air, tie the bag’s opening, and secure it with tape.
Tie the rubber band into a loop big enough for your finger, then attach it to the bag—and you’re done! Try bouncing it in your palm like a yo-yo.
It’s also fun to customize what you put inside the bag!
playmat
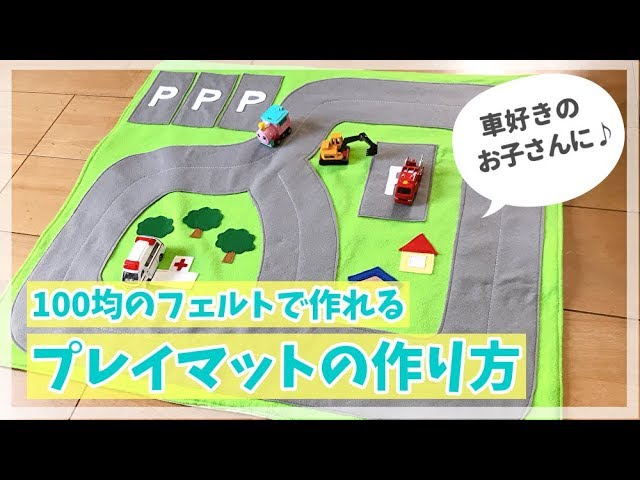
Here’s an idea for a road play mat that you’ll want to make for a child who loves toy cars.
Sew roads made from gray felt onto a base of felt in your favorite color.
Then, add and sew on whatever you like—houses, trees, a police box, a hospital, bus stops, and more.
If you don’t have a sewing machine, you can skip the stitching and use glue to attach everything instead.
With a little creativity, you can make all kinds of play mats, so let your imagination run wild as you create.
Making a construction site where kids can play with work vehicles sounds fun, too!
Perfect for button practice! Onigiri

Here’s an idea for felt rice balls that help kids practice buttoning! First, cut a rectangle from white felt and fold it.
Keeping the middle of the folded edge intact, cut it into a rice ball shape.
Make fillings like pickled plum or salmon and sew on snap buttons.
Sew matching snap buttons to the center of the rice ball’s inside as well.
Sew a two-hole button to the upper inside part of the rice ball, and make a slit on the opposite side.
Finally, glue a strip of seaweed cut from black felt to the outside, and you’re done! Attach your favorite filling and close the rice ball with the buttons to enjoy making onigiri.
mini drum
@hitomi_ins_ A taiko drum you can make in 1 minute (lol)Wadaiko (Japanese drums)#drumwork
♬ original sound – yaglupaya
Make it in no time! Here’s how to create a mini drum.
You’ll need a cup, plastic wrap, and masking tape.
To make it, stretch three layers of plastic wrap over the top of the cup and secure it with masking tape.
Fix the cup to the desk with masking tape, and you’re done! Try playing it with a pen or a straw.
It’s fun to discover how the sound changes depending on the cup size! You might also hear different sounds if you change the number of plastic wrap layers.
Create your own original mini drum and enjoy playing it!
Handmade microphone

Let me introduce a cute original microphone craft.
Prepare a plastic wrap tube, a capsule toy container, origami paper, and yarn, and let’s make it.
Wrap the origami paper around the plastic wrap tube so that a bit of the paper sticks out on either the left or right side.
On the side where the paper sticks out, tape on the yarn, crumple the extra paper to make it small, and tuck it into the center of the wrap tube—this completes the microphone handle.
Next, place the capsule toy container on top of the wrap tube and tape it so it won’t fall off, and your microphone is complete! Draw a switch on the handle, and add illustrations or stickers as you like to create your very own original microphone.
origami

We’re introducing how to fold a stylish spinning top that you can make with just three sheets of origami paper! It’s perfect for making and playing together with your child or friends.
You’ll create each part with the three sheets of paper and assemble them at the end.
There aren’t many difficult steps, and you won’t need glue or scissors, so kids can easily give it a try.
You can also freely customize it by changing the colors or adding patterned paper, letting you express your originality! It would make a delightful handmade gift from a child, too!