Perfect for first-timers! A collection of origami that’s super popular with kids as young as three!

This time, we’re introducing cute origami activities for three-year-olds.
At age three, children’s vocabulary grows, and they start to manage simple back-and-forth exchanges.
In terms of development, their fine motor skills improve, and they begin to do simple self-care tasks on their own, like fastening buttons and putting on socks.
They also start to enjoy using their hands more, and you’ll often see them actively engaging in hands-on play like origami, pretend play, or connecting Plarail train sets.
We’ll be showcasing some very popular origami for children like these, so please have fun trying them out with your own creative twists!
- For Age 3: Have Fun Making with Your Child! A Collection of Easy Dinosaur Origami Ideas
- Origami Butterfly Ideas That Are Easy for 3-Year-Olds
- [For 3-year-olds] Let’s make strawberries with origami! A collection of easy strawberry folding ideas
- [For 3-year-olds] Easy-to-make origami rabbit ideas collection
- [Origami] Simple Origami Ideas to Feel the Spring with 3-Year-Olds
- [For Preschoolers] Fold with Fun! January Origami Ideas for Little Ones
- [For Preschoolers] Let’s Make It Together with the Kids! Origami Ideas for February
- Simple origami for kids: cute, playable origami ideas
- [Preschool] Recommended for 3-year-olds! Easy-to-make fall origami craft ideas
- Origami for 2-Year-Olds: Fun and Educational! Origami Ideas for Toddlers
- [For 3-year-olds] A fun collection of easy origami fish to make!
- [For 3-year-olds] Let's make it with origami! A collection of easy mushroom folds
- Fun Halloween Origami for 3-Year-Olds
It's okay even for first-timers! We've collected origami that's hugely popular with children from age 3! (41–50)
A fox that can be folded into a whole body with a single sheet

I’m going to show you how to make a cute fox out of a single sheet of origami paper, with the whole body folded from just one piece! First, turn the paper over and fold it into a triangle twice, then open it once.
Fold both corners up toward the center.
Fold the model in half so that the parts you just folded end up on the outside.
Next, make a slight diagonal fold starting from the corner, and open the middle.
This part involves some fine work, so an adult should help.
Finally, tuck the tip inward and you’re done.
Use a pen or round stickers to draw the face!
An easy fox you can fold with just two sheets
Here’s how to make a fox with two sheets of origami paper that even a 3-year-old can fold.
First, fold one sheet into a triangle.
Next, fold the top part up just a little, then flip it over.
Fold the left and right corners up toward the center—this completes the face.
Now take the second sheet and fold it into a triangle the same way, then fold the triangle’s tip diagonally.
This makes the body.
Finally, glue the face and body together, and your fox is done! Drawing the face with a pen or using round stickers is also cute, so I recommend it.
Have fun making it!
Easy fox face

Perfect for kids who are just starting origami! Here’s a super easy way to fold a fox face.
Foxes often appear in picture books, so they’re familiar to children and highly recommended.
First, fold the paper into a triangle twice.
Next, fold the corners toward the center.
Using the folded corner as a pivot, fold both corners diagonally to form the ears.
Finally, draw the face with a pen, and you’re done! You can make it even easier by using round stickers for the eyes.
Feel free to get creative to suit your child!
A fox that also serves as practice for riding the rhythm.

Here’s how to fold an origami fox, which is also good practice for using glue.
First, take one sheet of origami paper, turn it over, and fold it into a triangle.
Fold the top edge back slightly, then flip it over.
Next, fold the left and right sides upward toward the center to form the face.
Then, take another sheet of origami paper and fold it into a triangle in the same way, and fold the triangle’s tip diagonally to make the body.
Now the body is done.
Finally, attach the face and body together with glue to complete the fox! When using glue, please have an adult assist.
It’s also recommended to draw the face with a pen or add stickers and use it for autumn wall decorations.
Bear’s Letter
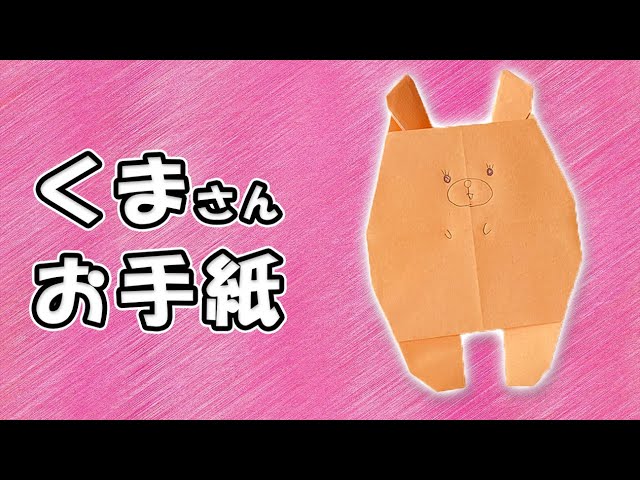
Using just one sheet of origami paper, you can easily fold a super-cute bear letter.
First, start with the boat fold.
On one side, leave about 1.5 cm from both corners and fold them up at a slight angle.
Then, leaving about 1 cm, fold both corners in just a little.
On the other side, slightly fold up both ends at a slant as well.
Tuck in the outer corners so they become rounded, imagining the shape of the body.
Round off the corners that will become the ears and feet, too.
Adjust the shape of the ears, and finish by drawing the face with a pen! Using round stickers and such is also recommended.
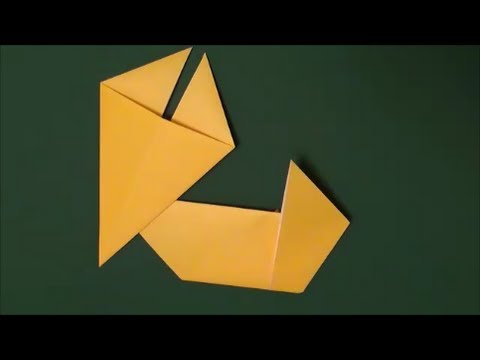
A fox origami method that also helps kids practice using scissors

You’ll want to display it! Here’s an adorable fox origami that looks ready to dash, made with just a single sheet of paper.
First, fold it using the zabuton (cushion) base.
Fold in half so the folded side will be the front, then open and squash-fold it into a square.
Next, fold the top layer down, unfold it, and open both sides.
Flip it over and repeat the same steps.
Turn one layer and fold all edges on both sides toward the center.
Turn one more layer.
On the open side, fold one corner diagonally outward.
On the closed side, use scissors to cut and form the legs.
For the last corner, cut it into the shape of a tail.
Draw the face, and you’re done! When using scissors, please have an adult assist.
A fox made with two pieces that can also be used on walls

This is an origami fox that can also be used as a finger puppet.
First, fold the paper into a triangle and fold both corners up to meet the top corner.
Then fold those flaps down outward to form the fox’s ears.
Fold up the bottom corner and flip the paper upside down.
Tuck the top layer of the lower triangular section inward, then turn the paper over.
Fold up the bottom corner of the remaining layer, fold its tip down slightly, and tuck both side corners to the back to finish.
Draw a cute fox face to complete it.