[Origami] Simple Origami Ideas to Feel the Spring with 3-Year-Olds

How about incorporating origami into a spring craft project for three-year-olds?
Around age three, children’s vocabulary grows, and more of them start showing interest in colors and shapes.
We’ve gathered plenty of spring-themed origami ideas that are perfect for three-year-olds.
There aren’t many folding steps, and the instructions are simple, so even children who aren’t used to origami can enjoy folding!
In addition to folding, there are also ideas that involve cutting with scissors.
We’re introducing lots of spring motifs that kids will be eager to make, so please use them for inspiration.
Because we regard what the children create as “artworks,” we use the term “seisaku (制作)” in the main text.
- [For 3-year-olds] Let’s make strawberries with origami! A collection of easy strawberry folding ideas
- [For Age 3] Let’s make it in April! A collection of craft ideas to feel spring events and nature
- Origami Butterfly Ideas That Are Easy for 3-Year-Olds
- [Origami] Easy spring-themed origami ideas to enjoy with 4-year-olds
- [For 3-year-olds] Easy-to-make origami rabbit ideas collection
- For three-year-olds: A collection of craft ideas featuring spring events and creatures that you’ll want to make with your three-year-old
- Perfect for first-timers! A collection of origami that’s super popular with kids as young as three!
- [For 4–5 year olds] A collection of recommended origami ideas for March—featuring seasonal events and natural motifs
- [Origami] Simple Origami Folding Ideas to Savor Spring with 5-Year-Olds
- [For 3-year-olds] A fun collection of easy origami fish to make!
- [For 4-year-olds] Let's fold! A collection of simple rabbit origami ideas
- [April] Spring Origami for Kids: A Collection of Simple and Cute Ideas
- [For Preschoolers] Fold with Fun! January Origami Ideas for Little Ones
[Origami] Simple spring-themed origami ideas to enjoy with 3-year-olds (31–40)
bamboo shoot

How about making bamboo shoots—a vegetable with delightful aroma and texture—out of origami? All you need are light brown origami paper, a pen, and round stickers.
First, with the colored side facing inward, fold the paper into a square twice and unfold.
Fold the bottom quarter up along the center crease.
Next, flip it over and open the paper by inserting your fingers.
Finally, fold both sides toward the center, and you’re done! Add a cute face to your bamboo shoot with stickers or a pen to make it even more charming!
If you make it larger, it can go on the wall too! Dandelion origami
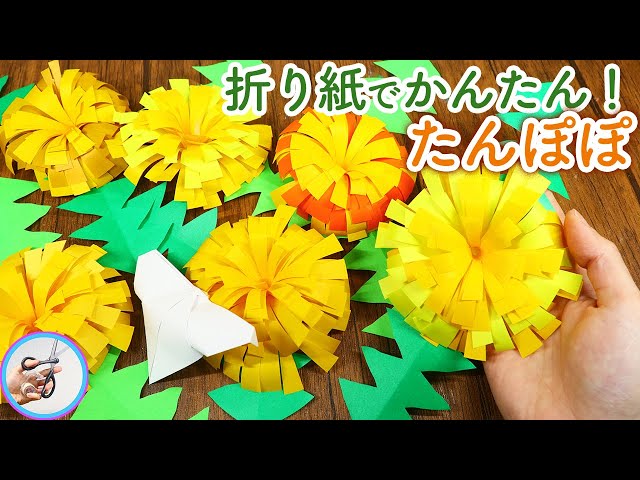
Make it larger and you’ll have a showy dandelion that works as a wall decoration.
Cut origami paper to create petals and glue them in place while shaping them.
Increasing the number of petals adds more volume.
Draw patterns on a rectangular piece of origami paper, cut it out, and use it to represent grass.
By layering and connecting additional petals, you’ll achieve a three-dimensional finish.
Varying the colors and sizes will instantly brighten up a space—an idea enjoyable for both kids and adults.
It can also be used as a seasonal display.
Make it with paper cutting! Dandelion fluff

Here’s a gentle, paper-cutting idea that captures the soft, airy spread of dandelion fluff.
Prepare origami paper, scissors, and a pencil.
Fold the origami paper in half twice, then fold it again into a triangle.
Open and align the layers so they fan outward, sketch the dandelion seed design, and cut carefully.
The key to a neat finish is to take your time with the fine details.
When you gently unfold it, a radiating pattern appears, revealing delicate fluff.
It’s a project that’s fun to open and see, recommended for both kids and adults.
Display it by a window to let the light shine through and make it even more beautiful.
[Origami] Ladybug
![[Origami] Ladybug](https://i.ytimg.com/vi/EQkb5LIEl2A/sddefault.jpg)
Let’s make a ladybug out of origami that kids will love! First, prepare one sheet of origami paper and fold it into a triangle.
Fold the left and right corners up to meet the top corner.
Then, take the top corner where the layers overlap and fold it down toward you by about 1 cm, leaving the very bottom part as is.
Next, tuck the corner you just folded down slightly inward.
Fold the remaining top corner to the back so it isn’t visible from the front.
Finally, fold the left, right, and bottom corners slightly to the back—and you’re done! Use a pen and round stickers to draw the wing patterns and the ladybug’s face to make it extra cute.
How to fold a tulip: suitable from age 3!

An easy tulip origami perfect for a first crafting experience, suitable from age three.
Since it’s completed in just a few steps, even small children can feel a sense of achievement, and simply changing the colors lets you create a delightful field of flowers.
You’ll use two sheets of origami paper: one for the flower and one for the stem and leaves.
For the flower, fold the paper into a triangle, then fold both corners up diagonally.
Next, fold the two upper corners and the bottom corner into small triangles to round the shape, and the flower is done.
For the stem and leaves, fold the paper into a triangle to make a crease, then fold the left edge to align with the crease.
Fold it in half along the crease, and finally fold the right side inward to separate the stem and leaves.
Combine it with the flower, and it’s complete!
[Origami] Easy origami ideas to feel the spring with 3-year-olds (41–50)
An easy way to fold a tulip

It’s a clever idea that recreates one of the tulip’s features: leaves shaped to hide the stem.
For the flower, you basically fold the origami into a triangle, then fold up both corners.
Tuck the tips to the back to round them off for a nice finish.
For the leaves, fold the origami into a triangle to make a crease, open it, then fold the top and bottom corners to the center.
Next, fold all four edges slightly away from the initial crease.
At this point, make sure the top, bottom, left, and right corners come to sharp points.
Once all edges are folded, fold the paper in half along the crease, then overlap the left and right corners to halve it again.
Finally, fold one of the overlapped corners back diagonally, and you’re done.
How to fold a tulip bouquet

A bouquet of tulips that’s perfect as a handmade gift for someone who’s helped you.
For the flowers, fold the origami into a triangle and make a crease down the center.
Fold the left and right corners diagonally toward the center line to form the petals.
Round off the left and right corners and the flower part is complete.
Using the same folding method, make five flowers, changing the origami colors as you like.
For the leaves, make a center crease and fold the left and right corners toward the center.
The key is to leave a gap at the center and fold into a triangle.
Using the same method, fold eight leaf-and-stem pieces.
Attach the flowers, stems, and leaves together, then wrap them with gift wrapping paper to finish.
It may be appreciated as a heartfelt present.