![[Origami] Simple Origami Ideas to Feel the Spring with 3-Year-Olds](https://i.ytimg.com/vi_webp/nC-Jg_6-xdo/maxresdefault.webp)

How about incorporating origami into a spring craft project for three-year-olds?
Around age three, children’s vocabulary grows, and more of them start showing interest in colors and shapes.
We’ve gathered plenty of spring-themed origami ideas that are perfect for three-year-olds.
There aren’t many folding steps, and the instructions are simple, so even children who aren’t used to origami can enjoy folding!
In addition to folding, there are also ideas that involve cutting with scissors.
We’re introducing lots of spring motifs that kids will be eager to make, so please use them for inspiration.
Because we regard what the children create as “artworks,” we use the term “seisaku (制作)” in the main text.
- [For 3-year-olds] Let’s make strawberries with origami! A collection of easy strawberry folding ideas
- [For Age 3] Let’s make it in April! A collection of craft ideas to feel spring events and nature
- Origami Butterfly Ideas That Are Easy for 3-Year-Olds
- [Origami] Easy spring-themed origami ideas to enjoy with 4-year-olds
- [For 3-year-olds] Easy-to-make origami rabbit ideas collection
- For three-year-olds: A collection of craft ideas featuring spring events and creatures that you’ll want to make with your three-year-old
- Perfect for first-timers! A collection of origami that’s super popular with kids as young as three!
- [For 4–5 year olds] A collection of recommended origami ideas for March—featuring seasonal events and natural motifs
- [Origami] Simple Origami Folding Ideas to Savor Spring with 5-Year-Olds
- [For 3-year-olds] A fun collection of easy origami fish to make!
- [For 4-year-olds] Let's fold! A collection of simple rabbit origami ideas
- [April] Spring Origami for Kids: A Collection of Simple and Cute Ideas
- [For Preschoolers] Fold with Fun! January Origami Ideas for Little Ones
[Origami] Easy spring-themed origami ideas to enjoy with 3-year-olds (1–10)
How to fold a cute ladybugNEW!

Ladybugs are a favorite with children, and you can actually make them easily with origami.
How about decorating your room with colorful ladybugs using red, yellow, and black origami paper? First, fold twice to make crease lines forming a triangle, then fold both slanted sides along the center line.
Fold only one layer downward, and continue folding along the creases.
Once the ladybug shape is formed, color the head with a black marker and draw round spots.
Attach round stickers for the eyes, and you’re done.
If you open the wing section, there’s space to write a message, making it perfect as a gift for friends!
3D Easy Origami ButterflyNEW!

Let’s try making an origami butterfly that signals the arrival of spring.
There’s a squash fold step, but basically you just fold along the creases and edges and you’ll be done! First, crease the paper so that triangles form on both sides by folding it diagonally.
Then fold both corners on one side up to meet the top corner.
Once folded, fold back along the creases you just made.
Flip the paper over, fold the top corner down to meet the bottom edge, and then fold it in half left to right.
Next, fold so that the crease from the earlier fold-back step lines up with the crease from the halving step.
You should now have a butterfly shape, so squash-fold the tips of the wings to round them, and you’re done.
Add antennae to finish it off.
Easy! How to fold cherry blossom petalsNEW!

When you see cherry blossoms in the yards of day care centers and kindergartens, in parks near your home, or along the river, it really feels like spring has arrived, doesn’t it? Many families go flower viewing or eat packed lunches under the cherry trees.
Cherry blossom origami that lets you enjoy spring is perfect for April crafts.
Take a sheet of origami paper cut to one-quarter size and fold it into a triangle with a slight offset.
To bring out the jagged look characteristic of cherry blossom petals, fold the left and right corners slightly out of alignment.
Flip it over, fold the two end corners, and one petal is complete.
Make five of these and glue them together to form a cherry blossom.
Why not make lots and enjoy cherry blossoms indoors as well?
Four-leaf clover you can make with a single sheet!NEW!

There’s a saying that four-leaf clovers bring good luck, and they’re a popular springtime plant.
On warm days, you might see children in the fields enjoying a hunt for four-leaf clovers.
How about making a four-leaf clover out of origami? First, make diagonal creases, then insert your finger into the pocketed sections and open them up.
Fold it into a triangle and trim the edges into curves.
Next, fold the center into a triangle, open it up, and adjust the shape.
It’s very easy to make, so even children who aren’t confident with origami can give it a try.
It’s great as a lucky charm or as a decoration for your room.
How to fold a cute strawberryNEW!

Here’s a cute way to fold a strawberry that even small children can make.
First, the strawberry: Place the origami paper color-side up and fold it in half into a triangle twice.
Make a crease down the center, then fold the corners in to meet that crease.
Slightly fold down the tips you just folded.
Next, make the calyx (leafy top).
Make a crease at the bottom, then fold diagonally so that three little peaks (mountains) appear.
Fold the parts you just made back, attach them to the strawberry with glue, and you’re done! Finally, we recommend decorating it cutely with round stickers or pens as you like.
Easy and cute origami honeybeeNEW!

Here’s an easy and cute way to fold a bee.
First, let’s make the face.
Fold the face piece using the “zabuton” (cushion) fold, then fold each of the four corners in just a little.
Next is the body.
Fold it the same way with a zabuton fold, then fold two places toward the center.
Fold the corners to line up with the center crease, then fold the tip down so it sticks out slightly.
For the wings: fold the paper in half into a triangle, then insert your fingers and open it up.
Flip it over and fold each of the four corners in just a little.
Finally, make the antennae and attach them with glue or similar.
Finish by decorating the face cutely, and you’re done!
Origami Poppy You Can Make from a Single Sheet!NEW!
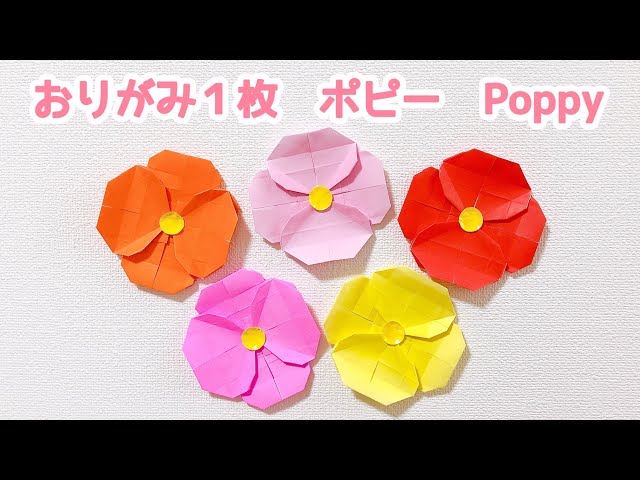
Poppies, which bloom in vivid shades of orange, yellow, and pink, are flowers you often see in parks in spring.
Their delicate, windswept beauty makes them popular with children, and they’re a perfect motif for an April origami craft.
Take origami paper in your favorite color, fold it in half horizontally, then fold both ends to the center.
Rotate it, fold it in half again, and fold both ends to the center.
Make diagonal creases in the middle square to form triangles, open it up, and flatten along the creases.
Continue shaping the flower by folding along the crease lines.
For the yellow center, stick on a round sticker.
Since there are many detailed steps, this craft is recommended for older kindergarteners who enjoy origami.