[Childcare] Playful craft ideas to enjoy with 5-year-olds


I want to enjoy crafts with a five-year-old, but they get bored with flat, two-dimensional projects…
Does that sound familiar?
Here are some craft ideas perfect for five-year-olds, whose thinking skills and ability to work on tasks are really blossoming—plus, they double as toys you can play with.
Enjoy the crafting process, and then try playing with the toys you made, both indoors and outdoors.
It’s also fine to lend and borrow toys with friends.
Kids tend to cherish toys they made themselves, so they’ll likely play with them carefully.
Teachers, why not make and play together too?
- Recommended for 5-year-olds! Simple DIY toy ideas
- [Nursery/Kindergarten] Crafts you can play with after making them
- [May] A collection of craft ideas to try with 5-year-olds
- [For toddlers] Simple but amazing craft ideas — including toys they can play with
- [Age 5] Exciting and fun! A special feature on ideas for at-home play
- [For 5-Year-Olds] Recommended Indoor Play! A Collection of Exciting Games
- [Childcare] Recommended for toddlers! Toy ideas you can make and play with
- [5-Year-Olds] Creative Project Ideas to Try in June! Let's Broaden Their Range of Expression
- Age 4: Simple and Fun! Handmade Toy Ideas
- Recommended for 5-year-olds’ September crafts! A collection of ideas to enjoy autumn
- For 5-Year-Olds: Let’s Make It! A Collection of Craft Ideas to Feel the Spring
- Turn a cardboard tube into an educational toy! A handmade toy your kids will love
- [For 5-year-olds] Crafts to try in July! Ideas that capture the season
[Childcare] Playful Craft Ideas to Enjoy with 5-Year-Olds (31–40)
Let’s make it together as a parent and child! A rocking horse craft

Let’s make a wooden hobbyhorse that toddlers can play with.
You’ll need two 1-meter pieces of wood and one 50-centimeter piece.
First, cross the two 1-meter pieces and fasten them together with screws.
Next, attach the 50-centimeter piece horizontally near the bottom of the crossed pieces to serve as a footrest.
That’s all for the steps, so as long as you have the tools, even beginners can make it.
When you cross the wood, adjust the lengths so that the intersection is about shoulder height for the rider.
Also, make sure the ends of the crossed wood do not extend beyond the rider’s shoulders.
The higher the footrest is, the harder it will be to mount, so it’s recommended to attach it at a low position.
Milk Carton Kaleidoscope

A kaleidoscope loved by both adults and kids! Here’s an easy kaleidoscope that even a 5-year-old can make.
You’ll need scissors, holographic origami paper and construction paper, a milk carton, tape, and if you want to add patterns, A4 copy paper and permanent markers will give you a nice finish.
It’s very simple to make: cut the milk carton, tape it together, and stick the holographic origami paper onto the carton.
Once the body is done, draw patterns on A4 copy paper for the outer wrap, then paste it onto the construction paper.
Wrap it around the body and you’re done! When you move the milk carton, the patterns change shape and look beautiful.
It’s a great activity to enjoy with children, so try making one together!
Gashi-Gashi Hand
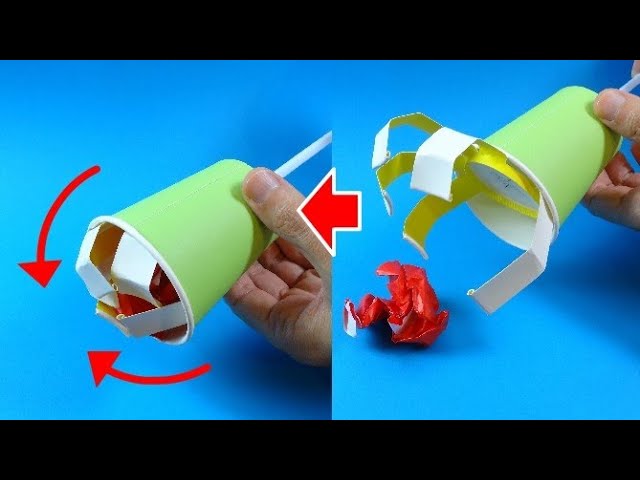
Why not make a “Grabby Hand” with a uniquely addictive motion? First, prepare two paper cups.
In one cup, cut slits to match the shape of a hand; once you’ve formed five fingers, fold them back to the opposite side.
Next, make about a 2-centimeter slit at the tip of a straw and staple it to the center of the hand-shaped cup.
Finally, poke a hole in the center of the bottom of the other paper cup and thread the straw through—done! Move the straw up and down, and the paper-cup hand will open and close, letting you grab paper scraps and more.
It’s fun to use during cleanup, and if you prepare lots of paper balls, you can even have a ball-collecting race with everyone and really get the excitement going!
[Ages 3 and up] Hedgehog Snip-Snip Craft
Using everyday paper plates to make hedgehogs is a great craft for 3-year-olds who are starting to enjoy expressing themselves.
Get paper plates, scissors, construction paper, and glue ready.
Prepare the hedgehog bodies in advance, and have the children make cuts around the edge of the paper plate, snipping from the outside toward the inside.
It’s also a good idea to draw guide lines so they can cut along them.
By drawing the hedgehog’s face themselves, each child can create their own original hedgehog.
Giving the hedgehogs names and using them in play can make the activity even more fun.
Voice changer with a paper cup

Let’s make a voice changer that tickles kids’ curiosity.
It’s super simple to build! Stick aluminum foil on one side of a paper cup and cut out the bottom—done in no time.
Put the bottom side to your mouth and speak, and like magic, your voice will sound different from usual.
You can almost see the kids bursting into laughter at their own transformed voices.
It’s a toy that could spark new ways of communicating with friends and teachers! This voice changer will make everyday chatter several times more fun—be sure to make one together and play with it!
[Childcare] Playful Craft Ideas to Enjoy with 5-Year-Olds (41–50)
cardboard tambourine
@nobuhiro1139♪ Original Song – Nobuhiro – ⛩️ OjiKura ⛩️
Fun to make! Here are some ideas for making a tambourine out of cardboard.
You’ll need cardboard, a compass, a pencil, a plastic sheet, craft glue, plastic bottle caps, beads, and vinyl tape.
It’s great that cardboard and bottle caps are easy to prepare at home or in preschool! Using familiar materials may also help foster an appreciation for taking care of things.
Be sure to try making one together with your child.
Pool cue air cannon
Let me introduce an air cannon made from a pool noodle that you can complete in no time.
Prepare a pool noodle, a balloon, a pom-pom ball, and vinyl tape, and let’s get started.
Cut the pool noodle, tie a knot at the mouth of the balloon, and then cut the top part of the balloon horizontally with scissors, leaving more material on the bottom section.
Fit the cut balloon onto the end of the pool noodle and secure it firmly with vinyl tape so it won’t come off—now it’s ready.
To launch, place a pom-pom ball inside and pull back on the balloon section, then aim upward and release.
The steps are simple, so it’s also recommended for busy teachers.