
Recommended for 5-year-olds! Simple DIY toy ideas

Five-year-olds become more dexterous and better at using tools, so you’ll start to see them trying to express the images they imagine through their own creations.
We want them to build up lots of experiences while enjoying the fun of making things on their own.
So this time, we’re introducing handmade toy ideas that will further expand the world of making for five-year-olds.
From toys with unique movements, to ones that invite deep, focused play, to those that encourage interaction with friends—we’ve gathered plenty of handmade toy ideas that kids will love.
Incorporate each child’s free ideas and creativity, make adjustments as you go, and try making and playing a lot together with friends and teachers.
Recommended for 5-year-olds! Simple DIY toy ideas (1–10)
catch-ball machine
How about making a fun catch-ball machine that shoots the ball and pawn with a satisfying pop? First, cut a circle in the center of a paper plate to match the diameter of a toilet paper tube, then cut away one quarter of the plate and overlap the edges to form a cone, taping it in place.
Next, cut slits into one end of the toilet paper tube, hook two rubber bands in a cross shape into the slits, secure them with tape so they don’t come off, and attach a ball made by wrapping tissues with tape to the rubber bands.
Thread the toilet paper tube through the hole in the paper plate and fix it in place.
Finally, make one more soft ball out of tissues and tape, and you’re done.
It’s fun to play alone, and making several to play with family or friends sounds great too!
Ball-toss game

Let’s make a ball-toss game using only paper! The steps are very simple.
First, accordion-fold a sheet of construction paper, then fold it in half like a fan and secure the middle with tape.
Attach one side of the fan upright to a paper plate, and on the opposite upper side, cut a small slit so a ring can catch onto it easily.
Finally, make a ring by looping a long, thin strip of construction paper and hook it into the slit—now it’s ready.
Press the accordion firmly with your hand and release; the ring will spring and fly off.
Place a deep paper plate or a box where you want to aim, and everyone can take turns launching the ring to try to land it inside! It looks simple but is trickier than it seems—kids are sure to get hooked!
Gashi-Gashi Hand
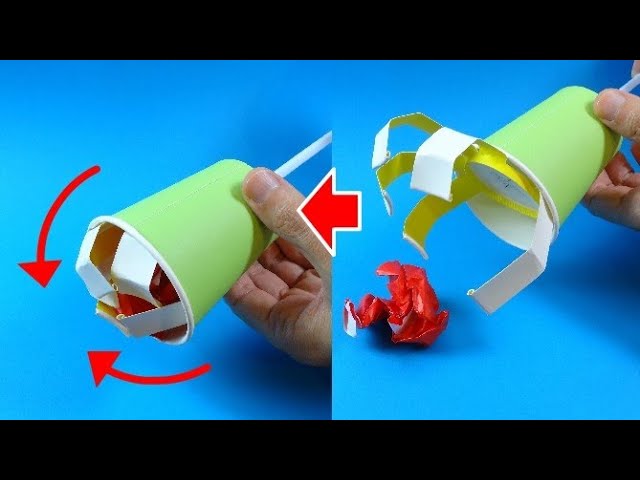
Why not make a “Grabby Hand” with a uniquely addictive motion? First, prepare two paper cups.
In one cup, cut slits to match the shape of a hand; once you’ve formed five fingers, fold them back to the opposite side.
Next, make about a 2-centimeter slit at the tip of a straw and staple it to the center of the hand-shaped cup.
Finally, poke a hole in the center of the bottom of the other paper cup and thread the straw through—done! Move the straw up and down, and the paper-cup hand will open and close, letting you grab paper scraps and more.
It’s fun to use during cleanup, and if you prepare lots of paper balls, you can even have a ball-collecting race with everyone and really get the excitement going!
Walking animals made from paper cups

These are animal paper cups that are super cute when they toddle along.
Cut two slits on opposite sides of the rim of a paper cup and fold the cut sections outward.
Attach a rubber band to a used battery, hook it onto the folded parts, and secure it with tape.
Twist the battery around and place the cup upside down—now you’ve got a toddling cup that walks! Finish it by gluing colored paper to the sides, adding ears, and drawing eyes and a mouth.
It’s so adorable you’ll want to make all kinds of animals.
Pop-up Rocket

Rockets full of dreams are a hit with kids! Why not try incorporating a “pop-out rocket” that even little ones can enjoy into your daycare or kindergarten crafts? It’s a well-flying rocket you can play with right after making it! Wrap origami paper around a toilet paper roll to create the rocket body.
Stick on shiny or patterned origami and design your own unique rocket.
Make the launch pad by rolling newspaper into a firm cylinder.
Finally, attach two rubber bands linked together to a chopstick, and secure it firmly to the tip of the launch pad—done! It’s a craft that’s twice as exciting: fun to make and fun to play with.
twisty snake

This is a whirling snake that spins energetically when you run holding the end of a string! Draw a spiral-shaped snake on construction paper, poke a hole in the center, and add the snake’s patterns.
If you color it vibrantly, it will look even prettier when it spins.
Once the coloring is done, cut along the lines.
Finally, thread fishing line or another string through the hole you made—done! If you hold the string and run full speed, the snake will spin around as if it’s dancing.
Leave the patterns and colors up to the kids! It’ll be so much fun to see what unique snakes they create.
Voice changer with a paper cup

Let’s make a voice changer that tickles kids’ curiosity.
It’s super simple to build! Stick aluminum foil on one side of a paper cup and cut out the bottom—done in no time.
Put the bottom side to your mouth and speak, and like magic, your voice will sound different from usual.
You can almost see the kids bursting into laughter at their own transformed voices.
It’s a toy that could spark new ways of communicating with friends and teachers! This voice changer will make everyday chatter several times more fun—be sure to make one together and play with it!