Recommended for 5-year-olds! Simple DIY toy ideas

Five-year-olds become more dexterous and better at using tools, so you’ll start to see them trying to express the images they imagine through their own creations.
We want them to build up lots of experiences while enjoying the fun of making things on their own.
So this time, we’re introducing handmade toy ideas that will further expand the world of making for five-year-olds.
From toys with unique movements, to ones that invite deep, focused play, to those that encourage interaction with friends—we’ve gathered plenty of handmade toy ideas that kids will love.
Incorporate each child’s free ideas and creativity, make adjustments as you go, and try making and playing a lot together with friends and teachers.
- [Childcare] Playful craft ideas to enjoy with 5-year-olds
- Age 4: Simple and Fun! Handmade Toy Ideas
- [Age 5] Exciting and fun! A special feature on ideas for at-home play
- [May] A collection of craft ideas to try with 5-year-olds
- [Childcare] Recommended for toddlers! Toy ideas you can make and play with
- [Nursery/Kindergarten] Crafts you can play with after making them
- Let's make toys with paper cups! Simple and fun handmade toys
- For 5-Year-Olds: Let’s Make It! A Collection of Craft Ideas to Feel the Spring
- For older kindergarteners: Let’s make it! A collection of recommended origami ideas for February
- Ideas for indoor activities, games, and group play that 5-year-olds enjoy
- [For 5-Year-Olds] Recommended Indoor Play! A Collection of Exciting Games
- [For toddlers] Simple but amazing craft ideas — including toys they can play with
- August Craft Ideas for 5-Year-Olds
Recommended for 5-year-olds! Simple DIY toy ideas (1–10)
Marble rolling with a paper plate

How about making a marble run that kids will be obsessed with? First, draw circles on a paper plate to match the size of the marbles and cut them out.
To keep the marbles from falling through, glue construction paper on the back of the holes to create marble pockets.
Finally, cut straws into random lengths and stick them freely onto the paper plate to form paths for the marbles—that’s it! It’s also fun to decorate the plate by drawing pictures or adding stickers.
Depending on how the straws are arranged, you can create all kinds of marble runs that showcase each child’s personality.
You can play with your own carefully crafted piece or swap with friends and play.
It’s a toy that will have you forgetting the time as you play to your heart’s content.
Making a sugoroku board game

This is a handmade sugoroku board game that combines prompts the children came up with.
Write each prompt on a card and stick it onto the board.
Using words or drawings, you can create a unique, original sugoroku.
Arrange the cards on the board, glue them down, and connect each card with lines—then it’s complete! With unique prompts on each space, such as “sing a song,” “jump,” “rock-paper-scissors with the teacher,” or “do an impression,” this original sugoroku will make time at the preschool lively and fun.
Cube puzzle made from a milk carton

Let’s try making a cube puzzle using a milk carton! First, open up the carton and cut it horizontally to make three strips, each 6.5 cm wide.
Next, use double-sided tape to stick two different colors of construction paper onto the cut carton pieces.
Tape two of the strips into loops, and then thread the remaining strip through those two loops before taping it into a loop as well.
Finally, decorate with your favorite stickers or drawings, and you’re done.
You can enjoy looking at the different designs on each face and repeatedly fitting pieces together—there are lots of ways to play.
It’s sure to positively support children’s fine motor skills and brain development!
Recommended for 5-year-olds! Simple DIY toy ideas (11–20)
straw wrapper

Let’s incorporate a fun, blow-and-play straw trumpet into childcare activities.
First, prepare a sheet of construction paper cut into a semicircle with a diameter of 25–30 cm.
If possible, ask the children what colors they want and have their favorites ready.
Roll the construction paper into a trumpet shape and secure it with tape.
Next, cut both sides of the tip of a straw at an angle, and also cut off the tip of the paper trumpet.
Slowly insert the straw, starting from the cut end, through the trumpet’s opening, and secure it with tape at the end.
Flatten the cut end of the straw and blow into it… See if it makes a sound and have everyone play together!
Jack-in-the-box made from a milk carton

Let’s make a perfect jack-in-the-box for birthday parties and celebrations, and have some thrilling fun with five-year-olds! First, flatten a milk carton and cut it into 5 cm-wide strips.
Decorating the cut pieces with hologram stickers will enhance the look.
Make small slits above and below around the center and hook a rubber band into them.
Fold it the other way, and you’ve created a mechanism that springs up with the power of the rubber band! Make several of these to match the size of your box.
Prepare some confetti as well and set everything in the box.
You can also add a message or a small gift.
When the lid is opened, the springy pieces and confetti pop out—this jack-in-the-box is a surefire hit that’s exciting every time you open it!
kaleidoscope

A kaleidoscope whose patterns change with the light is a toy that really sparks children’s curiosity.
So why not try making a simple, easy kaleidoscope using a milk carton and aluminum foil? Sticking the aluminum foil onto the end of the milk carton might be a little difficult for children, but encourage them to take on the challenge.
Seeing the pictures they’ve drawn on white paper reflected on the foil and gleaming will feel fresh and exciting, and it may also spark their interest in color changes and light reflections.
Sliding puzzle
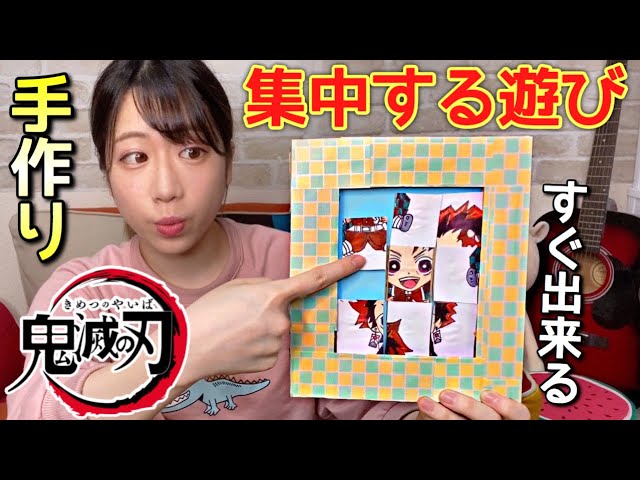
Why not try making a sliding puzzle by hand? It’s a toy that makes use of a five-year-old’s thinking skills and imagination, and because it’s handmade, you can create the puzzle with a motif that interests them.
First, prepare three flat pieces of cardboard of the same size.
Set one aside as the base, then draw a frame on the other two and cut out the centers.
Stack the frames you made and glue them together.
For the puzzle section, cut it just slightly smaller so it fits easily, and draw the puzzle piece lines on the back.
After attaching the picture to the front, cut along the lines of the pieces on the back.
Finally, fit the pieces into the frame and remove one piece—done!