Recommended for 5-year-olds! Simple DIY toy ideas

Five-year-olds become more dexterous and better at using tools, so you’ll start to see them trying to express the images they imagine through their own creations.
We want them to build up lots of experiences while enjoying the fun of making things on their own.
So this time, we’re introducing handmade toy ideas that will further expand the world of making for five-year-olds.
From toys with unique movements, to ones that invite deep, focused play, to those that encourage interaction with friends—we’ve gathered plenty of handmade toy ideas that kids will love.
Incorporate each child’s free ideas and creativity, make adjustments as you go, and try making and playing a lot together with friends and teachers.
- [Childcare] Playful craft ideas to enjoy with 5-year-olds
- Age 4: Simple and Fun! Handmade Toy Ideas
- [Age 5] Exciting and fun! A special feature on ideas for at-home play
- [May] A collection of craft ideas to try with 5-year-olds
- [Childcare] Recommended for toddlers! Toy ideas you can make and play with
- [Nursery/Kindergarten] Crafts you can play with after making them
- Let's make toys with paper cups! Simple and fun handmade toys
- For 5-Year-Olds: Let’s Make It! A Collection of Craft Ideas to Feel the Spring
- For older kindergarteners: Let’s make it! A collection of recommended origami ideas for February
- Ideas for indoor activities, games, and group play that 5-year-olds enjoy
- [For 5-Year-Olds] Recommended Indoor Play! A Collection of Exciting Games
- [For toddlers] Simple but amazing craft ideas — including toys they can play with
- August Craft Ideas for 5-Year-Olds
Recommended for 5-year-olds! Easy DIY toy ideas (51–60)
Marbles and rubber bands

It’s a simple-looking craft that doesn’t seem like a spinning top at first glance: just link rubber bands together and attach a marble to each end.
The key is how you spin it.
Hold one marble, then rotate the other in circles to wind the rubber bands around the marble you’re holding.
Once the rubber bands are wound tightly, you’re ready—let go, and the rubber bands unwind, making the two marbles spin around rapidly.
The sight of it gradually expanding and the colorful marbles zipping around is quite striking.
felt ball

Felt balls, which can be played with in many ways, are also recommended.
First, download a pentagon template from the internet and use it to cut cardboard.
Next, cut felt to match the pentagons you’ve made and embroider the characters on them.
Once you have 12 pieces, assemble them, stuff them with filling, and you’re done.
I hope you’ll play freely—roll it to see which character shows up or toss it in the air.
You can also put a bell inside to enjoy the sound.
playmat
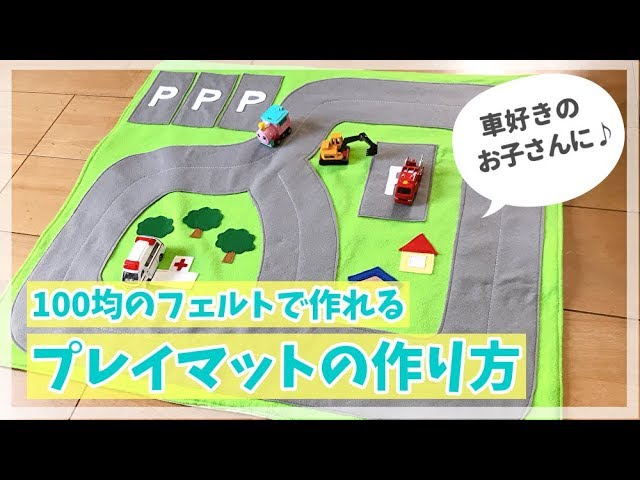
Here’s an idea for a road play mat that you’ll want to make for a child who loves toy cars.
Sew roads made from gray felt onto a base of felt in your favorite color.
Then, add and sew on whatever you like—houses, trees, a police box, a hospital, bus stops, and more.
If you don’t have a sewing machine, you can skip the stitching and use glue to attach everything instead.
With a little creativity, you can make all kinds of play mats, so let your imagination run wild as you create.
Making a construction site where kids can play with work vehicles sounds fun, too!
Transforming robot made from plastic bottles

Let’s connect plastic bottles with magnets and build a real robot! Here are some ideas for a transforming robot made from plastic bottles.
It’s exciting to be able to make robots using materials we have around us in daily life.
This time, let’s make a robot using plastic bottles and magnets.
What you’ll need: plastic bottles, construction paper, cardboard, magnets, paper cups, straws, clothespins, binder clips, vinyl tape, and small drink containers.
Be careful to avoid injury while crafting!
Recommended for 5-year-olds! Simple DIY toy ideas (61–70)
Button practice toy

Here’s a toy idea that lets kids practice buttoning using Anpanman’s facial parts.
It’s made with felt.
First, stack two circular felt pieces to create the base of Anpanman’s face.
Embroider the eyebrows, nose, cheeks, and mouth outline on it, then sew buttons onto the eyes, nose, and cheeks.
After that, sew the corresponding attachable parts that fasten onto the buttons, and you’re done! You can use either snap buttons or regular buttons with holes—choose whichever seems more fun for your child.
Perfect for button practice! Onigiri

Here’s an idea for felt rice balls that help kids practice buttoning! First, cut a rectangle from white felt and fold it.
Keeping the middle of the folded edge intact, cut it into a rice ball shape.
Make fillings like pickled plum or salmon and sew on snap buttons.
Sew matching snap buttons to the center of the rice ball’s inside as well.
Sew a two-hole button to the upper inside part of the rice ball, and make a slit on the opposite side.
Finally, glue a strip of seaweed cut from black felt to the outside, and you’re done! Attach your favorite filling and close the rice ball with the buttons to enjoy making onigiri.
Magnetic Fukuwarai

Let’s play with magnet sheets and a whiteboard! Here are some ideas for magnetic Fukuwarai.
Fukuwarai is one of Japan’s traditional games, typically enjoyed during New Year’s celebrations.
It’s a unique game where you place facial parts—eyes, nose, mouth, ears, eyebrows—onto a face in the correct spots while keeping your eyes closed.
This time, let’s make a version using magnet sheets.
What you’ll need: magnet sheets, a whiteboard, a pencil, paper, construction paper, scissors, a craft knife, and double-sided tape.
This should also help solve the common problem of pieces shifting out of place while you play!