For older kindergarteners: Let’s make it! A collection of recommended origami ideas for February

February brings a string of cold days, which means more time playing indoors, doesn’t it?
That’s why we recommend origami play.
In this article, we’re sharing a collection of origami ideas you’ll want to try in February.
As graduation from kindergarten approaches, many older children have gained lots of new skills.
Even with origami models they’re making for the first time, many children can now follow instructions or an origami book and fold on their own without the teacher guiding each step.
If teachers create and display origami diagrams, children can choose what they want to make and fold freely!
It’s wonderful to provide an environment where children can make what they want, when they want.
Please use these ideas as inspiration and try making all kinds of things!
For older preschoolers: Let’s make it! A collection of recommended origami ideas for February (1–10)
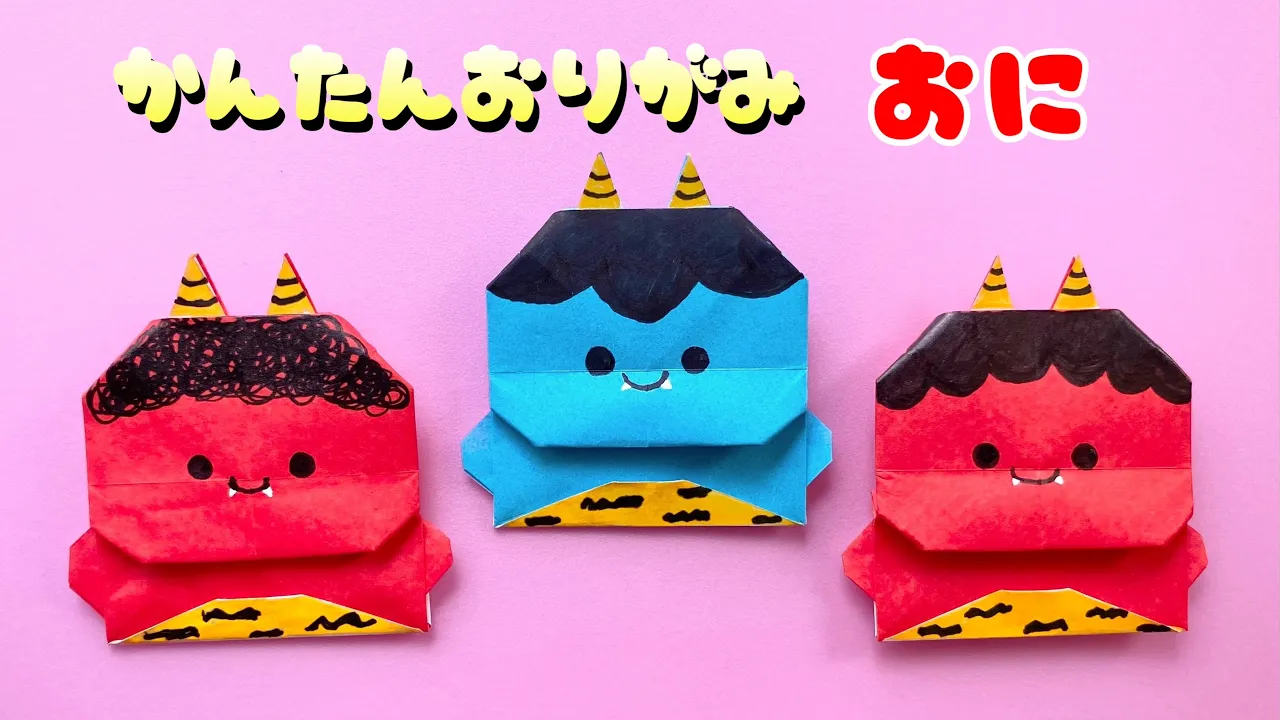
Oni of Setsubun

Let’s drive out the demons inside our hearts! Here’s how to make a Setsubun demon (oni) with origami.
You’ll need origami paper, a white pen, a black pen, and a yellow pen.
The key to this idea is making crisp folds.
When creating the initial creases, press firmly with the pads of your fingers and make straight, sharp folds! For the more complicated steps, it’s great to work together with friends, teachers, or a guardian.
This is a recommended craft idea for Setsubun.
Give it a try!
Polar Bear and the Scarf

Recommended for older preschoolers! Here’s an origami project: a polar bear with a scarf.
Start with the colored side up and fold using the “Kannon” base.
Fold the top left and right edges to the center to make crease lines, then fold the left and right corners inward.
Fold the back side as is, and change the valley fold at the front into a mountain fold.
Next, using the bottom left and right corners as pivots, fold the top left and right corners toward the center.
Open and fold outward from the center of the top toward both sides.
Now make the ears: flip it over, flatten the top corner, and fold it to form ear shapes.
Diagonally fold the lower section to suggest the body, draw the face, and your polar bear is complete.
For the scarf, take a 15 cm × 3 cm strip of origami paper, fold it in half, and fold it to look like a scarf to finish!
penguin

Here’s how to fold a cute, neatly shaped penguin.
First, fold the paper into a triangle twice to make a cross-shaped crease, then open it.
With the colored side facing up, fold the top corner down to the center to make a crease, then continue folding it down two more times like a layered fold.
Flip it over, and fold the top left and right edges down to align with the vertical crease.
Next, fold down the top corner, making sure the beak area is folded so that it runs parallel to the crease.
Flip it over again, and fold both sides inward diagonally so the corners meet.
Fold up the bottom corner, and fold the left and right “arms” diagonally.
Finally, adjust the corners so it forms a penguin shape, and you’re done! Draw the eyes and beak with a pen to make it extra cute.
knit cap

Here’s an origami tutorial for a cute knit cap that’s perfect for the cold winter.
First, turn the paper over, fold it into a triangle twice, then unfold once.
Take the front layer’s tip and fold it down to the bottom edge twice.
Flip it over, then fold the left and right corners toward the center.
Fold the left and right edges inward to shape it like a hat, then turn it to the front.
Next, use a quarter-sized piece of origami paper to make the hat’s pom-pom.
Fold it twice using the “cushion” (zabuton) fold.
Slightly round each of the four corners with small folds.
Finally, glue the pom-pom onto the hat, and your knit cap is complete! It looks adorable in a variety of colors.
puffy heart balloon
https://www.tiktok.com/@miigomama_chiiku/video/7333951617814826248Enjoy original decorations too! Introducing a puffy 3D heart balloon made from origami.
All you need is origami paper in your favorite color.
A heart motif is perfect for Valentine’s Day, and making it three-dimensional makes it even cuter! The folding method is simple, but the part where you blow air into it to make it 3D looks fun.
Decorating the finished heart balloon with drawings or stickers will make it look even more festive! It’s also a great idea to attach a straw and turn it into a heart wand.
Enjoy customizing it together with the kids!
mumps

Let’s make origami! Here’s a gentle-looking Otafuku (good-fortune lady).
You’ll need black origami paper, red round stickers, black round stickers, and a black pen.
It’s said that Otafuku’s calm, smiling expression brings lots of good fortune.
How about making your very own Otafuku with origami? The creasing steps are important, and some parts of the folding can be a bit complex, but just like the chant “Oni wa soto, fuku wa uchi” (“Demons out, fortune in”), it’s also recommended to make an Otafuku together with an oni (ogre) craft!
Bear and heart

Here we have a cute bear and heart made of origami.
First, how to make the bear: fold into a triangle twice, then unfold one step back and fold both ends up.
Like making a samurai helmet, fold both sides up diagonally.
Fold the bottom corner up toward the center, and once you tuck all the corners inward, the bear is complete.
Next, how to make the heart: fold into a square twice to create a cross-shaped crease, then open it.
Fold the bottom edge up to the center line, flip it over, and fold the bottom left and right corners up toward the center line.
Flip it over again, fold the bottom corner up to the top edge, and flip it over once more.
Open the pockets on the upper left and right, fold up the top layer, and rotate the piece 180 degrees.
Fold up the left and right corners, tuck in the side corners, then fold up the bottom corner.
There will be a pocket on the bottom side—tuck the top part into it, glue it to the bear, and you’re done!