[100-Yen Store Crafts] Handmade ideas that captivate adults too. Stylish DIY/handmade.


“I want to easily add a splash of color to my life!” but “I can’t come up with any ideas…” If that sounds like you, we recommend grown-up DIY projects using 100-yen shop items.
With combinations of materials like paper clay, dried flowers, and candles, you can create stylish pieces you’ll want to share on social media.
Enjoy taking your time with these projects in your free moments, and try turning them into decor for your room or gifts for someone special.
In this article, we’ll introduce simple, stylish craft ideas you can make using materials from 100-yen stores.
- [For Adults] Simple yet Impressive Crafts: A Stylish, Eye-Catching Collection
- [Easy and Simple] Popular DIY Ideas You Can Make with Materials from 100-Yen Shops
- [For Adults] Fun Craft Ideas Perfect for Killing Time
- Craft projects recommended for adult hobbies: a stylish and cute collection of works
- [Adult Craft] Ideas for Relaxing Home Decor and Accessories Made with Paper Clay
- [For Adults] Recommended Craft Kits
- Easy-to-make crafts for adults. Projects recommended for beginners.
- [Easy] Practical craft ideas. Great for beginners too!
- Christmas crafts for adults: stylish project ideas you'll want to display
- Ideas for paper cup crafts for adults: from interior decor to practical items.
- [Great for killing time!] Winter-Recommended Craft Ideas for Adults
- Crafts you can make with 100-yen shop items! A collection of fun project ideas that elementary school kids will love
- Construction paper craft ideas adults can enjoy—from small accessories to stylish home decor
[Dollar Store Crafts] Handmade ideas that even adults will get hooked on. Stylish DIY (21–30)
Design charm

Have you heard of gel nails, the kind you see on menus at nail salons? Gel nails are created by curing a gel-like resin onto your natural nails.
They give a plump, glossy finish that looks beautifully polished.
Let’s try making a lovely charm using gel nail resin sold at 100-yen shops.
We’ll make the base with UV resin.
Pour resin into a mold, add decorative items like alphabet stickers, and cure it.
Then apply the gel nail resin and decorate with gold leaf, etc.
Next, coat with resin and cure to complete the piece.
Attach your preferred charm hardware to finish it off.
Melon Soda Clip
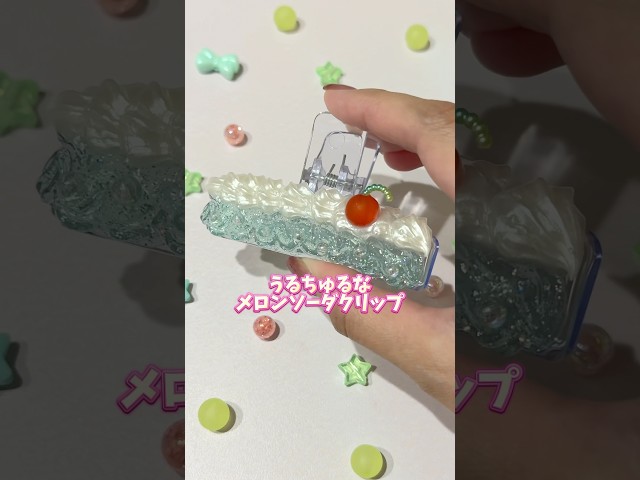
Let me introduce a refreshing and mature-cute melon soda clip.
Prepare a clip, whipped-cream glue, red beads, and deco parts, and let’s get crafting.
Pipe the whipped-cream glue onto the clip.
The key is to pipe it in wavy swirls.
Attach a deco part to a red bead to make a cherry accent, then stick it on.
Put a cap on top and let it dry, and you’re done.
Give this original clip a try!
Beaded accessories

Accessories made with small beads are items that go well with any outfit.
Beads come in a variety of colors, sizes, and shapes, and they’re beautiful just to look at.
The design changes depending on where you thread the line—flower shapes, heart shapes, and more.
The process involves detailed work, but it’s a great project for enjoying focused, hands-on crafting.
Even if you’re not confident working with tiny, delicate beads, there are larger sizes available, so don’t worry.
Many 100-yen shops sell a wide range of beads, too.
You’ll probably enjoy the time spent finding your favorites.
Botanical candle

Botanical candles are very popular as interior decor.
Let’s try making one using items sold at 100-yen shops.
Break a stick candle into about half and put it into the container that originally held cotton swabs, then place the rest of the candle in a pot and heat to melt.
Pour the melted wax into the cotton swab container, insert a wick, and let it set.
Next, place the hardened wax in the center of a larger cotton swab container than the one you prepared first, and add dried flowers around it.
You don’t need many flowers, but be careful not to add too many or the wax won’t be able to penetrate.
Pour in the melted wax, and once it has completely cooled and solidified, it’s done.
It’s a piece that’s sure to delight whether you make it for yourself or as a gift.
stuffed animal

You can actually make stuffed toys from socks.
First, choose socks that match the image of the stuffed toy you want to create.
Fluffy socks might make it feel more like a plush.
Next, measure and cut the necessary parts, then stuff them with filling.
The shape depends on how you add the stuffing, so proceed carefully.
After that, make the remaining parts in the same way and sew them together, and you’re done.
Try making various plushies, like animals or anime characters.
wall interior

Let’s make some wall decor by putting or attaching dried flowers into photo frames or glass test tubes from the 100-yen shop! Choose small dried flowers for the test tubes, and trim them if they’re too long.
Tweezers can be handy.
Once you’re done, wrap twine around the cork for a stylish finish.
You won’t use the clear cover part of the frame, so feel free to arrange the flowers with some volume.
A hot glue gun works well for adhering pieces, but be careful to avoid burns.
When you’re finished, display your creations on a wall or on a shelf in your room.
Hemp twine lampshade

Lampshades made with jute twine look cool and very charming when displayed in a room, don’t they? The truth is, you can make one easily by hand.
Inflate a 6-inch balloon to the size you want for the lampshade and secure it, then brush on glue thinned with water.
Just like making papier-mâché, wrap the balloon with jute twine in your favorite color.
Use a brush to soak the twine with the adhesive as you go, wrapping it so it doesn’t unravel.
Once you’ve finished wrapping and the whole thing is completely dry, pop the balloon inside.
Cut out the opening for the light, remove any balloon pieces stuck to the twine, and you’re done.