[For Seniors] Enjoy the Arrival of Spring Indoors! Recommended April Origami


April is a season when many people take their first steps into new environments, with events like school entrance ceremonies and company induction ceremonies.
Elderly care facilities such as day service centers may also be welcoming new seniors.
This time, we’re introducing recommended origami for April.
Because origami uses the fingers extensively, it’s also used as rehabilitation after a stroke and as a form of brain training.
Everything we’re introducing today is themed around April.
Enjoy creating pieces in origami recreation that let you feel the arrival of spring!
- [For Seniors] Embraced by Spring: Wall Decoration Ideas to Enjoy in April
- [For Seniors] Perfect Finger Exercises! Seasonal Flower Origami
- [For seniors] Enjoy spring: April craft ideas
- For Seniors: Come, Spring! Recommended March Craft Ideas for Daycare Services
- [For Seniors] Spring Wall Decorations: A Collection of Ideas to Brighten Up Your Room
- [For Seniors] Feel the Arrival of Spring: A Collection of Cherry Blossom Craft Ideas
- [For Seniors] Enjoy Cherry Blossoms Indoors: Wall Decoration Ideas
- [For Seniors] Introducing May-themed Origami!
- [For Seniors] Enjoyable Brain Training! Recommended Origami for February
- [For Seniors] Enjoy Something New Every Day! Today’s Origami
- [For Seniors] Haiku for March: Enjoying a Spring Moment with Famous Verses
- [For Seniors] Recommended for day services! Simple and cute small craft ideas
- For Seniors: Feel the Arrival of Warm Spring. Introducing Origami Ideas
[For Seniors] Enjoy the Arrival of Spring Indoors! Recommended April Origami (41–50)
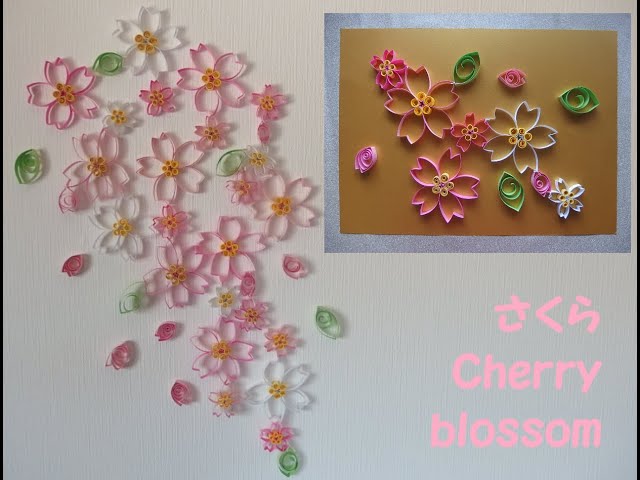
cherry blossoms

This is a wall decoration featuring cherry blossoms with beautifully three-dimensional petals.
First, make the basic cherry blossom: fold an origami square into a triangle, fold the left and right sides toward the center, and cut.
Once you have a cherry blossom with five heart-shaped petals joined together, start folding while slightly overlapping the petals.
Make the leaves with craft scissors; the key is to create veins by making fine folds.
Finally, stick everything onto letter paper in your preferred color, combining it with flowers made using a craft punch, and you’re done.
Have fun arranging them by grouping several small cherry blossoms together or layering larger flowers.
Swaying Cherry Blossoms
Here’s a cute cherry blossom craft idea that gently sways in the breeze! I recommend using thicker origami paper.
First, take pink origami cut into strips, form a ring, and fold it so that one part looks like the letter M.
Use a toothpick or a twig to push the ring inward, then pinch the sides with your fingers to shape it more easily.
Make five of these and glue them together at the center.
Next, take yellow origami cut into strips, roll it tightly from the end to make small coils, and attach five of them under the petals as stamens.
Repeat the steps to make several blossoms, then tie the petals of each flower together with thread to connect them, and your swaying cherry blossoms are complete! Display them on a wall or hang them from the ceiling to enjoy.
ladybug

A popular origami piece that evokes the arrival of spring is the ladybug.
It’s easy to make with a single sheet of paper, so even seniors can enjoy it with confidence.
Its rounded shape and the cute contrast of red and black make it perfect for seasonal decorations.
The steps are simple, yet using the fingertips provides brain stimulation and hand exercise, making it effective for rehabilitation as well.
Display the finished ladybugs together with cherry blossoms and other flowers to create a bright, cheerful spring scene.
It’s a recommended craft that will instantly lift your spirits.
Japanese bush warbler

The Japanese bush warbler, known for its “ho-hokekyo” song, is perfect for a spring origami activity.
You can make it with a single sheet of origami paper, so it seems easy for seniors to join in.
Prepare light yellow-green origami paper, round stickers, and a white pen.
Fold the paper in half into a triangle, then continue folding along the creases.
Once the warbler’s body is made, use the round sticker and white pen to create the eye.
If you don’t have a round sticker, draw it with a black pen instead.
This cute bush warbler origami is likely to spark seniors’ creativity.
Try making plum blossoms as well and display them together.
They’ll instantly brighten up the room.
a bouquet of tulips

Did you know that tulips, which bloom in vibrant colors from late March to mid-April, come in a wide variety of hues? In addition to classic red, yellow, and white, there are even black and purple tulips! Let’s try folding tulips with origami in your favorite colors.
Use quarter-size pieces of origami paper to make the flowers, and combine two pieces to form the stem.
Attach the flowers to wrapping paper with a ribbon, and you’re done.
They make a lovely gift for family and friends on special occasions.
Azaleas and butterflies

Azaleas, which bloom in vivid pinks and purples, are at their best from mid-April to mid-May.
As a May wall decoration idea, how about making azaleas and butterflies? Let’s fold azaleas using red and pink origami.
First, make crease lines and use them as guides as you fold.
While the paper is still folded, cut it with scissors into the shape of petals.
Then use the scissors to round and shape the cut petals.
For the butterflies, using washi-patterned origami will really make them stand out.
Butterflies fluttering over a brightly colored field of azaleas is sure to lift the spirits of anyone who sees it.
Please use this as a reference!
Hanging ornaments

We’d like to introduce a lovely spring hanging decoration that gently sways in the breeze.
You can make it with just origami paper and string, so it’s perfect for craft activities in senior care facilities.
Prepare both solid-colored and patterned origami paper, cut three circles of each, and fold them in half.
Glue the solid and patterned halves alternately, attach them to a string, and your temari ball is finished.
Next, fold three sheets of origami paper in half vertically, stack and glue them together, then draw a pencil outline so it forms a cherry blossom shape and cut it out.
When you open it, you’ll have a symmetrical flower.
Snip small cuts into the petals to make it look like a sakura blossom, then attach it to the string to complete the piece.
Gazing at your hanging decoration while feeling the warm spring breeze is sure to bring a peaceful moment.