[For Seniors] Embraced by Spring: Wall Decoration Ideas to Enjoy in April


In spring, the scenery becomes colorful with cherry blossoms, rapeseed flowers, clover, and more—so different from winter, isn’t it?
Warm weather makes you want to go out, but some older adults may find it difficult to do so.
So in this article, we’ll introduce April wall decorations that let you feel the arrival of spring while staying indoors.
You can make not only April flowers and plants but also insects like butterflies, bees, and ladybugs.
Displaying them near violets or dandelions enhances the seasonal atmosphere even more.
We hope everyone enjoys creating these together while communicating with fellow seniors and facility staff.
- [For Seniors] Spring Wall Decorations: A Collection of Ideas to Brighten Up Your Room
- For Seniors: Feel the Arrival of Warm Spring. Cherry Blossom Wall Decoration Ideas
- [For seniors] Enjoy spring: April craft ideas
- [For Seniors] Color Your Care Facility’s Spring: Wall Decoration Ideas
- [For Seniors] Make an April Calendar: Fun Ideas to Brighten Your Mood
- [For Seniors] Recommended for day-service centers. A collection of craft ideas for April
- [For Seniors] Enjoy the Arrival of Spring Indoors! Recommended April Origami
- [For Seniors] Making a March Calendar: Introducing Spring-Themed Motifs and Arrangements
- For Seniors: Come, Spring! Recommended March Craft Ideas for Daycare Services
- [For Seniors] Enjoy Cherry Blossoms Indoors: Wall Decoration Ideas
- [Day Service] Spring Take-Home Crafts: Ideas to Warmly Brighten Your Room
- For Seniors: Recommended Wall Decoration Ideas for March
- [For Seniors] May-Themed Wall Decoration Ideas Full of Seasonal Flair
[For Seniors] Wrapped in Spring: Wall Decoration Ideas to Enjoy in April (21–30)
dandelion fluff
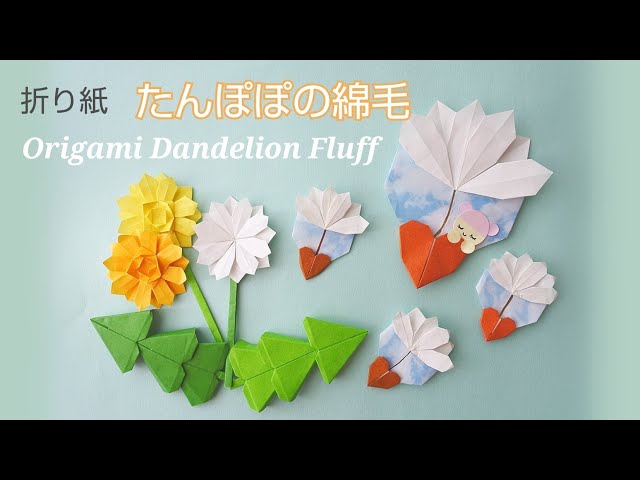
When you see dandelions in bloom, you can’t help but think, “Spring has come,” right? Older adults may also feel the arrival of spring.
In spring, you might make dandelion crafts as part of recreation activities.
It’s also a great idea to make dandelion fluff and display it together with the dandelion pieces.
If you use them as a wall decoration, they’ll create a lovely atmosphere indoors.
Seeing the displayed dandelions and fluff may bring back memories for some seniors—of their childhood or moments with family.
Be sure to enjoy a pleasant time together while sharing those memories.
yaezakura (double-flowered cherry blossoms)

Cherry blossoms are a motif that symbolizes spring in Japan, and their soft colors really convey the warmth of the season.
This decoration expresses cherry blossoms with origami, layering petals to create a double-flowered yaezakura finish.
The tree is attached flat onto a background mount, and then three-dimensional flower pieces are arranged on top.
Doubling the flowers is a key point for adding depth, and giving them creases so they appear slightly lifted enhances the three-dimensional effect.
Letting small petals seem to dance around suggests a spring breeze, which is also recommended.
Dandelions and shepherd’s purse

Spring is the season when many kinds of flowers begin to bloom, and their colorful scenery conveys warmth and a sense of excitement.
This craft expresses springtime flowers like dandelions and shepherd’s purse using origami, creating a warm landscape.
First, cut origami paper into thin strips, fold them, and curve them to form petals.
Then layer them to make the flower components, and arrange them together with stems and leaves to complete the piece.
It’s important to pay attention to the sizes and placement of the flowers and how they overlap with the background.
Paper pom-pom butterfly

A cute butterfly wall decoration made with tissue paper pom-poms.
First, stack several sheets of tissue paper in two colors and fold them in an accordion.
Unfold once, then fold in half perpendicular to the creases, and cut with scissors to form a butterfly shape.
Return it to a fine accordion fold, secure the center with wire, and gently fluff out the tissue paper to create a three-dimensional butterfly.
Make them in various colors and decorate an entire wall—the room will instantly look bright and festive!
Swaying Cherry Blossoms
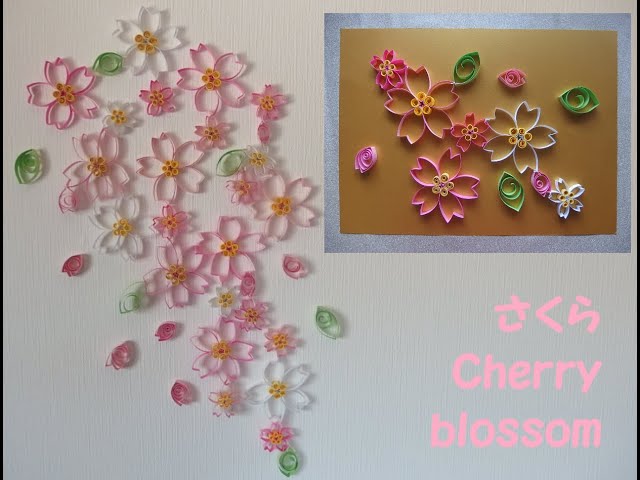
Here’s an idea for a wall decoration that evokes cherry blossom petals swaying in the wind.
Make petals by cutting origami paper into rectangles and forming each piece into a loop.
Combine four to five petals and glue a yellow piece in the center to create a three-dimensional cherry blossom.
If you press the inside of the flower and leaf pieces with a bamboo skewer to add curvature, they’ll gain a soft, rounded 3D look.
Connect the finished blossoms and leaves with thread and attach them to the wall so the design sways when a breeze passes through.
It’s a decoration that’s both visually striking and dynamic, letting you feel the arrival of spring.
cherry blossom

Cherry blossoms in a pale pink hue evoke the arrival of spring.
If you decorate your wall with cherry blossoms that color Japan’s spring, your room will instantly feel brighter! Try making wall decorations by cutting colored construction paper into cherry blossom shapes.
Lightly trace a circle on the paper using a plate or similar object, then cut it out with scissors.
Fold it, make a few cuts, and open it up—the cherry blossom petals are ready.
Because this simple method lets you produce many petals, it’s also recommended for recreational activities in senior care facilities.
Combine large petals, small petals, leaves, and branches to create a lively, festive wall display!
A field of clover

Haven’t you ever gone searching for clovers? They say finding one brings good luck… This video shows you how to actually make those lucky clovers! By making lots of them, you can create a lovely decoration like a field.
They’d be great for room decor or for making calendars at day services, too! The more you make, the more it looks like a grassy meadow.
Try working on it with a big group! Changing the clover colors can add depth as well… Be sure to make plenty and put them to good use!