[Childcare] August origami: simple and cute ideas

August is a great month for playing outside, but on extremely hot days, there are times when you’d rather stay cool indoors.
So in this article, we’ve gathered origami ideas that are perfect for August!
We’ll show you how to make summertime favorites like fireworks, watermelon, and shaved ice, as well as cute sea creatures.
There are also ideas you can use for preschool and kindergarten crafts, so be sure to check them out.
All of these are easy to make, so even kids who are just starting with origami can give them a try!
- [Childcare] August Crafts: Cute Ideas to Make in Summer
- Fun to make in childcare! A collection of easy origami ideas recommended for July
- [Age 4] Easy origami ideas perfect for summer! A collection of cool, refreshing motifs
- [For Seniors] August Wall Decoration Idea Collection
- [Childcare] Perfect for June! Easy origami ideas
- [For 4-year-olds] Recommended for August! Craft ideas: Enjoy a variety of motifs
- August Craft Ideas for 5-Year-Olds
- [For 2-Year-Olds] Craft Ideas to Enjoy in August! Incorporate Summery Motifs and Techniques
- Enjoy August with preschoolers using origami! A collection of summer-perfect ideas
- Have fun in August! A collection of summer origami ideas recommended for preschoolers (4–5 years old)
- Recommended for older preschoolers! A collection of origami craft ideas to enjoy summer in August
- [Childcare] A roundup of easy summer origami ideas to enjoy with 5-year-olds
- [Age 3] Simple summer origami ideas. A roundup of classic summer motifs.
[Childcare] August origami: simple and cute ideas (91–100)
Puffy, three-dimensional goldfish

Let’s make a fun twist on the classic origami balloon! Here’s a puffy, three-dimensional goldfish idea.
All you need is one sheet of origami paper in your favorite color, a black pen, and a white pen.
It’s a unique, playful idea that makes the goldfish look adorably puffed up! Fold a balloon-like goldfish from a single sheet of paper, then use the black and white pens to draw the eyes and patterns.
It will look as if the goldfish has leapt right out of an aquarium.
This idea is sure to make anyone go “Whoa!” the moment they see the finished goldfish!
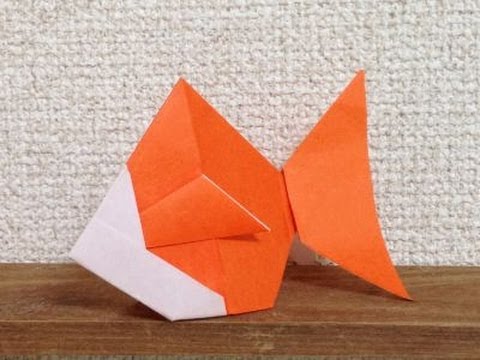
Wobbling Goldfish

This goldfish origami can be moved to recreate the gentle swaying motion of swimming.
The folding process is similar to the yakko-san, pinwheel, and trick boat models up to a certain point, so it should be easy to get started.
Every part is three-dimensional, and when you move the tail fin, it looks as if the fish is actually swimming, so you can enjoy not only making it but also playing with it.
You can also make it cute by adding eyes with round stickers or a felt-tip pen.
Be sure to give it a try!
Simple goldfish
Let’s make it with scissors! Here’s a simple goldfish craft idea.
All you need is origami paper in your favorite color and a pair of scissors.
It’s a fun activity for both kids and adults to enjoy together! The process of making a goldfish with your favorite colored origami paper and scissors is simple yet helps build concentration.
In particular, after cutting the origami, it’s important to fold carefully so you don’t tear the paper—this is a key point.
This step will help develop dexterity and focus.
The finished goldfish is adorable and fun to display!
whale shark

Let’s make a cool shark! Here are some ideas for a whale shark.
What you’ll need: blue-toned origami paper, 8 mm white round stickers, and/or a white pen.
The whale shark is known as the largest fish in the world and is characterized by its gentle nature.
Let’s try making a cool whale shark out of origami! The key point is the step where you leave small gaps at the creases to form the shape.
This is the secret to recreating the shark’s unique body shape.
Children can learn the folding techniques while creating a highly polished finished piece!
snow crab

This is a snow crab, a sea creature characterized by its large claws and unique shape.
Fold the origami into a triangle, then fold back the bottom portion to create additional creases.
Turn it over and continue folding along the creases to form steps; this will create the crab’s body.
To represent the crab’s signature large claws, layer the paper as you fold, sharpening the tips for a realistic finish.
Once you’ve shaped the claws, draw the eyes with a pen at the end to complete a cute snow crab with an expressive look.