[For Beginners] A Collection of Easy and Recommended Craft Ideas

There are many kinds of crafts—sewing fabric with a machine, doing embroidery, knitting with yarn—and it’s wonderful if you can do any of them yourself.
Still, even if you’re interested in handicrafts, many people may feel they’re difficult or think they’re too clumsy to even get started.
In this article, we’ll introduce craft ideas recommended for beginners.
We’ve gathered ideas that are easy to try, such as projects you can hand-sew simply or make using materials from 100-yen shops.
If you’ve found it hard to get started until now, please try beginning with the ideas we introduce!
- [Easy] Practical craft ideas. Great for beginners too!
- [Beginner Friendly] Easy Craft Ideas You Can Do
- [Hand Sewing] Easy crafts recommended for elementary school students. Let's handmake something cute!
- Handmade plushies with everyday items! A collection of ideas perfect for beginners
- Handmade accessory ideas that will delight the recipient! Easy DIY with everyday materials
- [Handmade] Let's Add a New Hobby! A Summary of Handicraft Types [Craft]
- Try knitting with everyday items! Easy ideas using forks and cardboard
- [Easy] Keychains made with yarn. Recommended even for beginners at handicrafts.
- [Crafts] Cute! Handmade Drawstring Pouch Idea Collection
- [Easy and Simple] Popular DIY Ideas You Can Make with Materials from 100-Yen Shops
- Easy-to-make crafts for adults. Projects recommended for beginners.
- [Let's Make It with a Sewing Machine!] Gift Ideas That Will Delight
- [For Elementary School Students] A Collection of Simple Handmade Gift Ideas
[For Beginners] A Collection of Easy Craft Ideas (1–10)
Basic scrunchie

Here’s an idea for an easy-to-make hair accessory: a scrunchie.
Prepare a piece of fabric measuring 12 cm by 55 cm and a 25 cm hair elastic.
Place the fabric horizontally, then fold it in half lengthwise with right sides together and sew along the long edge.
Now that the fabric is a loop, move the seam to the center.
Fold the front half of the loop into thirds by overlapping the top and bottom edges.
Next, with the folded section tucked inside, align and overlap the top and bottom edges of the back half of the loop.
Leave a small opening for turning, and sew all the way around the overlapped section.
Turn the fabric right side out, thread the elastic through, and close the opening to finish.
A drawstring pouch you can make by hand sewing

It can be hard to find a drawstring pouch in just the size you want, so some of you may be thinking of making one yourself.
This idea is perfect even if you don’t have a sewing machine—no zigzag stitching required, and you can make it by hand.
Prepare a rectangular piece of fabric, fold and sew the raw edges to finish them, then create a channel at the top for the cord.
After that, simply sew the bottom and both sides together.
Hand sewing takes a little more time, but even beginners can do it.
The finished pouch will be half the size of the fabric, so prepare fabric sized to the pouch you want to make.
Simple mask case

During cold and flu season or for those with hay fever, masks are indispensable.
Let’s make a mask case so you can carry your mask cleanly.
First, fold the pocket fabric in half and sew the top and bottom, then stitch it onto the center area of the outer fabric.
Place the lining fabric right sides together with the outer fabric and sew the edge opposite the flap.
On the outer fabric, make a mountain fold 5 mm below the pocket’s stitching line, and fold the seam you just sewed to the inside.
Fold the lining fabric to match the size of the outer fabric and layer them.
Leave a turning opening and sew all around, then turn the piece right side out.
Close the opening and attach a snap button to finish.
[For Beginners] A Collection of Easy and Recommended Craft Ideas (11–20)
Easy double-sided pouch you can make in 5 minutes
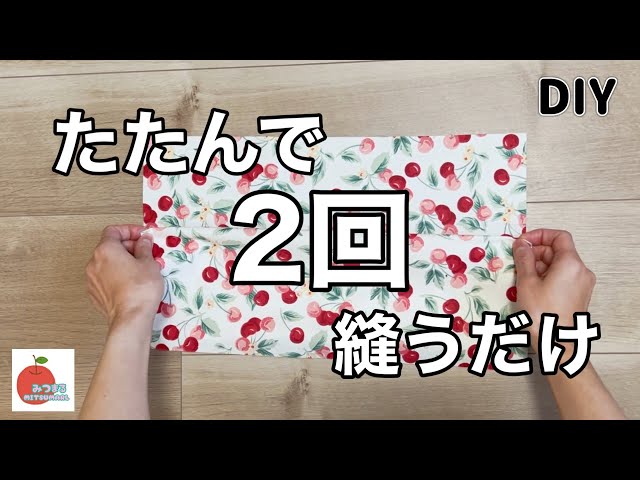
Here is a simple reversible pouch that only uses a sewing machine twice and can even be made by hand.
If you use a machine, you can finish it in about five minutes, so give it a try.
First, fold a single piece of fabric into thirds.
When folding, let one edge extend by 1 cm.
Then fold it in half, round off the bottom edge, and sew all the way around.
Once that’s done, turn it right side out and topstitch around the edge.
And just like that, it’s finished.
It has two pockets, so you can keep different items separate.
It’s very easy, so please try making it!
A shoulder bag you can make with materials from a 100-yen shop

Let’s make a cute shoulder bag using only items from the 100-yen shop.
First, layer a placemat and quilt batting and cut them.
Use the leftover placemat to make an inner pocket and tabs for attaching the strap.
After sewing the inner pocket onto the main body, match the quilt batting with the placemat lining, add boxed corners (gussets), and sew with a machine.
Attach the two tabs at this stage.
Once sewn, turn it right side out and add a snap fastener.
Attach the strap and you’re done.
It’s super cute, so give it a try!
Round drawstring pouch with lining that can be made from fabric scraps

Here is a lined drawstring pouch made from fabric scraps.
It has a round bottom, and the fact that you can hand-sew it makes it nice and easy.
To make it, first prepare two outer pieces and two lining pieces of the same size, as shown in the pattern.
For both sets, place the outer and lining fabrics right sides together and sew along the straight edge.
Open them up, then layer the two sets right sides together and sew, leaving the center unsewn.
Press the seam allowances open at the center, turn the piece right side out from that opening, and tuck the lining into the outer fabric pouch.
Sew along the top and bottom of the channel where the cord will go, thread the cord through, and you’re done.
It’s perfect for small items or as a cosmetic pouch.
Sewing beginners welcome! Headband

Here’s how to make a headband that’s easy even for sewing beginners or those not confident with a sewing machine.
First, make the elastic casing and the main piece separately, sewing each into a loop.
Press the main piece with the seam centered on the inside.
Fold the main piece down to the width of the elastic, then sew the elastic onto the main piece.
After that, thread the fabric for the elastic casing over the elastic and sew one end in place.
Do the same with the other end of the elastic, then sew the elastic casing fabric closed to finish.
If it doesn’t fit your head, try turning the joint where the elastic is connected to the inside.