For Seniors: Simple and Lovely Crafts – A Collection of Take-Home Project Ideas for Day Service


If you can take home the pieces made at day service centers and other senior facilities, you can display or use them at home, adding a little extra enjoyment to everyday life.
Many older adults also enjoy focusing on the act of making things.
So this time, we’ve gathered ideas for projects you can take home.
We’ve included practical items you can use at home, like small organizers and photo frames, as well as pieces you can simply display and enjoy!
The materials are easy to prepare, and we also make use of recyclables like empty jars.
Crafting involves using your fingertips, which can stimulate the brain and help prevent cognitive decline, while also providing a sense of accomplishment and fulfillment from creating something.
Please have fun making these projects!
- [For Seniors] Simple Handicrafts Recommended for Finger Exercise
- [For Seniors] Introducing Fun Crafts Made with Plastic Bottle Caps
- [For Seniors] Practical Crafts to Make in Day-Service Recreation: Idea Roundup
- [For Seniors] Recommended for day services! Simple and cute small craft ideas
- [For Seniors] Crafts to Enjoy with Yakult Containers: Ideas for Ornaments and Toys
- [For Seniors] Perfect for winter events! Easy craft ideas
- [For Seniors] Small craft ideas: for yourself and as gifts!
- [For Senior Daycare Centers] Ideas for Summer Take-Home Crafts
- [Day Service] Handmade Autumn Crafts: Take-Home Project Ideas
- [For Seniors] Easy and Fun! Tsumami Zaiku Craft Ideas
- Simple, Recommended Autumn Crafts for Seniors
- [Day Service] Spring Take-Home Crafts: Ideas to Warmly Brighten Your Room
- [For Seniors] Have Fun Making Things Based on Today’s Mood! Today’s Recommended Craft
For Seniors: Simple and Lovely Crafts — Day Service Take-Home Project Ideas (111–120)
Gift box with hydrangeas

Let us introduce a gift box adorned with hydrangeas—visually striking and exciting to open.
You’ll fold the box by marking guide lines on origami paper as you go.
There are some fine steps, but by imagining the finished form while you work, you’ll engage your planning skills—your executive function—which can help stimulate the brain.
After making a hydrangea using origami in the same color as the box and gluing it on, the project is complete.
Adding decorations like pearls will make it look even more elegant.
Put a small gift inside and present it—your recipient is sure to be delighted.
For Seniors: Simple and Lovely Crafts. Day Service Take-Home Project Ideas (121–130)
Fireworks Milk Carton Fan

On hot summer days, many older adults have probably fanned themselves with a hand fan.
Here’s a perfect summer craft idea: a handmade uchiwa (Japanese fan).
Using an empty milk carton, you can make a sturdy fan.
Cut the milk carton into a circle and tape a chopstick to the outer (printed) side to serve as the handle.
Then cut another circular piece from a milk carton and attach it on top with the white side facing outward.
Draw fireworks on a round piece of construction paper, stick it onto the fan, and you’re done.
The fireworks motif enhances the summery feel and will help older adults enjoy the sense of the season.
Goldfish swaying in the breeze

Let’s make a goldfish hanging ornament that’s perfect for displaying by the window.
Prepare construction paper, origami paper, masking tape, a needle and thread, glue, and scissors.
The structure of the ornament is a loop made by rolling a long, thin strip of construction paper into a ring, with a goldfish hanging inside it by a thread.
When you hang it up, you also suspend the ring with thread.
To keep it from looking too plain with just dangling thread, attach circular pieces of Japanese-patterned origami as decorative accents.
Make the goldfish out of origami using the classic method that transforms a samurai helmet (kabuto) into a goldfish.
When connecting it to the ring, pass the needle through the goldfish’s belly, but be sure to tie a secure knot in the thread before you thread it through.
It’s also a good idea to reinforce the spot on the ring where the needle goes through with masking tape for extra strength.
A fluffy, cozy pouch woven from cardboard

A fluffy, fuzzy pouch you can use for cosmetics or quick outings.
You’d never guess it was woven with cardboard.
Cut slits into both ends of a piece of cardboard and glue chopsticks to it.
Thread yarn through the slits and wrap it around the cardboard.
Using yarn attached to the chopsticks, weave over-under, over-under along the threaded yarn—similar to how you’d use a loom.
Once you’ve woven a sufficient length, cut it free from the cardboard.
Make two woven panels and tie the yarn at the ends to join them.
Turn it inside out, insert an inner pouch, add decorations, and you’re done.
Try making one with fluffy yarn!
Cushions woven from cardboard
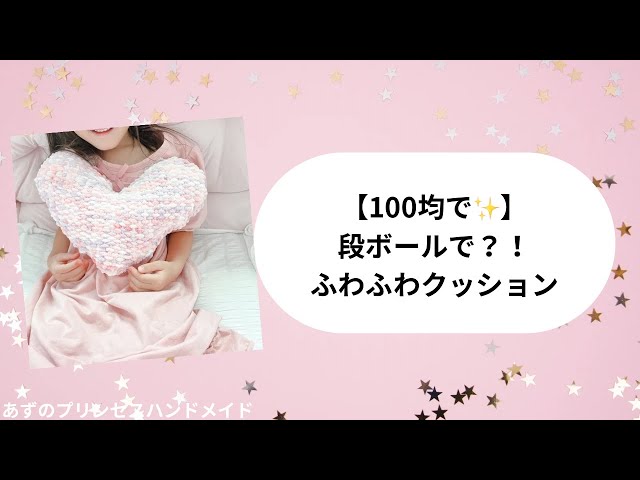
A cute cushion woven with cardboard feels nice to the touch and can be easily made with everyday materials.
Get your yarn, cardboard, chopsticks, and a comb ready.
Trace a heart shape made from construction paper onto the cardboard and cut it out.
Make small, frequent slits around the heart with scissors and hook the yarn onto them.
Next, use the chopsticks to weave the yarn so it goes over and under alternately; using a comb as you work will help the process go smoothly.
Tie off the yarn, trim it, and remove the piece from the cardboard.
Make a second heart of the same shape, stack the two together, and stitch around the edges with yarn.
Stuff generously with filling, and you’re done.
It’s a great project for parents and kids to enjoy together, so give it a try!
Woven ring bag made from cardboard
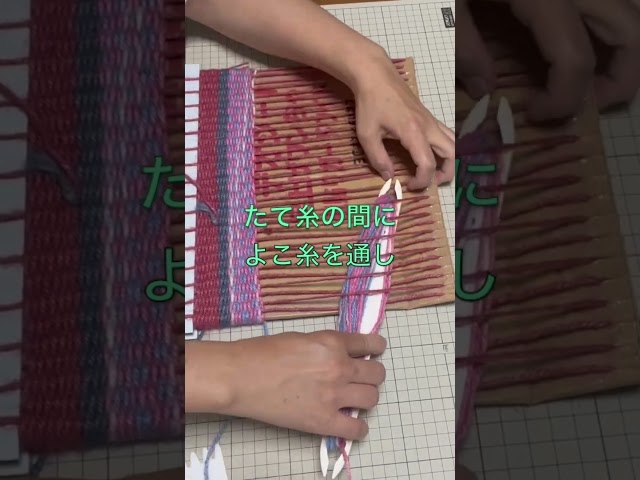
You can make a genuine hemp bag using a simple homemade loom.
Cut slits into both ends of a piece of cardboard and thread the hemp twine through.
Pass a stick wound with hemp through both the front and back sides, weaving as if using a loom.
This way, you can create a seamless, tubular piece.
Once you finish weaving, cut it free from the cardboard and tie the yarn.
Attach your preferred handles and a base for the bag, and your lovely hemp bag is complete.
It’s an easy method, but the natural finish will elevate your style when you carry this bag.
Weaving a coaster with a paper plate
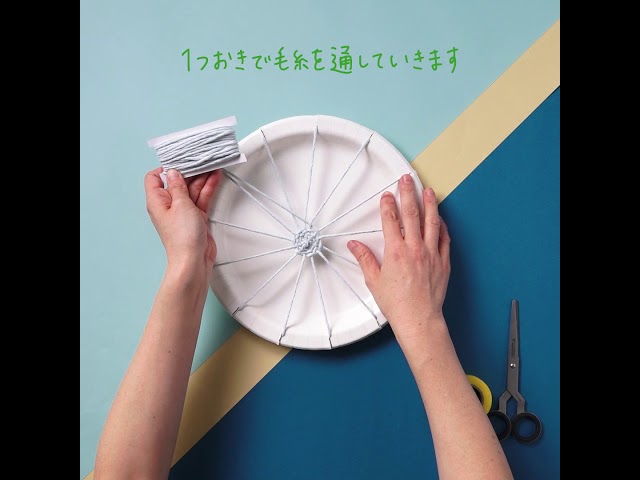
Let’s make round yarn coasters that take advantage of a paper plate’s circular shape.
Cut slits around the rim of the paper plate.
The key is to make sure the number of slits is odd.
Thread yarn from the back of the plate through a slit, then across to the slit on the opposite side.
Continue threading the yarn through all the slits, and then start weaving from the center of the plate.
With this method, you can easily make a circular coaster.
Switching yarn colors partway through will create a cute design.
Both paper plates and yarn are sold at 100-yen shops, so it’s easy to gather the materials.
It also sounds fun to make matching coasters together with your child.