For Seniors: Simple and Lovely Crafts – A Collection of Take-Home Project Ideas for Day Service


If you can take home the pieces made at day service centers and other senior facilities, you can display or use them at home, adding a little extra enjoyment to everyday life.
Many older adults also enjoy focusing on the act of making things.
So this time, we’ve gathered ideas for projects you can take home.
We’ve included practical items you can use at home, like small organizers and photo frames, as well as pieces you can simply display and enjoy!
The materials are easy to prepare, and we also make use of recyclables like empty jars.
Crafting involves using your fingertips, which can stimulate the brain and help prevent cognitive decline, while also providing a sense of accomplishment and fulfillment from creating something.
Please have fun making these projects!
- [For Seniors] Simple Handicrafts Recommended for Finger Exercise
- [For Seniors] Introducing Fun Crafts Made with Plastic Bottle Caps
- [For Seniors] Practical Crafts to Make in Day-Service Recreation: Idea Roundup
- [For Seniors] Recommended for day services! Simple and cute small craft ideas
- [For Seniors] Crafts to Enjoy with Yakult Containers: Ideas for Ornaments and Toys
- [For Seniors] Perfect for winter events! Easy craft ideas
- [For Seniors] Small craft ideas: for yourself and as gifts!
- [For Senior Daycare Centers] Ideas for Summer Take-Home Crafts
- [Day Service] Handmade Autumn Crafts: Take-Home Project Ideas
- [For Seniors] Easy and Fun! Tsumami Zaiku Craft Ideas
- Simple, Recommended Autumn Crafts for Seniors
- [Day Service] Spring Take-Home Crafts: Ideas to Warmly Brighten Your Room
- [For Seniors] Have Fun Making Things Based on Today’s Mood! Today’s Recommended Craft
[For Seniors] Simple and Lovely Crafts: Day-Service Take-Home Project Ideas (251–260)
Sunflower weaving with paper plates

We’d like to introduce a sunflower weaving craft made using a paper plate and raffia tape.
First, use parchment paper to shape a flower template, then place it over a paper plate and draw guidelines.
Cut along the lines with scissors, and paint the plate with acrylic paints in sunflower colors.
Wrap twine across the gaps between the petals, then use that as the warp and weave the raffia tape through like a loom.
You’ll end up with a colorful, summery, and cheerful sunflower.
Since it uses easily accessible materials, it’s also recommended as a recreation activity in senior care facilities.
amulet
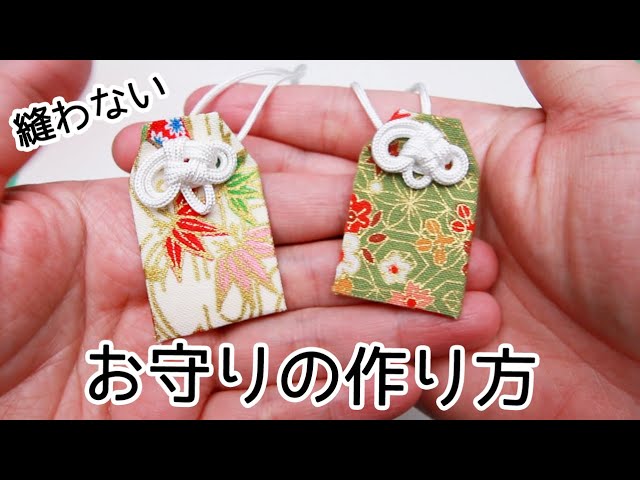
A great omamori (good-luck charm) that’s also perfect as a gift for your family.
Do you think making one by hand is too hard? Believe it or not, you can create a genuine-looking charm without any sewing! Just get some patterned printed fabric tape, which you can even find at 100-yen shops.
Cut the tape to the specified size, peel off the backing, and stick the pieces together—that’s it! The part where you tie the double musubi-knot can be a bit tricky since it’s detailed work.
Because it uses your fingertips a lot, it’s also recommended as brain training for seniors.
And of course, it’s wonderful to wear as a charm for yourself, too.
Handmade desk clock

A handmade desk clock using favorite photos, postcards, or beautiful design paper makes a warm, ideal gift for seniors living in care facilities.
By using family or grandchildren’s photos, memorable landscapes, or seasonal motifs as the clock’s background, it offers a soothing sight each time they look at it and can spark conversations.
Beyond its practicality as a clock, it also serves as interior decor, brightening up their room.
A one-of-a-kind original clock will surely become a memorable gift.
single-flower vase

A single-flower vase to display blossoms can make a nice accent in your room.
This time, we’re introducing a single-flower vase made from a flyer.
Prepare colored varnish spray, craft glue, chopsticks, double-sided tape, and an aluminum can.
Roll the flyer tightly to make a long, thin stick.
Trim the tip to adjust the length.
After making both long and short sticks, attach them to the aluminum can following the video as a guide, and secure them with string.
Attach wire so that it wraps around the second row of sticks and form a loop for hanging.
Shape it, spray with colored varnish, and it’s complete.
Simple kusudama hanging ornament

How about turning a kusudama made from flyers into a gently swaying hanging ornament? You can make a kusudama by combining 12 small pieces.
We’ve introduced an easy method in this article and on YouTube, so please take a look for reference.
Prepare a long length of lace thread and tie a large knot at the end.
Once it’s threaded through a needle, string the parts in any order you like.
Adding beads or little cranes makes it extra cute! Finish by threading everything onto a slim rod, and you’re done.
This hanging ornament, which sways with every breeze, will brighten up any room.
Please hang it up and let it soothe you.
Woven basket with a cobblestone pattern

Let’s try making a basket using the stone-paving weave by combining small cut pieces of advertisements! When you hear “stone-paving weave,” you might picture baskets made with craft bands.
In this video, we’ll take on the stone-paving weave using familiar ad flyers instead.
Fold the small cut flyers, and combine four pieces while they’re folded in half.
From there, keep adding more pieces to build the basket.
Even though the material is just paper flyers, the multiple interlocking parts create a sturdy basket.
Try making one together with everyone!
Wind chimes made from egg cartons

Eggs are something almost every household uses.
This time, we’re sharing an idea to transform an egg carton into a wind chime.
First, cut out a single-cup section of the carton.
Make a hole in the center, then decorate the rim with bead stickers or similar embellishments.
Prepare a small hanging strip (tanzaku) decorated to your liking, and thread it together with a bell; attach a pipe cleaner at the front end.
Add a bead to secure the carton, twist the pipe cleaner, and your wind chime is ready to hang anywhere.
The steps are simple, and because it uses fine motor skills, it’s perfect as a recreational activity in senior care facilities.