For Seniors: Simple and Lovely Crafts – A Collection of Take-Home Project Ideas for Day Service


If you can take home the pieces made at day service centers and other senior facilities, you can display or use them at home, adding a little extra enjoyment to everyday life.
Many older adults also enjoy focusing on the act of making things.
So this time, we’ve gathered ideas for projects you can take home.
We’ve included practical items you can use at home, like small organizers and photo frames, as well as pieces you can simply display and enjoy!
The materials are easy to prepare, and we also make use of recyclables like empty jars.
Crafting involves using your fingertips, which can stimulate the brain and help prevent cognitive decline, while also providing a sense of accomplishment and fulfillment from creating something.
Please have fun making these projects!
- [For Seniors] Simple Handicrafts Recommended for Finger Exercise
- [For Seniors] Introducing Fun Crafts Made with Plastic Bottle Caps
- [For Seniors] Practical Crafts to Make in Day-Service Recreation: Idea Roundup
- [For Seniors] Recommended for day services! Simple and cute small craft ideas
- [For Seniors] Crafts to Enjoy with Yakult Containers: Ideas for Ornaments and Toys
- [For Seniors] Perfect for winter events! Easy craft ideas
- [For Seniors] Small craft ideas: for yourself and as gifts!
- [For Senior Daycare Centers] Ideas for Summer Take-Home Crafts
- [Day Service] Handmade Autumn Crafts: Take-Home Project Ideas
- [For Seniors] Easy and Fun! Tsumami Zaiku Craft Ideas
- Simple, Recommended Autumn Crafts for Seniors
- [Day Service] Spring Take-Home Crafts: Ideas to Warmly Brighten Your Room
- [For Seniors] Have Fun Making Things Based on Today’s Mood! Today’s Recommended Craft
[For Seniors] Simple and Lovely Crafts: Day Service Take-Home Project Ideas (421–430)
A scarf on a plate stand

You can knit using a rod-style stand for holding plates upright.
Wrap the yarn around the rods on the plate stand in order.
Place the yarn over the wrapped yarn, then hook the lower yarn over it.
By repeating this, you can make a scarf.
There’s a similar method in finger knitting, so some older adults may have made one with their fingers before.
Plate stands and yarn are available at 100-yen shops, so it’s easy to get started.
Since you use your fingers a lot, it may also have brain-training benefits.
glasses

Cute glasses made with pipe cleaners, straws, and scissors are also recommended! Since you don’t need many supplies, it’s easy to get started.
Prepare four pipe cleaners and two straws, then pinch and twist the ends of each pipe cleaner.
Make two of these, then bring the ends together to form a V shape.
Twist the two V-shaped pieces together to complete the frame.
Finally, cut the straws to the length of the arms of the glasses, twist them onto the frame to attach, and you’re done!
Dress-up Hina dolls

These Hina dolls use paper cups and are fun both to make and to enjoy when finished.
When you twist the paper cup, the patterns on the Emperor’s and Empress’s kimonos change.
It’s a piece you can gift to your grandchildren or display in your room.
After cutting and coloring the paper cups, add faces, accessories, and parts to the Emperor and Empress.
On a separate paper cup, create three different kimono patterns.
Using masking tape makes this easy.
Stack the two paper cups to complete it.
The steps are simple, but the project is full of clever ideas.
Moving your fingertips while crafting and spinning the finished piece may also help stimulate the brain.
3D star-shaped trinket box

This is an adorable, star-like three-dimensional case that’s also convenient to use as a small storage container.
Beyond its beautiful appearance, a key point is how easy it is to make from a single sheet of paper by using foldbacks.
You start by folding the origami paper and making cuts with scissors to create a precise pentagon, then fold along each edge.
Next, you lift and fold along the boundaries of the edges to shape the form.
As the process continues, the folds become progressively finer, so paying attention to delicate finger movements is important.
Keep your focus on achieving a soft look and a beautiful pattern.
Simple cute umbrella

Why not try making a cute miniature umbrella using felt and wire? With different color combinations, you can enjoy your very own original design.
Cut the felt fabric into a half-circle and choose two colors to combine.
Use a glue gun to attach the pieces while creating a gentle curve, shaping them into an umbrella.
Wrap thread around a piece of wire to form the shaft, then gently bend one end to make the handle.
After attaching the felt to finish the form, add pearls or beads at the end for a charming, decorative touch.
There are many small steps, but since you won’t be using needles, you can work safely and with peace of mind.
It makes a perfect interior accent or a small gift.
Enjoy a soothing crafting time as you keep your fingers busy making an adorable little umbrella.
Simple bookmark
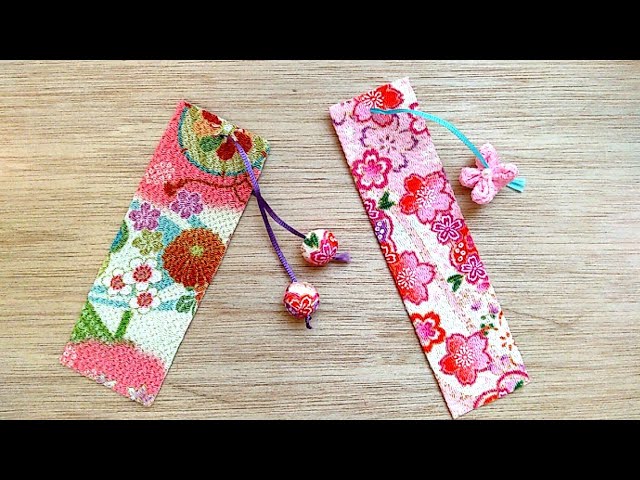
This is a bookmark craft we’d like older adults who enjoy reading to make.
Prepare chirimen fabric, apply double-sided tape to the back, and fold it in half.
Thread a string through with a needle.
It looks lovely to add decorations to the string, such as a small Styrofoam ball covered with chirimen, or other chirimen craft pieces.
Because this bookmark is easy to make, it should be approachable for older adults as well.
Having a handmade bookmark makes reading even more enjoyable.
Chirimen fabric is also available at 100-yen shops, so gathering materials is easy.
A simple rose

Here’s a felt rose you can make in five minutes.
Cut a piece of felt into a 10 cm circle, then cut it in a spiral and roll it from the outer edge to form the flower.
Make a hole to pass the stem through.
Curl the tip of a green chenille stem (pipe cleaner), apply glue, thread it through the bottom of the flower, and secure it—that’s it, you’re done in no time.
Cutting the flower’s edge in a wavy pattern gives it a different look, too.
You can use it without a stem on wreaths or flower crowns, or make many to create a bouquet—there are lots of ways to enjoy it.
It’s safe and easy, so it’s also recommended for cognitive decline prevention activities and as occupational therapy in senior care facilities.