[Christmas & New Year] Craft Ideas for Day Services in December


December is a month when you can feel the Christmas atmosphere, including through decorations at day-service centers.
Christmas, New Year’s, and other major events come one after another.
In Japan, December is written as “Shiwasu,” reflecting how bustling this time of year can be.
Older adults may also be sensing the arrival of December.
So this time, we’re introducing craft ideas for day-service centers that are perfect for December.
We’ve assembled a wide variety of projects—decorations to brighten up Christmas, pieces that boost the festive mood, and New Year’s items, too!
They’re great to make and display in your own room, and would surely delight family members as gifts.
Enjoy a wonderful December with heartfelt, handmade items!
- [For Seniors] Fun Crafts Recommended for December
- For Seniors: Auspicious Handmade Zodiac Ornament Craft Ideas
- [For Seniors] Let’s Make New Year Decorations by Hand! A Collection of Easy Ideas Using Everyday Materials
- [For Seniors] Recommended for day services! Simple and cute small craft ideas
- [For Seniors] Try Making a Handmade Christmas Wreath! A Collection of Ideas Using Everyday Materials
- For seniors: Introducing handmade decoration ideas to welcome a wonderful Christmas
- For seniors: Decorate the December wall with a tree. Easy ideas using origami and yarn.
- Christmas crafts using paper cups
- [For Seniors] Introducing Fun Crafts Made with Plastic Bottle Caps
- Easy way to make Christmas stockings
- [For Seniors] January Craft Ideas for Day Service Activities
- Take-Home Craft Ideas for Winter: Perfect for Day Services for Seniors
- [For Seniors] Recommended for Christmas Crafts! Simple Handmade Project Ideas
[Christmas & New Year] Craft Ideas for Daycare Services in December (31–40)
A Christmas garland that also works as a sun catcher
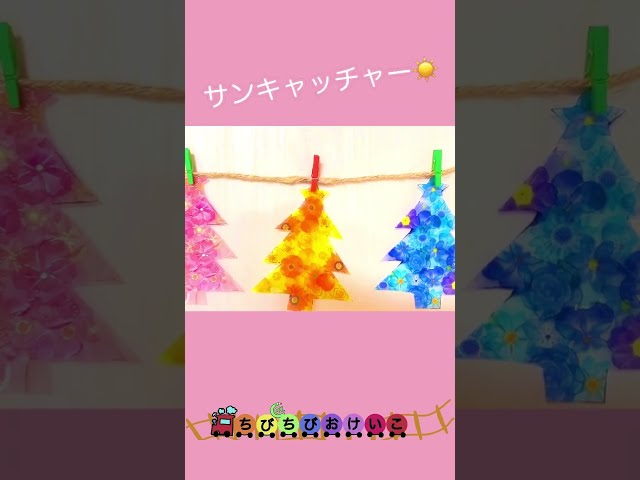
Recommended for anyone looking for an easy-to-make garland! First, draw a tree on a clear file folder and fill in the inside with your favorite stickers.
If you’d like to use it as a sun catcher, use translucent stickers.
Once the stickers are in place, cut it out in the shape of a tree and clip it together to complete your garland.
Using the same design with stickers in different colors can give you both a unified look and a festive touch.
It might also look cute to decorate the edge of the clear file with sparkly pipe cleaners.
Christmas tree using decalcomania

Fold a sheet of green construction paper in half and open it, then drop paint on only one side.
The paint will become the ornaments, so think about the colors and where you place the drops as you work.
After dropping the paint, fold it in half again to create a decalcomania— it will transfer to the other side.
Cut the construction paper into a tree shape and attach a trunk made from brown construction paper.
Finally, make a star from yellow construction paper and decorate the very top of the tree.
If you punch a hole at the top and thread a string through, it could also become a garland.
Santa made of felt

Here’s a handmade idea for a cone-shaped Santa Claus.
First, cut a piece of cardstock into a semicircle and roll it into a cone.
Cover it with felt in your favorite color, then glue a long, thin strip of white felt slightly above the center to represent the hat.
Cut out the face base and clothing pieces from felt and attach them as well.
For the beard, use yarn and a pen, creating it with a method similar to casting on stitches in knitting.
Once you’ve glued the beard around the face base, add eyes using rhinestones painted black and attach a larger bead for the nose.
Finally, add a star-shaped accent to the chest, and you’re done.
Fluffy Origami Wreath
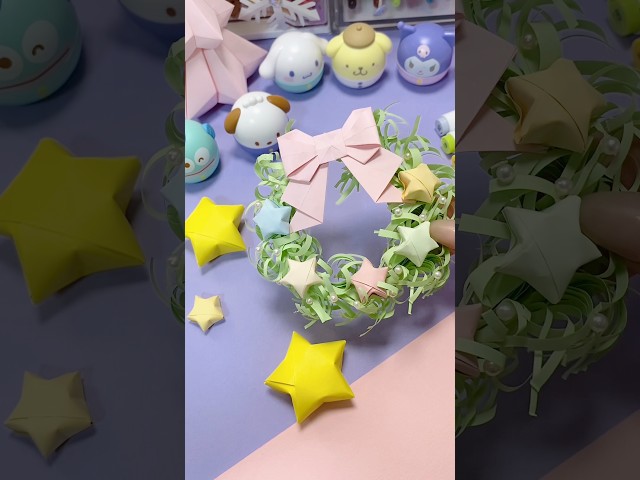
This is a Christmas decoration that’s easy to make with everyday materials.
Roll a sheet of origami paper into a long, thin stick, bend it into a circle, and you’ll have a base for a wreath.
Cut another strip of origami paper lengthwise, fringe one end finely, and wrap it around the base with double-sided tape to create a fluffy, pipe-cleaner-like texture.
Finally, add any decorations you like to finish a bright and cute wreath.
You can freely customize it with different colors and embellishments.
It’s a warm, seasonal craft that older adults can enjoy making easily.
Wall-mounted Christmas tree made from paper rolls

Let’s use toilet paper rolls to create a wall-mounted Christmas tree.
First, keeping the triangular shape of a tree in mind, lay out the rolls temporarily in rows to form tiers.
If a roll is too short or too long, cut it to size.
Once you have the triangle, glue the rolls together row by row, and attach green construction paper to the sides.
After everything is attached, secure the whole piece with tape or similar.
For the trunk, connect about three rolls and wrap them with brown yarn.
Fix the triangular section and the trunk to the wall so they connect, and finish by placing a star at the top of the tree.
Adding origami ornaments will make it look even more charming!
[Christmas & New Year] Craft Ideas for Day Service in December (41–50)
Christmas tree made with ribbons

This is a handmade tree idea that’s completed simply by sticking teardrop-shaped ribbon pieces onto a cone base made from thick paper.
To make the teardrop-shaped parts, cut ribbon to a suitable length and glue the two ends together.
When attaching the ribbon to the base, face the rounded end downward and stick them in a straight line.
If it’s hard to keep them straight, draw guide lines on the base beforehand to help with placement.
Once all the ribbons are attached, decorate the top with a star to finish! Adding small beads for extra sparkle would also look cute.
Just cut and paste. Shaka-shaka ornament.
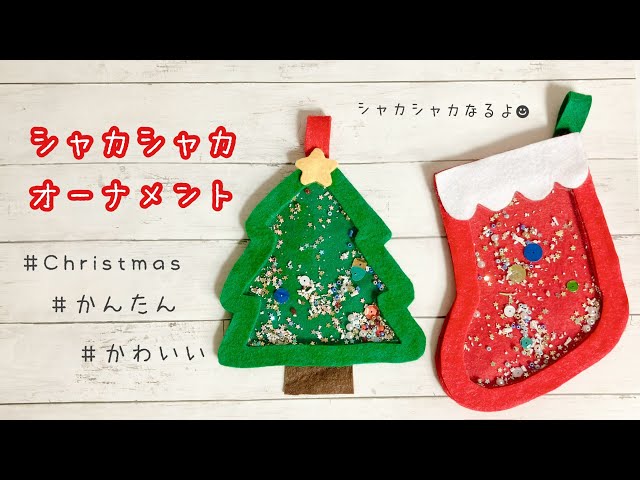
Let’s handcraft warm, felt Christmas ornaments.
First, create your favorite shapes—like a stocking or a tree—using thick paper.
Next, use this template to cut 0.3 mm plastic sheet and the felt that will serve as the ornament base.
Cut out the inside of the thick-paper template to make a frame-only template, then use that to cut three felt frames.
Glue two of the felt frames onto the felt base to add height, and place your favorite beads or sequins inside.
Glue the plastic sheet and the remaining felt piece on top, attach a hanging component, and you’re done!