[Christmas & New Year] Craft Ideas for Day Services in December


December is a month when you can feel the Christmas atmosphere, including through decorations at day-service centers.
Christmas, New Year’s, and other major events come one after another.
In Japan, December is written as “Shiwasu,” reflecting how bustling this time of year can be.
Older adults may also be sensing the arrival of December.
So this time, we’re introducing craft ideas for day-service centers that are perfect for December.
We’ve assembled a wide variety of projects—decorations to brighten up Christmas, pieces that boost the festive mood, and New Year’s items, too!
They’re great to make and display in your own room, and would surely delight family members as gifts.
Enjoy a wonderful December with heartfelt, handmade items!
- [For Seniors] Fun Crafts Recommended for December
- For Seniors: Auspicious Handmade Zodiac Ornament Craft Ideas
- [For Seniors] Let’s Make New Year Decorations by Hand! A Collection of Easy Ideas Using Everyday Materials
- [For Seniors] Recommended for day services! Simple and cute small craft ideas
- [For Seniors] Try Making a Handmade Christmas Wreath! A Collection of Ideas Using Everyday Materials
- For seniors: Introducing handmade decoration ideas to welcome a wonderful Christmas
- For seniors: Decorate the December wall with a tree. Easy ideas using origami and yarn.
- Christmas crafts using paper cups
- [For Seniors] Introducing Fun Crafts Made with Plastic Bottle Caps
- Easy way to make Christmas stockings
- [For Seniors] January Craft Ideas for Day Service Activities
- Take-Home Craft Ideas for Winter: Perfect for Day Services for Seniors
- [For Seniors] Recommended for Christmas Crafts! Simple Handmade Project Ideas
[Christmas & New Year] Craft Ideas for Day Service in December (41–50)
Papercut Tree

Fold a sheet of green construction paper in half and draw the shape of half a tree.
Cut along the line with scissors and open it up so it becomes a full tree shape.
Once it’s cut, keep it folded and make slits starting from the folded edge.
Cut parallel to the base, being careful not to cut off the outer edge.
To make all the folds into mountain folds, open the slit sections alternately to the left and right.
Decorate with a star made from yellow construction paper, and add round stickers to represent ornaments—then it’s done.
There are also instructions for making snowflakes, so why not make some to decorate together?
Easy wreath made from a single sheet of origami paper

There are various ways to make wreaths out of origami.
You can create a cute wreath with just a single sheet.
From a 15-centimeter square sheet of origami paper, cut it into nine pieces measuring 5 centimeters each.
Set one piece aside, and fold the remaining pieces into the parts for the wreath.
The trick is to make four pieces with the colored side facing outward and the other four with the white side facing outward.
Once the parts are finished, assemble them into the wreath.
Fold and cut the remaining piece to make a ribbon and decorate the wreath with it.
You can also enjoy customizing it by adding round or star-shaped stickers.
It’s a project that older adults can enjoy making while chatting with those around them.
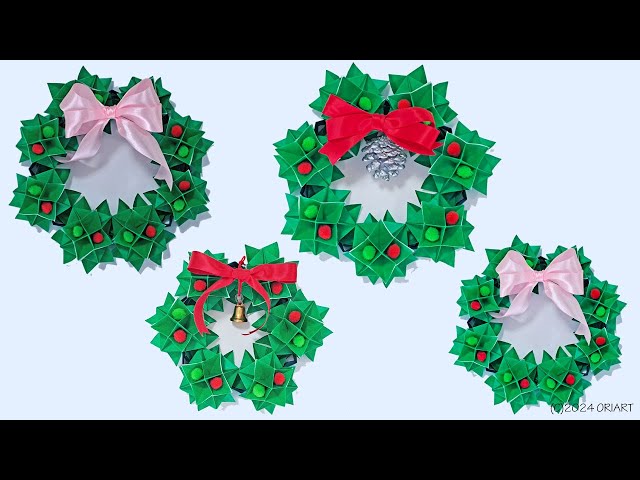
A voluminous Christmas wreath made with origami

Origami that can be done while seated is an easy, accessible recreation.
Many older adults may be quite skilled at it.
A Christmas wreath made by combining flower-shaped origami pieces has a delicate feel.
Some seniors might feel inspired to say, “I want to try making that.” Because it’s made by assembling small parts from smaller origami paper, it involves a lot of fine hand movements.
It seems likely to stimulate the brain even more than regular origami crafts.
It’s also a lovely wreath project that can spark conversation as you chat with those around you while making it.
Santa stuck in a chimney

How about making a Santa Claus decoration trying to climb down a chimney to deliver presents? It’s a humorous piece that will surely make you chuckle and feel delighted every time you see it.
All you need are a toilet paper roll, colored construction paper, a pen, scissors, and glue.
First, draw a chimney pattern on brown construction paper with a white pen and paste it onto a slightly flattened toilet paper roll.
Next, use red, white, and black construction paper to create Santa’s lower half.
Once Santa is ready, glue him upside down on top of the chimney.
Finish by adding snow pieces and a white sack to the chimney.
3D Origami: Easy Christmas Wreath
This is a wreath made from parts assembled using five sheets of origami.
A distinctive feature is that you can connect as many of the parts as you like to make the wreath.
Why not try making one in a size that suits seniors’ preferences, whether large or small? Origami pieces may seem fragile, but parts made by layering five sheets create a sturdy, three-dimensional result.
Add decorations like ribbons, pinecones, or craft pompoms to complete an even more impressive wreath.
Three-dimensional tree
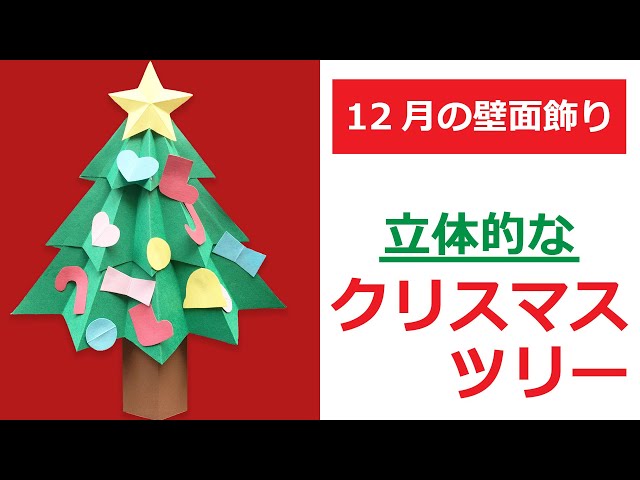
Here’s an idea for a paper tree that uses folds to create a three-dimensional finish.
First, cut the tree’s foliage, trunk, and ornament parts from construction paper; you can download the templates and use those.
For symmetrical parts, place the template on folded construction paper and cut them together to save time.
For the tree and star parts, add folds at the designated points to give them a 3D look.
Attach the folded foliage pieces to the tree base in tiers, then glue on the trunk and star.
Finally, decorate with the ornament parts to complete the project.
Paint play: easy Christmas wreath
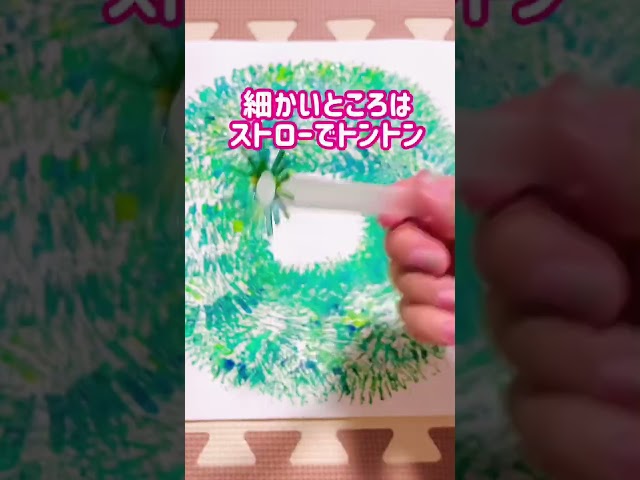
If you get creative, even scrap materials can transform into crafting tools.
I think toilet paper rolls are one of the most common scraps from daily life.
Cut narrow slits into one end of a toilet paper roll.
Spread the slits out like a dandelion flower and apply paint.
Then press it onto drawing paper with a gentle dabbing motion so it makes ring shapes.
You can do the same with a straw: cut slits, dab it in paint, and press—this lets you color finer details as well.
Once it looks like a wreath, attach craft embellishments with wood glue to finish.
With this unique method, older adults are likely to get absorbed and enjoy working on the project.