For seniors: Year-round ideas for wall decorations


Wall decorations that brighten up the walls of senior care facilities.
Many facilities likely include them as part of craft-based recreation.
While seasonal wall art that lets residents feel the time of year is lovely even when spending time indoors, pieces that seniors can make at their own pace—and that can be used year-round regardless of season—have their own special appeal.
So this time, we’re sharing ideas for “wall decorations you can use all year round.”
Craft recreation helps stimulate the brain by using the fingers, and it also sparks conversation with other residents, promoting communication.
Be sure to try out the ideas introduced here!
- [For Seniors] Recommended Wall Decorations and Crafts for January
- [For Seniors] Lovely Decorations Made with Construction Paper: Ideas to Brighten Up Your Room
- [For Seniors] Heartwarming and Cozy: Perfect Wall Decoration Ideas for Winter in Care Facilities
- Recommended winter wall decorations for seniors: heartwarming ideas
- For Seniors: Auspicious Handmade Zodiac Ornament Craft Ideas
- [For Seniors] Recommended Wall Decorations for December: Ideas Collection
- Useful in care facilities! Ideas for autumn wall decorations
- Wall decoration ideas for seniors recommended for September
- [For Seniors] Ideas for Winter Wall Decorations and Hanging Ornaments: Introducing Projects That Are Easy to Try
- [For Seniors] Color Your Care Facility’s Spring: Wall Decoration Ideas
- Simple, Recommended Autumn Crafts for Seniors
- [Respect for the Aged Day] Mural decorations to brighten the celebration. Simple handmade ideas to try
- [For Seniors] August Wall Decoration Idea Collection
[For Seniors] Year-Round Use! Wall Decoration Ideas (11–20)
Paper collage on hanshi (Japanese calligraphy paper)

A beautiful collage wall decoration made with colored calligraphy paper.
Use watercolor paints or similar to color the paper vibrantly.
Once it’s completely dry, cut it into small leaf shapes.
Draw a tree trunk on a backing sheet, apply glue to the leaves you made, and stick them on to complete a vivid collage.
If you color the paper mainly in red and cut it into maple shapes, it becomes a perfect decoration for the autumn foliage season! If using scissors is difficult, you can tear the paper by hand, like a torn-paper collage, and it will still turn out lovely.
mascot doll

Let’s add a mascot doll with a gentle, cute face that warms the heart to your wall decorations.
You can make it using colored construction paper and lace paper doilies.
First, prepare a sheet of colored paper that’s slightly larger than the lace doily, and stick the doily on top.
Fold it in half and cut; use one half for the body, and shape the other half into a cone for the hat.
After gluing the two together, attach the face and draw in the facial features.
The arms can be adjusted to various angles, making this a doll that’s easy to use for many scenes and events.
Origami rainbow hot air balloon

How about making a large rainbow-colored hot air balloon wall decoration using a classic craft: paper chain garlands made from origami? Create the chains in seven colors and paste them onto a sheet of colored construction paper cut into a balloon shape.
A big balloon will catch the eye, and the seven-color rainbow will make for a cheerful wall display.
In addition to the balloon, you can add softly floating clouds and cute little birds, or even place a doll riding in the balloon.
Making lots of small balloons would also create an impressive wall decoration.
Spherical felt garland

How about a cute garland made of felt spheres? The method is simple, and it’s great that all you really need is a hot glue gun.
First, cut the felt into circles, fold each one in half, and glue the fold with the hot glue gun.
Next, take three of the resulting felt half-circles and glue them together along the folded edges to form a hemisphere.
Finally, sandwich the string for the garland between two hemispheres and glue them together to finish.
Enjoy choosing colors and arranging them in an order that matches the atmosphere of the space where you plan to display the garland.
bouquet

This colorful and cute bouquet motif is easy to use as a decorative element.
Make the flowers and the wrapping paper in different colors to create a sense of depth through contrast and layering.
Trimming each part with scissors is also an important step, and it’s a great idea to use the offcuts to decorate the flowers or the wrapping paper.
Not only should you choose your colors carefully, but also make good use of both sides of the origami paper to create a vibrant bouquet.
It could also be fun to design it so the wrapping opens up and can be used as a message card.
Paper ball made with origami

Paper balls made from origami are very easy to make.
First, fold the origami paper in half, then fold it in half again.
Next, cut them into circles.
You can use a compass to make the circles, or trace around a cup or an empty can.
Fold each circle in half and glue the halves together.
The number of pieces you use will change the look of the ball, so try making it with the amount you like.
If you thread twine through the center as you assemble it, it will turn into a string of balls like a hanging decoration.
It also works great as event decor.
For Seniors: Year-Round Wall Decoration Ideas (21–30)
minogame (a mythic turtle with a long tail of algae in Japanese folklore)
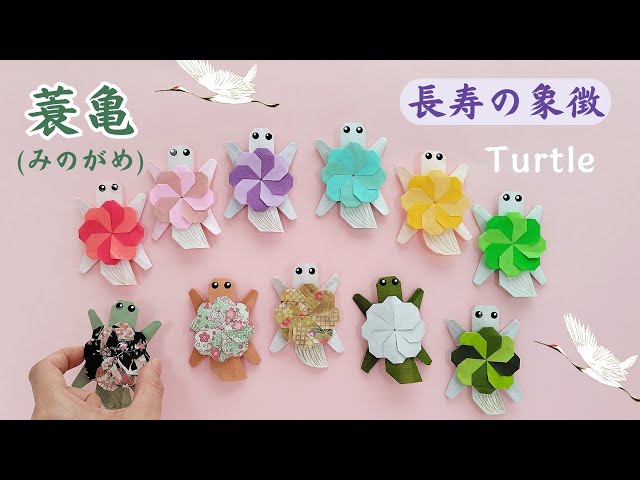
A minogame turtle with algae growing on its shell.
Because it lives long enough for algae to grow, it’s also a symbol of longevity.
Let’s make this minogame in colorful origami.
Prepare four sheets of origami paper—two each in different colors.
Cut all the origami into rectangles and fold them into long, narrow strips.
Fold each one into a shape like a musical note, then combine them to form the turtle’s shell.
Next, use the leftover ends to make the turtle’s head, legs, and tail, and draw on the eyes to finish.
Make lots of minogame turtles in various colors and display them!