[For Seniors] Simple and Fun: Craft Ideas You Can Make with Everyday Items


What we introduce here are easy craft ideas for older adults.
They’re all easy to incorporate into recreational activities at senior facilities such as day service centers.
Using familiar, everyday materials, these crafts are simple to make, making it easy for seniors to give them a try.
We hope you’ll use craft-making to help stimulate both mind and body.
Since it involves using the hands, it also serves as brain training and can help prevent dementia.
Be sure to read this article and use it as a reference for craft activities.
- [For Seniors] A Collection of Craft Ideas Using Paper Cups
- [For Seniors] Recommended for day services! Simple and cute small craft ideas
- For Seniors: Simple and Lovely Crafts – A Collection of Take-Home Project Ideas for Day Service
- [For Seniors] Simple Handicrafts Recommended for Finger Exercise
- [For Seniors] Lovely Crafts Made with Tissue Paper: Ideas Collection
- [For Seniors] Have Fun Making Things Based on Today’s Mood! Today’s Recommended Craft
- [For Seniors] DIY Rehabilitation Aids: A Collection of Easy-to-Make Ideas
- [For Seniors] Easy and Fun! Tsumami Zaiku Craft Ideas
- Simple, Recommended Autumn Crafts for Seniors
- [For Seniors] Easy Construction Paper Crafts Activity
- [For Seniors] Day-service activities also recommended! Craft ideas for November
- [For Seniors] Practical Crafts to Make in Day-Service Recreation: Idea Roundup
- [For Seniors] Fun to Make, Soothing to Display! Snowman Craft Ideas
[For Seniors] Easy and Fun: Craft Ideas You Can Make with Everyday Items (21–30)
A simple rose

Here’s a felt rose you can make in five minutes.
Cut a piece of felt into a 10 cm circle, then cut it in a spiral and roll it from the outer edge to form the flower.
Make a hole to pass the stem through.
Curl the tip of a green chenille stem (pipe cleaner), apply glue, thread it through the bottom of the flower, and secure it—that’s it, you’re done in no time.
Cutting the flower’s edge in a wavy pattern gives it a different look, too.
You can use it without a stem on wreaths or flower crowns, or make many to create a bouquet—there are lots of ways to enjoy it.
It’s safe and easy, so it’s also recommended for cognitive decline prevention activities and as occupational therapy in senior care facilities.
Medicine calendar

How about a reusable, calendar-style pill case? Create a grid on a piece of cardstock like a calendar, with space for 31 days, and attach pockets to each space.
Make the pockets by cutting a clear plastic file folder into small pieces, and prepare small sachets for the pills using tracing paper or similar.
Glue all the clear-file pockets onto every space in the grid on the cardstock.
For the tracing-paper sachets, add the dates and attach them with clips so you can move them when the month changes and reuse the calendar for the next month.
Finally, assign the month and the days of the week at the top of the cardstock with the pockets, and you’re done! Using colored cardstock or decorating the pockets with colorful washi tape will give it a fun, pop look that makes it enjoyable to use.
small accessory case

Why not turn unwanted items into a handy little organizer? All you need to prepare is one tissue box and two sheets each of two different kinds of origami paper.
First, peel off the film in the center.
Next, from the hole in the middle, draw lines toward the corners to mark cutting guides.
Use scissors to cut along those lines.
Apply double-sided tape to the back, and attach the pieces while shaping them.
Once you’ve formed a box that opens and closes, stick on the origami paper you prepared earlier and decorate to finish.
Imagining the shape as you work stimulates the brain, and since you’ll use your fingertips a lot, it may also help prevent cognitive decline.
kimono charm
@kipara_craft Kimono amulets you can make without sewing ✨ The method is almost the same as the “Kimono Pochi-bukuro” I posted before 👘💓 Unlike the amulets you buy at a shrine, these might not carry blessings from the deities 😂, but the feeling of “Mom made this while thinking of me” will surely come through… 👦🏻👧🏻 ✔ Starting preschool/advancing a grade ✔ Recitals ✔ Moving house Perfect for the start of something new or little milestones ✨ Materials ▶ Precut fabric: made with 10 cm × 10 cm in the video ▶ Chiffon ribbon / Seria JAN: 4542804132472 ▶ Ribbon embellishment / Seria JAN: 4900662746253 ▶ Adhesive felt stickers ▶ Clear file folder ▶ Ball chain or strap ▶ Double-sided tape (fabric tape if possible👌) ▶ Glue or hot glue gun (for attaching parts) How to make 1) Fold two edges by 2 cm. 2) On the edges folded in step 1, stick 1 cm-wide white felt on the outside. 3) Fold back so the white felt shows. 4) Turn over and place a backing made from the corner of a clear file in the center. 5) Overlap and fold the top and bottom, slightly offset from the center. 6) Fold both sides left → right. 7) Wrap a ribbon as an obi and decorate 🎀 8) Punch a hole, thread the ball chain, and you’re done 👏 Save this and give it a try 🥰💕︎#StayHomeTime#100-yen shop DIY#AffordableSeriaHandmade
♬ Flowers – SoundAudio
Prepare a square piece of fabric and fold up two adjacent edges by 2 cm.
Then attach a collar-like self-adhesive felt to the lower 1 cm and double-sided tape to the upper 1 cm, and fold it back so that the self-adhesive felt is slightly visible.
This part will be the overlap of the kimono.
Turn the fabric over so that the overlapped section is on top, and place a clear file with your wish paper inserted in the center.
First fold the top and bottom corners, then fold the left and right corners starting from the left.
Once everything is securely adhered, attach a ribbon obi at the center and on the back.
Finally, decorate with your favorite parts and add a ball chain to finish!
A case that opens wide

A practical upcycling idea that makes great use of an empty plastic wrap box.
Its wide-opening design makes the contents easy to see and access smoothly.
You can make it with everyday materials, and the simple method of just gluing fabric on is also appealing.
Even those who aren’t confident in sewing can try it with ease.
The finished piece hardly looks like an empty box and is perfect for storing stationery and small items.
The look changes dramatically depending on the fabric pattern, so you can enjoy a personalized touch.
Since the steps are simple, I felt it’s a great idea for a summer vacation craft or a parent-child DIY project.
Book cover

Why not make your reading time more enjoyable by using your favorite small fabric accessories? By making use of tenugui you can find at local shops, you can easily create an original book cover.
Since there’s no sewing involved, it’s appealing even for those who aren’t confident in their sewing skills.
With a bit of creativity in how you fold and secure it, you can adapt it to books of various sizes.
Its light, airy texture makes it easy to carry and keeps it from taking up space in your bag.
Wrapped in a pattern that feels like you, I felt that your reading moments become even more special.
pencil case
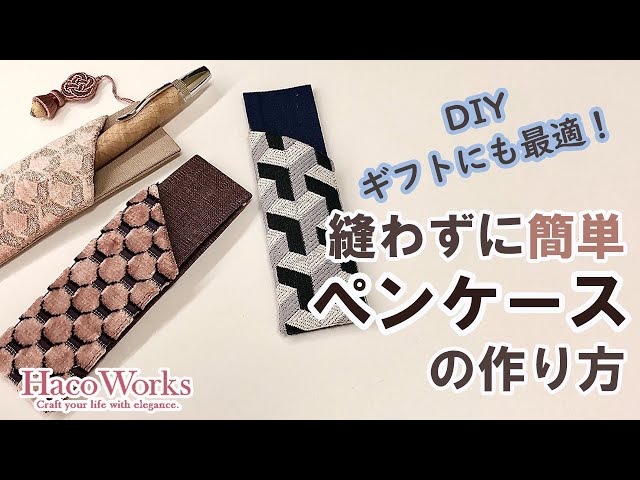
Introducing a pen case you can make just by gluing! Attach cardboard to the base fabric, then layer and adhere the pocket fabric on top.
The pocket has a slanted opening for a striking look.
Add a small decoration for a nice accent—perfect for gifts.
Basically, you just cut the fabric with scissors and glue it together, so you can complete a fabric accessory with a fun, craft-like feel.
Use solid fabric for the base and patterned fabric for the pocket to create a simple yet stylish piece.