[For Seniors] Recommended for Craft Activities! Cute Paper Clay Projects

Craft activities to prevent dementia and slow its progression.
Many facilities incorporate craft activities that require dexterous use of the fingers while thinking through the creation process.
Here, we present ideas for cute paper-clay projects.
Paper clay, which is shaped with a little water, hardens as it dries.
Even after it hardens, it remains light and is a familiar material for older adults.
The adorable finished pieces can be taken home and displayed for added enjoyment!
Participants are also likely to feel a sense of accomplishment from creating something themselves.
Please use these ideas as a reference to help you make wonderful creations.
- For Seniors: Simple and Lovely Crafts – A Collection of Take-Home Project Ideas for Day Service
- [For Seniors] Crafts to Enjoy with Yakult Containers: Ideas for Ornaments and Toys
- [For Seniors] Lovely Crafts Made with Tissue Paper: Ideas Collection
- For seniors: Recommended for day services. Hands-on activities that help prevent dementia.
- [For Seniors] Styrofoam Craft Ideas: Simple and Recommended
- [For Seniors] Simple and Fun: Craft Ideas You Can Make with Everyday Items
- [For Seniors] Recycle Everyday Materials: A Collection of Flyer Craft Ideas
- [For Seniors] Add Color to Your Room: A Collection of Flower Craft Ideas
- [For Seniors] Day-service activities also recommended! Craft ideas for November
- [For Seniors] Easy Construction Paper Crafts Activity
- [For Seniors] A Collection of Craft Ideas Using Paper Cups
- Recommended for seniors: Cute rabbit craft ideas
- [For Seniors] Get Started Easily: Simple Handicraft Kit Ideas
[For Seniors] Recommended for Craft Activities! Cute Paper Clay Projects (1–10)
Photo frame with paper clay flowers

Let’s make a cute photo frame decorated with flowers made from paper clay! For the base of the frame, you can use an existing photo frame, or we also recommend cutting a clear file folder to photo size and using that.
If you use colored paper clay, there’s no need to paint—easy and convenient! You can shape each flower one by one, but an easy method is to roll the clay into small balls and snip cuts into them to create petals, so give that a try.
Attach the flowers around the photo frame with glue, and you’re done! How about enjoying it by putting in a photo taken with friends at a care facility or a picture of your grandchildren?
cat strap

This is a cat-shaped strap made with paper clay.
The big advantages are that the material is light, easy to form, and allows for free design.
First, press the paper clay into a chocolate mold to create the cat shape.
The mold will give you indentations for the facial features, but if you plan to design the face later, it’s recommended to fill those in and make the surface flat.
Once you have the cat’s outline, let it dry, then paint the patterns and facial features with paints, and attach the strap to finish.
Add your own expressions and patterns to give it originality and aim for a cute cat strap.
Adding parts like a tail could be fun, too.
small accessory case

A small accessory box made from paper clay is a wonderful craft activity that draws out the creativity of older adults.
Lightweight and easy to handle, paper clay can be shaped freely with a bit of water, so seniors can enjoy working with it at their own pace.
The finished pieces reflect each person’s life experience and sensibilities, giving them a unique and deeply appealing character.
Displaying the piece in a room and seeing it every day can bring a sense of accomplishment and joy.
Why not make a keepsake-filled accessory box together with an older loved one and enjoy a fulfilling time?
[For Seniors] Recommended for Craft Activities! Cute Paper Clay Creations (11–20)
teddy bear
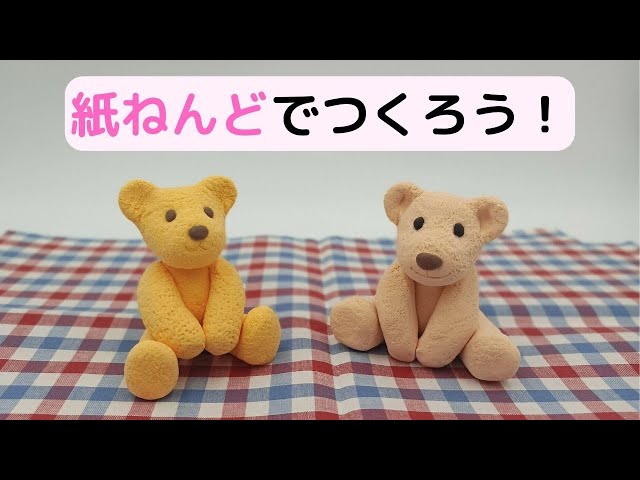
How about making a cute teddy bear that’s perfect for everyday soothing? It’s easier if you use pre-colored air-dry clay, but if you’re using white clay, mix in paint beforehand to tint it.
Since it’s hard to sculpt everything from head to body out of one piece, it’s recommended to form separate parts—head, body, arms, and legs—and then glue them together.
Add the eyes and nose afterward as well.
If you gently dab the entire surface with a scrub brush, you can recreate the teddy bear’s soft, fluffy texture, so be sure to try that.
aroma stone

Aroma stones that fill your room with a lovely scent.
Let’s make gift-ready aroma stones using paper clay! Use cookie cutters or silicone molds to create your favorite shapes.
Of course, you can also skip the molds and sculpt your own shape from scratch.
It’s also recommended to add patterns with tools like spatulas or stamps.
Once you’ve shaped them and the paper clay has dried, they’re done! After that, just add a few drops of your favorite essential oil.
You can even find essential oils at 100-yen shops.
ornament

Let’s make ornaments that can add a little decoration to your room and also hang on a Christmas tree! First, shape air-dry clay into any design you like, about 1 cm thick.
You can also use a spatula or similar tool to add patterns at this stage.
Once the shape is done, insert a piece of wire for hanging or make a hole for a ribbon.
After the clay has dried, use watercolor paints or water-based markers to add color and patterns.
When you’re finished decorating, thread a ribbon through the ones designed for it, and you’re done! Hang them in various places to instantly brighten up your room.
Easy! Bento

Let’s make a paper-clay bento that’s perfect as a play kitchen set for your grandchild! Shape your favorite bento items like rice balls, rolled omelets, and octopus sausages, then paint them.
You can also make the bento box itself out of paper clay, or use a store-bought one—either is fine.
For coloring, if you want a wide area to be a single color, it’s best to mix the color into the clay before shaping.
For finer details, it’s recommended to paint after the paper clay has dried.
Create a colorful bento and enjoy a mini cooking experience!