![[For seniors] A handmade calendar you’ll want to make in February](https://i.ytimg.com/vi_webp/tJeTtU-n1rs/maxresdefault.webp)

How about making a handmade calendar together with older adults, instead of just looking at the usual one every day? By making it yourself, you’ll feel more attached to it, and it will bring you joy each time you see it.
We introduce various types of calendars—wall-mounted, desktop, and tear-off daily styles—so why not start with an easy one? Some include messages on each day’s page or use photos.
Turning the page might become a daily pleasure! Use this article as a reference and enjoy a fun crafting time.
- For Seniors: Wall Decorations to Brighten Up February — Festive Ideas for Setsubun, Valentine’s Day, Plum Blossoms, and More
- [For Seniors] Make Every Day Fun! A Collection of Handmade Tear-off Calendars
- [For Day Service Centers] February Craft Ideas: Decorations for Setsubun, Valentine’s Day, and the Feeling of Spring
- [For Seniors] Fun February Crafts: Ideas Inspired by Setsubun, Valentine’s Day, and Other Events
- [For Seniors] Have Fun Making Things Based on Today’s Mood! Today’s Recommended Craft
- [For Seniors] Making a March Calendar: Introducing Spring-Themed Motifs and Arrangements
- [For Seniors] February Wall Decorations: Setsubun-Themed! Fun Ideas with Oni Demons and Ehomaki Sushi Rolls
- [For Seniors] Heartwarming Handmade New Year’s Cards: Fun Ideas Using Everyday Materials
- For seniors: Year-round ideas for wall decorations
- [For Seniors] Make an April Calendar: Fun Ideas to Brighten Your Mood
- [For Seniors] Recommended Wall Decorations and Crafts for January
- For Seniors: Recommended Wall Decoration Ideas for March
- [For Seniors] Gift It to Someone Special: A Collection of Handmade Birthday Card Ideas
[For Seniors] Want to Make in February! Handmade Calendar (1–10)
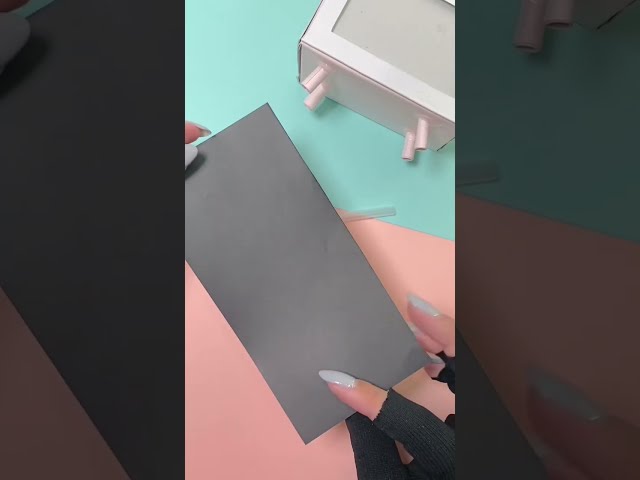
Retro-cute! TV-shaped calendar
In the 1950s (Showa 30s), black-and-white televisions made their debut.
Black-and-white TVs even came to replace housecleaning as one of the so-called “three sacred treasures” of the time.
Some older folks may remember going to a neighbor’s house just to watch TV when they first bought one.
Here’s a retro, TV-shaped calendar that lets you reminisce about those days.
Make a rectangular box and attach legs to the bottom.
Then, insert a one-month calendar you’ve drawn on construction paper into the “screen” area of the TV, and it’s complete.
If you make one, it can even serve as a perpetual calendar you can use forever.
book-style desk calendar

Let me introduce a very stylish, book-style desktop calendar.
Use origami cardstock and your favorite colors and patterns of origami paper to make the cover.
Attach origami paper to the inside as well, and add an inner pocket to create a neat, finished cover.
Use six sheets of origami paper to make the calendar pages.
You can buy origami in various colors and patterns at 100-yen shops, so create it with any look you like! Fix the pages you made to the cover, attach the calendar stickers, and you’re done.
This cute, palm-sized handmade calendar is adorable and is sure to be a hit with seniors too.
Please use it as a reference!
A calendar made with plastic bottle caps

Here’s a fun calendar that uses plastic bottle caps.
Prepare 31 bottle caps and write the numbers 1 through 31 on them.
The caps will represent the dates on your calendar.
Also prepare a base large enough to hold up to 31 caps, and insert thumbtacks into it.
After placing the thumbtacks, write the month and the days of the week.
Then, arrange the caps on the tacks according to the month, and it’s complete.
By changing the month, the days of the week, and the positions of the caps, you can use the calendar for a long time.
Placing the bottle caps onto the thumbtacks also serves as finger exercises for older adults and can help stimulate brain activity.
perpetual calendar

As the year draws to a close, some older adults may be thinking, “What should I do about next year’s calendar?” In times like that, how about a perpetual calendar you can use year after year? Perpetual calendars come in various forms, such as ones with cards or cube blocks to change the date and day of the week, or versions where each month corresponds to a set of dates.
They also come in a variety of materials, from wood to acrylic, but you can easily make one yourself using items from 100-yen shops.
It’s lovely to add photos or cards with messages to your perpetual calendar.
Since it also works as decor, it’s nice to display what you’ve made in your room.
Cherry blossoms and Mount Fuji

Let’s try making a handmade calendar with construction paper! Paste a calendar with dates onto construction paper in your favorite color.
You can write directly on the calendar with a pen, or staff can prepare one in advance using a computer.
It’s easy to add a Mount Fuji illustration like in this video, but if you’re good at drawing, please draw it yourself! You’ll end up with a wonderful, original piece.
Finally, add cherry blossoms made from tissue paper, and it’s complete! Create a bright, seasonal piece full of charm.
A snowman made with an eraser stamp
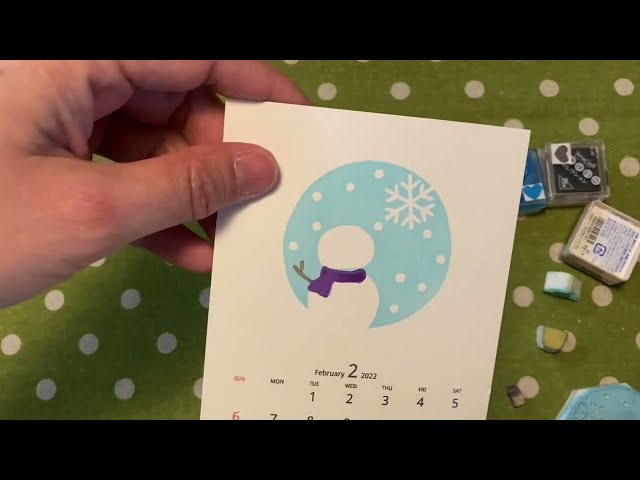
Why not try making a handmade February calendar using eraser stamps? If the staff prepare the eraser stamps in advance, the craft can proceed smoothly.
Of course, it’s also great to have dexterous seniors make them.
Let’s decorate a calendar with the dates already printed using the eraser stamps.
Stamps with cute motifs like snowmen, scarves, and hearts are lovely.
When stamping, press down with even pressure across the whole stamp for a clean finish.
Once the main design is done, use a round stamp to add a snowy effect.
Give this adorable handmade calendar made with eraser stamps a try!
Perpetual calendar made from a milk carton

Here’s an introduction to making a perpetual calendar out of milk cartons.
Milk cartons are usually made of thick paper and often come in a rectangular shape.
Using that characteristic, we’ll create a cube-shaped perpetual calendar.
Cut and fold the milk cartons so they form perfect squares.
Paste construction paper on the sides, and attach a sheet with the month written on it.
Using the same method, make cubes for the days of the week and the dates, then combine them to complete the calendar.
Changing the cubes every day might be enjoyable for older adults as well.
Some seniors may experience difficulties recognizing the correct date, time, or season.
By updating the calendar daily, it can help them stay aware of the date.