[For Seniors] Simple Handicrafts Recommended for Finger Exercise


Are there any seniors who are worried about losing dexterity in their hands?
Handicrafts that you can enjoy while doing them are attracting attention as a wonderful hobby that keeps your fingers moving.
“Looks difficult…” “I’m clumsy with my hands…” You don’t need to worry about that at all.
In recent years, easy-to-use materials like fabric adhesives and felt have become widely available.
Even without needles or thread, you can create lovely pieces just by cutting and gluing.
Why not enjoy exercising your fingers while making one-of-a-kind handmade creations?
This time, we’ll share plenty of easy craft ideas that even older adults can start with confidence.
And of course, we’ve also prepared more elaborate projects for those who are skilled at crafts!
- For Seniors: Simple and Lovely Crafts – A Collection of Take-Home Project Ideas for Day Service
- [For Seniors] Ideal for Finger Rehabilitation: A Collection of Simple Ideas Made with Yarn
- For Seniors: Needle-Free Crafts. A Safe and Easy Collection of No-Sew Project Ideas
- [For Seniors] Small craft ideas: for yourself and as gifts!
- [For Seniors] Recommended Handmade Activities! Simple Ideas
- For Seniors: Easy, No-Sew! Felt Craft Ideas
- [For Seniors] Amazing Scrap Fabric Hacks! Easy Handmade Small Item Ideas
- For Seniors: Auspicious Handmade Zodiac Ornament Craft Ideas
- [For Seniors] Get Started Easily: Simple Handicraft Kit Ideas
- [For Seniors] Recommended for day services! Simple and cute small craft ideas
- [For Seniors] Enjoy Your Alone Time: Perfect Ideas for Passing the Time
- [For Seniors] DIY Hand Rehabilitation Tools to Strengthen Fingertips: A Collection of Handmade Ideas
- [For Seniors] Practical Crafts to Make in Day-Service Recreation: Idea Roundup
[For seniors] Recommended easy handicrafts that help exercise the fingertips (11–20)
Mini Cube Basket

An idea for a no-sew accessory case made using strong double-sided tape and fusible interfacing.
It explains in detail how to apply the fabric and interfacing, allowing you to nail the basics and achieve a neat finish.
The appeal is that you can create a three-dimensional shape without using needles or a sewing machine.
The cute, plump cube shape is great for organizing your desk area or shelves.
Adding a leather strap with hardware further elevates the design.
I felt it was a highly satisfying DIY idea that combines practicality with good looks.
drawstring pouch

Using the stick-type fabric glue “Sewing Meister” makes it easy to try even without a sewing machine, needles, or thread.
Although bonding takes about 24 hours, it adheres firmly and is said to be washable.
Since there’s no sewing, the process is simple, making it approachable for those who aren’t confident in sewing.
The materials are easy to source—just some fabric, cord, and fabric glue.
Choose a favorite fabric and it’s perfect not only for everyday use but also as a small gift.
I felt this is a practical, handmade idea that you can tackle with ease.
cloth dish

A fabric dish that’s finished simply by folding and shaping the cloth is a handmade idea you can enjoy casually.
Since you don’t use needles or thread, there’s little prep or hassle, and you can make one as soon as the mood strikes—that’s the appeal.
The steps are simple, making it approachable for a wide range of ages.
It’s plenty practical too, serving as a catchall, a snack tray, or an accessory dish.
If you choose a type that can be flattened when not in use, storage is no problem.
Made with your favorite fabric, it becomes an easy, fun project that also adds a nice accent to your interior.
A friendship bracelet made of cardboard

Here’s how to make a friendship bracelet using cardboard and yarn.
Prepare a piece of cardboard and mark it using a compass and a ruler.
Cut slits along the marks.
Once you have your yarn ready, weave it through the slits as you braid.
When it reaches the desired length, remove it from the cardboard, tie it off, and trim any excess yarn to finish.
Because you use cardboard, it avoids excessive strain and lets you work your fingertips moderately, making it safe and comfortable for older adults as well.
It’s also said that the colors of friendship bracelets carry meanings.
Why not make one as a gift for someone special?
Tissue cover without a box

It’s an appealing idea piece that stands out for how easy it is to make without sewing tools.
By using the fabric adhesive “Sewing Tools” in stick form, you can achieve a secure finish without stitching, which is reassuring.
The steps are simple—just cut the fabric and stick it together—so it feels approachable even for first-timers.
Being machine-washable is another welcome plus.
It’s practical, yet customizable with your favorite fabrics, so you can enjoy an original design that matches your interior.
The materials are affordable and easy to gather, making this a highly recommended, low-effort handmade project.
pencil case
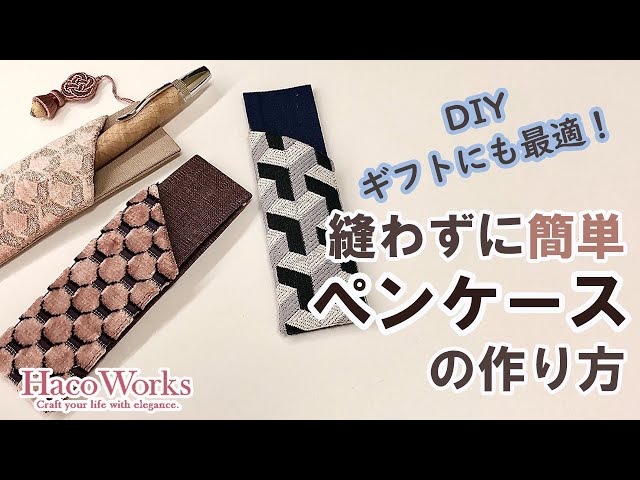
Introducing a pen case you can make just by gluing! Attach cardboard to the base fabric, then layer and adhere the pocket fabric on top.
The pocket has a slanted opening for a striking look.
Add a small decoration for a nice accent—perfect for gifts.
Basically, you just cut the fabric with scissors and glue it together, so you can complete a fabric accessory with a fun, craft-like feel.
Use solid fabric for the base and patterned fabric for the pocket to create a simple yet stylish piece.
[For Seniors] Recommended Simple Crafts That Exercise Your Fingers (21–30)
Lily of the valley corsage

I made a lily-of-the-valley corsage, which is in season from April to June.
Thread beads onto wire to form the core.
Cut white felt into a circle, make six slits, round the corners, and trim the tips.
Cut a slit in the center, thread the wire through, and then attach the felt to the beads.
Adjust the size as you glue to create bud and flower pieces.
Bundle them so they don’t overlap and secure with tape.
It looks neat if you arrange them like a triangle with the top as the apex.
Tape on a corsage pin, attach felt leaves, wrap with ribbon, and you’re done.
It also creates a spring-like atmosphere as interior decor or a wall ornament.
Give it a try!