[For Seniors] Simple Handicrafts Recommended for Finger Exercise


Are there any seniors who are worried about losing dexterity in their hands?
Handicrafts that you can enjoy while doing them are attracting attention as a wonderful hobby that keeps your fingers moving.
“Looks difficult…” “I’m clumsy with my hands…” You don’t need to worry about that at all.
In recent years, easy-to-use materials like fabric adhesives and felt have become widely available.
Even without needles or thread, you can create lovely pieces just by cutting and gluing.
Why not enjoy exercising your fingers while making one-of-a-kind handmade creations?
This time, we’ll share plenty of easy craft ideas that even older adults can start with confidence.
And of course, we’ve also prepared more elaborate projects for those who are skilled at crafts!
- For Seniors: Simple and Lovely Crafts – A Collection of Take-Home Project Ideas for Day Service
- [For Seniors] Ideal for Finger Rehabilitation: A Collection of Simple Ideas Made with Yarn
- For Seniors: Needle-Free Crafts. A Safe and Easy Collection of No-Sew Project Ideas
- [For Seniors] Small craft ideas: for yourself and as gifts!
- [For Seniors] Recommended Handmade Activities! Simple Ideas
- For Seniors: Easy, No-Sew! Felt Craft Ideas
- [For Seniors] Amazing Scrap Fabric Hacks! Easy Handmade Small Item Ideas
- For Seniors: Auspicious Handmade Zodiac Ornament Craft Ideas
- [For Seniors] Get Started Easily: Simple Handicraft Kit Ideas
- [For Seniors] Recommended for day services! Simple and cute small craft ideas
- [For Seniors] Enjoy Your Alone Time: Perfect Ideas for Passing the Time
- [For Seniors] DIY Hand Rehabilitation Tools to Strengthen Fingertips: A Collection of Handmade Ideas
- [For Seniors] Practical Crafts to Make in Day-Service Recreation: Idea Roundup
[For Seniors] Recommended Simple Handicrafts That Exercise the Fingers (41–50)
A basket woven from hemp twine

Compared to a while ago, 100-yen shops have increased.
From handy gadgets and clever items to relaxing goods, you can’t help but reach out and end up buying things you don’t even need.
So here’s a lovely mini basket made from materials sold at 100-yen shops: paper cups and jute twine.
To make it, just cut the paper cup into strips and weave the jute twine through them.
If you’re an older person who enjoys knitting, you’ll probably breeze through the steps.
It does involve detailed work, so it can take quite a bit of time.
You might enjoy splitting it up over several days and working on it at your own pace.
A scarf woven from milk cartons

With an empty milk carton and some disposable chopsticks, you can make a knitted scarf.
Cut several chopsticks in half and attach them to the milk carton.
Now you’ve got a simple loom.
You can also use thin black bobby pins instead of chopsticks, but the chopsticks are easier to knit with.
By threading the yarn through the chopsticks in sequence, you can knit, so even young children can make a project.
As the knitting progresses and the scarf grows longer and longer, kids will probably get excited watching it.
When you’re finished, add yarn pom-poms to complete a cute scarf.
Woven mats and vase doilies made from cardboard
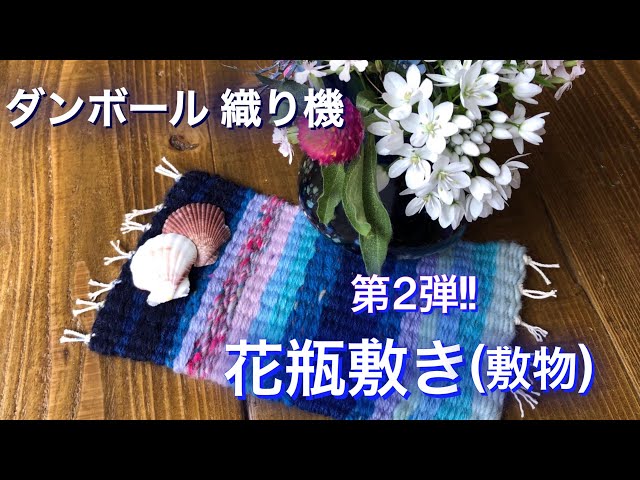
It’s fun to make knitted items with a handmade loom, isn’t it? Your child will probably enjoy creating projects with excitement, too.
You can make a cardboard loom by cutting slits in two edges of a piece of cardboard and attaching chopsticks.
Thread twine through the slits, and use two colored markers to dye the yarn alternately.
Attach the yarn to a toothpick and start weaving, passing it over and under the twine of the same color—that’s the trick.
It also looks lovely to change the yarn colors for a gradient effect.
Try making it with your favorite colors of yarn.
Tie off the twine at the edges and you’ll have a finished mat or a vase coaster.
Macaron keychain made with 100-yen shop materials

Here’s how to make a cute, round macaron keychain.
Prepare cover buttons, a tassel, fabric, Edo braided cord, jump rings, keychain hardware, and adhesive.
Place the fabric into the cap, set the button, and press it in with the setter to make a cover button.
After making two, bend the loop on the back of the buttons, apply adhesive, and stick the two buttons together.
Attach the Edo braided cord to the clasp of the joined buttons, threading it through the button’s jump ring partway and wrapping it around as you go.
Thread the tassel onto a jump ring, then likewise thread it onto the Edo braided cord and continue wrapping.
Secure everything firmly with adhesive, check the overall balance, and you’re done.
towel rabbit

The towel bunny has a fluffy feel, just like a stuffed animal.
Its design is so clever that it might look difficult, but it’s actually easy to make by hand.
All you need are items you can find at a 100-yen shop, like a towel, rubber bands, tape, and colored paper.
The key to a good finish is shaping the bunny’s form with the towel.
Since you use your fingers during this step, it can also help with rehabilitation for older adults.
Once you’ve created the shape, all that’s left is to decorate it cutely.
Have fun making it together!
Finger-knitted acrylic scrubber

Finger-knitted acrylic scrubbies are an easy craft idea that uses readily available acrylic yarn.
Their soft feel and colorful look make them appealing, and they’re also highly practical—they clean well and dry quickly.
Since the process involves hooking the yarn with your fingers as you knit, it’s perfect for finger exercises, and the fine motor movements can even provide brain-training benefits.
By experimenting with colors and shapes, you can create your own unique designs, and sharing the finished pieces with one another can turn the activity into a great opportunity for communication.
plastic bottle holder

Staying hydrated is very important not only for children but also for older adults! Many people carry a plastic bottle so they can have a drink anytime.
In those situations, a bottle holder is highly recommended.
Amazingly, you can make one easily using only craft glue—no needles or thread at all! After cutting the fabric to fit the size of your bottle, apply craft glue where you would normally sew and stick the pieces of fabric together.
Since it needs to dry thoroughly, clip the glued areas while drying.
The glued sections tend to stiffen nicely, so you’ll end up with a sturdy bottle holder!