[For Seniors] Let’s Make New Year Decorations by Hand! A Collection of Easy Ideas Using Everyday Materials


How about a craft activity where you hand-make decorations to brighten up the New Year? We’ll share ideas for easy-to-try ornaments using familiar materials—auspicious motifs like senryō (coralberry), the pine-bamboo-plum trio, Mount Fuji, and sea bream.
You can crumple lots of tissue paper, accordion-fold origami, or press clay onto cardboard—great fine-motor exercises, too.
If everyone divides up the tasks and works together, the conversation will flow and smiles will abound.
Once the decorations are finished and hung on the wall, they’ll fill the space with a festive New Year’s atmosphere.
Enjoy a fun crafting time while sending your wishes into the coming year!
- For Seniors: Auspicious Handmade Zodiac Ornament Craft Ideas
- [For Seniors] Recommended Wall Decorations and Crafts for January
- [For Seniors] January Craft Ideas: Boost Your Luck with New Year Decorations and Good-Luck Charms
- [For Seniors] Try Making Your Own Kadomatsu! A roundup of ideas using origami, felt, and yarn
- Lucky Daruma: Craft ideas for decorating January wall displays for seniors
- [For Seniors] January Craft Ideas for Day Service Activities
- [For Seniors] Decorate your January wall with rabbits! Packed with ideas like snowball fights, New Year’s festivities, and rice cake pounding
- Recommended winter wall decorations for seniors: heartwarming ideas
- [For Seniors] Brighten Up Your New Year’s Party: A Collection of Handmade Decoration Ideas
- [For Seniors] Perfect for winter events! Easy craft ideas
- For seniors: Decorate the December wall with a tree. Easy ideas using origami and yarn.
- [For Seniors] Easy Origami Recommended for Winter
- For seniors: Snowman crafts to brighten January wall displays—fun ideas using origami, paper plates, and papercutting.
[For Seniors] Let’s Make New Year’s Decorations by Hand! A Collection of Easy Ideas Using Everyday Materials (11–20)
Simple tissue paper shimenawa wreath

Shimenawa are often displayed as New Year approaches to ward off evil spirits and indicate a place to welcome the gods.
Prepare four sheets of crepe paper and glue the edges together.
Place folded tissue paper inside and roll it up to wrap it, which will give the shimenawa some thickness.
Twist it as you shape it into a loop.
For the mizuhiki cords, form loops in both large and small sizes, balancing their proportions as you go.
Make an Edo-uchi cord and attach the flowers, and it’s complete.
Create a handmade shimenawa and welcome a festive New Year.
Plum blossom decoration
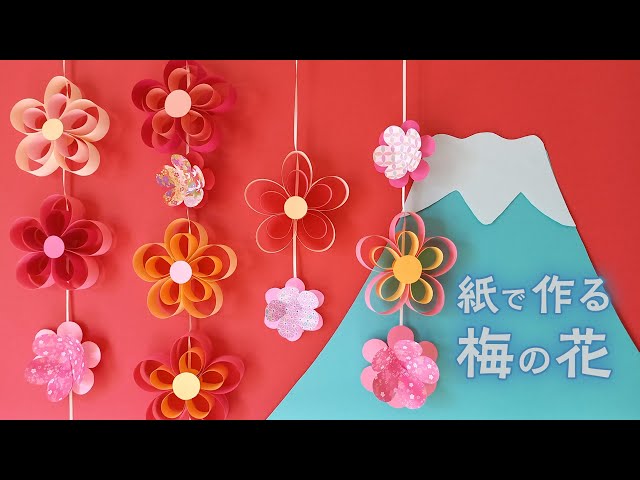
These plum blossom decorations will instantly brighten up your room when displayed on walls or by windows.
They’re easy to make with paper, so older adults can enjoy the activity as well.
One version uses two strips of paper of different lengths stacked together, shaped into petals, stapled, and then combined to form a plum blossom.
The other version uses two pieces of paper cut into petal shapes, layered to create the blossom.
You can mix these two types to make a hanging decoration, or display them individually anywhere you like, such as on walls—either way, they’ll look lovely! You can freely customize them by changing materials and sizes, so why not give it a try?
A small New Year’s pine decoration at the mallNEW!

Pipe cleaners are also great for New Year’s decorations.
Let’s make pine, bamboo, and plum—auspicious plants for the New Year—and add them to a kadomatsu.
You create them by wrapping and curling the pipe cleaners.
While making these lucky New Year items, older adults can enjoy themselves and get plenty of fine-motor movement, too.
As you work, you might recall past New Year’s and year-end memories with family and have lively conversations.
A kadomatsu made with fluffy pipe cleaners gives off a cozy, heartwarming feel.
It could make a lovely interior decoration as well.
Folding fans and paper fans

Fans that spread out in an auspicious, widening shape are popular as lucky charms and gifts.
How about making and displaying such fans together with paper fans? The process for both fans and paper fans is the same: fold them in an accordion.
For the fan, before you start folding, attach a strip of paper down the center to represent the ribs.
Prepare two accordion-folded pieces each for both the fan and the paper fan, and glue them together.
For the fan, open it into a shape close to a half-circle.
For the paper fan, open it all the way around into a full circle, glue the ends together, and it’s done.
Attach a string and hang them up for display!
Kadomatsu made of origami

How about making kadomatsu out of origami as part of your New Year’s decorations? It takes a bit of time, but you don’t need any difficult techniques, so give it a try! The pine, bamboo, and plum motifs, the fan, and even the kadomatsu base—everything is made from origami.
Because there’s lots of detailed work, it’s perfect for finger dexterity training for seniors and for helping prevent cognitive decline.
If smaller origami paper is hard to work with, feel free to adapt the project by using larger sheets.
Japanese-style hanging decoration for New Year

As a slightly more intricate craft idea, here’s a New Year’s Japanese-style hanging decoration.
This one uses origami to make yakko-dako kites and cranes.
A yakko-dako is a kite shaped like a person in a kimono with arms outstretched—you often see them around New Year’s.
You can also try making other Japanese motifs in origami, such as plum blossoms and folding fans.
If the fine work involved in making the yakko-dako is difficult, prepare the parts in advance and provide support as needed.
Create the pieces with origami, cut small parts with a craft knife, arrange them, and you’re done.
Hang it in your room to enjoy the look of them flying.
[For Seniors] Let’s Make New Year Decorations by Hand! A Collection of Easy Ideas Using Everyday Materials (21–30)
Shimenawa wreath decoration

Let’s use paper cord from the 100-yen shop to make a shimenawa wreath decoration! Unlike store-bought items, it will have a handmade feel that you’ll grow attached to.
Spread out the paper cords to form a bundle and twist it clockwise, then twist that bundle counterclockwise.
Next, prepare another length twisted clockwise and wrap it around the first bundle.
Finally, shape it into a wreath and you’re done! Add plum blossoms, mizuhiki cords, folding fans, and more to create a wreath brimming with originality.