[For Seniors] Let’s Make New Year Decorations by Hand! A Collection of Easy Ideas Using Everyday Materials


How about a craft activity where you hand-make decorations to brighten up the New Year? We’ll share ideas for easy-to-try ornaments using familiar materials—auspicious motifs like senryō (coralberry), the pine-bamboo-plum trio, Mount Fuji, and sea bream.
You can crumple lots of tissue paper, accordion-fold origami, or press clay onto cardboard—great fine-motor exercises, too.
If everyone divides up the tasks and works together, the conversation will flow and smiles will abound.
Once the decorations are finished and hung on the wall, they’ll fill the space with a festive New Year’s atmosphere.
Enjoy a fun crafting time while sending your wishes into the coming year!
- For Seniors: Auspicious Handmade Zodiac Ornament Craft Ideas
- [For Seniors] Recommended Wall Decorations and Crafts for January
- [For Seniors] January Craft Ideas: Boost Your Luck with New Year Decorations and Good-Luck Charms
- [For Seniors] Try Making Your Own Kadomatsu! A roundup of ideas using origami, felt, and yarn
- Lucky Daruma: Craft ideas for decorating January wall displays for seniors
- [For Seniors] January Craft Ideas for Day Service Activities
- [For Seniors] Decorate your January wall with rabbits! Packed with ideas like snowball fights, New Year’s festivities, and rice cake pounding
- Recommended winter wall decorations for seniors: heartwarming ideas
- [For Seniors] Brighten Up Your New Year’s Party: A Collection of Handmade Decoration Ideas
- [For Seniors] Perfect for winter events! Easy craft ideas
- For seniors: Decorate the December wall with a tree. Easy ideas using origami and yarn.
- [For Seniors] Easy Origami Recommended for Winter
- For seniors: Snowman crafts to brighten January wall displays—fun ideas using origami, paper plates, and papercutting.
[For Seniors] Let’s Make New Year Decorations by Hand! A Collection of Easy Ideas Using Everyday Materials (21–30)
ritual arrow (hamaya)

Hama-ya (ritual arrows) are said to keep you safe for the year when displayed facing that year’s unlucky direction.
They might seem difficult to make, but they’re surprisingly easy! Fold a white rectangular sheet of paper in half, cut the top and bottom off at an angle, and snip fine cuts to create the feathers.
Make a small split at the top of a paper straw to fit the feathers, and wrap a thin strip of red origami paper around part of the straw.
Finally, set the feathers in place, and you’ve got a hama-ya made entirely of paper! It’s a perfect New Year’s craft that lets you display a lucky charm without having to visit a shrine.
Mini kadomatsu made with straws
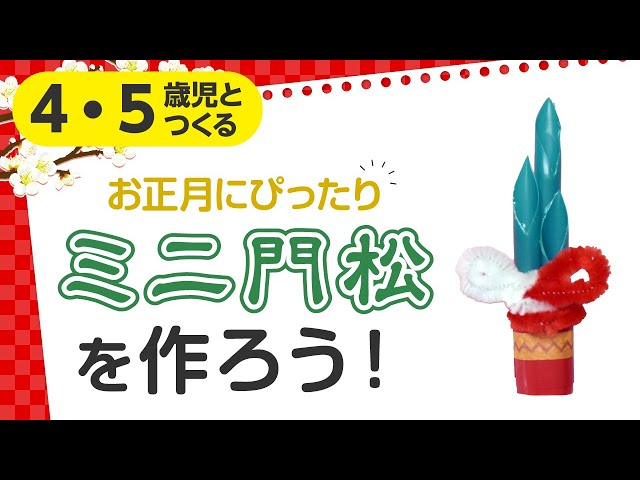
This is an easy New Year’s decoration you can make with everyday materials.
Since it uses pipe cleaners, straws, and tape, there’s no need to prepare special tools or supplies, and anyone can try it with ease.
By treating the straws as bamboo and wrapping pine and ornaments with pipe cleaners, you can create a three-dimensional, festive kadomatsu.
Because everything is secured with tape, there’s less stress during assembly, making it reassuring for beginners at crafts.
You can also enjoy playing with color combinations and shapes during the process, allowing you to finish a one-of-a-kind kadomatsu of your own.
Add handmade warmth and festivity as you welcome the New Year.
Origami kadomatsu (New Year’s pine decoration)

Kadomatsu made by folding origami can be used in various ways, such as attaching them to wreaths or calendars you’ve crafted.
Let’s use our fingers and hands a lot as we make them.
Not only does it help train fine motor skills, but it can also be expected to have brain-training benefits.
Many people probably create kadomatsu pieces toward the end of the year.
If you make them while chatting with older adults about how they used to spend New Year’s, the conversation will likely liven up.
Seniors may enjoy reminiscing and share many stories.
It’s also recommended to mount them on backing paper to make cards or to display them on the wall.
[No-Sew] Handmade Kadomatsu Decoration with Felt
![[No-Sew] Handmade Kadomatsu Decoration with Felt](https://i.ytimg.com/vi/M1N7WajLPm8/sddefault.jpg)
Creations made from felt convey warmth through the nature of the material.
Even a New Year’s decoration like a kadomatsu, which is often associated with the chill of the season, can feel cozy when made from felt.
You might think felt crafts require sewing with needles or a sewing machine, but you can make them without sewing.
Instead of stitching, you attach the felt using a hot glue gun.
While handling a glue gun does require care, it seems accessible for many older adults to participate in making these.
The result is an adorable kadomatsu that would be perfect to display at home, and it would surely be appreciated as a gift for family as well.
Kadomatsu Sand Art

Let’s try making a kadomatsu (New Year’s pine decoration) using sand art with colorful sand.
By layering several colors of sand in a glass, you can create sand art with a uniquely personal style.
The choice of sand colors, as well as the layers and patterns you form with the sand, will enhance the originality of each piece.
It seems like each older adult can finish a creation that reflects their own ideas.
The sand, glass, and kadomatsu decorations used for sand art can all be sourced from items sold at 100-yen shops.
Since many of the materials pose minimal risk of injury, please consider this as a reference for making wonderful kadomatsu together with older adults.
Pine, bamboo, and plum made from tissue paper

These are decorations of pine, bamboo, and plum made with tissue paper.
Each piece is simple, but arranged together like this, they make the wall look very festive.
The parts aren’t too difficult to make, either.
For the pine, fold the tissue paper in an accordion, fold it in half, cut off two corners, tie the crease with a pipe cleaner to form the branch, then make slits and fan it open to finish.
For the bamboo, fold the tissue paper into a rectangle, fold the left edge up to meet the top edge twice, unfold one layer back, twist the remaining right section, attach it to the folded part, and shape it.
This makes one bamboo leaf; make three and attach them together.
For the plum blossoms, accordion-fold the tissue paper, round both ends, and cut the center (along the folded side) into a triangle.
Then bundle it together with a wire along with the stamen piece made by cutting slits with shredding scissors, and peel apart the tissue layers one by one to shape the plum blossom.
Shichifuku Daruma (Seven Lucky Gods Daruma)

Perfect for New Year party wall decorations! How about making Seven-Lucky Daruma dolls? In this idea, you create the daruma pattern by folding a rectangular sheet of construction paper and making slits along the creases.
The remaining opposite section becomes the daruma’s face—attach a white paper base there and draw the expression with a pen.
The slit sections pop out in 3D, so they really catch the eye when displayed on the wall.
Be sure to make a variety of colorful Seven-Lucky Daruma and decorate them together with New Year-themed elements like plum blossoms.