For Seniors: Simple and Fun Hina Matsuri Crafts—An Idea Collection Using Various Materials

As Hinamatsuri approaches, you might feel like adding a touch of springtime brightness to your room.
That’s why we recommend easy Hinamatsuri crafts you can enjoy casually.
We’ll share ideas for items like hanging ornaments and tabletop decorations that you can make using various materials such as felt and pompoms.
Many of them can be finished without sewing, letting you savor the seasonal tradition while keeping your hands busy—a delightful bonus.
Once you display your finished pieces, the space will instantly feel brighter.
Be sure to enjoy some conversation together as you try your hand at crafts brimming with the colors of spring.
- For seniors: Heartwarming and cozy. Recommended handmade Hina dolls
- [Day Service] Excited for Hinamatsuri! Craft ideas to brighten up your room
- [For Seniors] Brighten Up Hinamatsuri: Wall Decoration Ideas
- [For Seniors] Easy and Fun! Tsumami Zaiku Craft Ideas
- [Day Service] Setsubun decorations that bring smiles. Ideas for enjoying them with a variety of materials.
- For Seniors: Recommended Wall Decoration Ideas for March
- [For Seniors] Lovely Crafts Made with Tissue Paper: Ideas Collection
- [For Seniors] Liven Up Setsubun Crafts! Handmade Ideas Using a Variety of Materials
- [For Seniors] Fun to Make, Soothing to Display! Snowman Craft Ideas
- [For Seniors] Have Fun Making Things Based on Today’s Mood! Today’s Recommended Craft
- [For Seniors] Origami Crafts to Brighten Hinamatsuri: A Collection of Decorative, Festive Ideas
- For Seniors: Wall Decorations to Brighten Up February — Festive Ideas for Setsubun, Valentine’s Day, Plum Blossoms, and More
- [For Seniors] February Wall Decorations: Setsubun-Themed! Fun Ideas with Oni Demons and Ehomaki Sushi Rolls
For Seniors: Easy and Fun Hina Matsuri Crafts. A Collection of Ideas Using Various Materials (81–90)
Hina dolls made with toilet paper rolls and origami

This craft uses toilet paper rolls that you might otherwise throw away to make Hina dolls.
It requires very few materials, so if you’re looking for a Hinamatsuri craft, definitely give it a try! The basic method is simply to decorate cut toilet paper rolls with origami or Japanese-patterned paper.
Rounding the corners of the rolls gives them a cute look! You can also make the kimono sleeves three-dimensional to add a touch of elegance.
Since this is a highly flexible craft, try creating your own original Hina dolls!
Wall-mounted Hina doll decoration
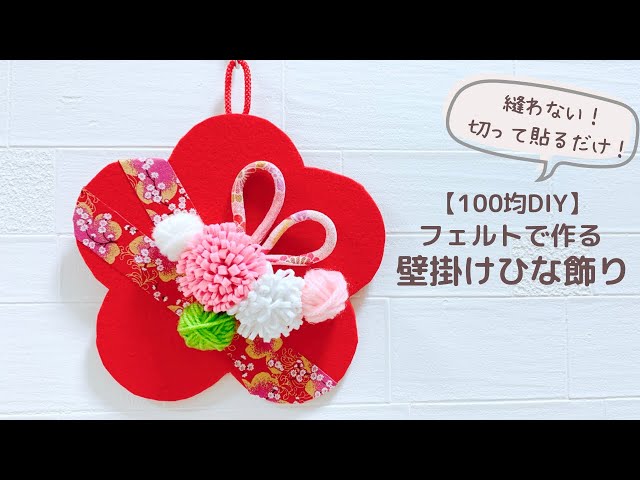
You might think that crafts using fabric are difficult because of the sewing, right? This project is perfect for seniors’ craft recreation because it’s completed simply by cutting and gluing—no sewing required.
Fold a white sheet of paper in half to mark the center, then use a compass to draw a circle.
This circle will become the flower template.
Use thick felt to make the flower base.
Roll some yarn around a balled-up tissue to make a yarn pom-pom, create felt flowers, and then decorate them onto the base.
Adding washi-patterned fabric tape or string makes it even more charming! Please enjoy trying out lots of different variations.
The Emperor Doll and the Empress Doll in Origami

Let’s try folding a cute set of Hina dolls with origami! Fold the kimono, face, and head parts for both the Empress (Ohinasama) and the Emperor (Odairisama) separately.
Glue the face part onto the hair part, then attach them to the kimono part.
Add the small accessories you made separately, and finish by drawing the facial features.
To make them look even more like Hina dolls, try displaying them in creative ways—such as sticking them in a frame decorated with peach blossoms or standing them on a red base to resemble a tiered Hina stand.
Have fun with the display, too!
Hishi-mochi made with origami

When it comes to offerings for Hina dolls, we often think of peach branches, shirozake (sweet white sake), and hishimochi.
This time, we’ll introduce an easy-to-make hishimochi using origami.
Start by making the initial creases and then form the shape.
The steps are simple, so try folding together with older adults who may find it challenging, and enjoy the process.
Hishimochi is made of three layers from the top: pink, white, and green.
There’s actually a deep meaning here that represents a spring scene: pink is for peach blossoms, white is for snow, and green is for fresh greenery.
Be sure to make these colorful hishimochi with origami and add a festive touch to your Hina Matsuri celebration.
Paper lantern with origami

No Hina Doll display is complete without bonbori lanterns.
They’re an essential decoration that even appears right at the start of the children’s song “Ureshii Hinamatsuri.” In the past, bonbori were reportedly used as lighting at weddings held at night in Japan.
This time, let’s fold bonbori out of origami that gently illuminate the faces of the Emperor and Empress dolls.
The steps aren’t complicated, making it an easy project for older adults as well.
For the flame part of the bonbori, try using your favorite origami in bright or soft colors.
Peach blossom in origami

Here is an introduction to making a “three-dimensional peach blossom” that looks lovely displayed on a wall or attached to a wreath.
The finished piece faithfully recreates a realistic peach flower.
It may look complicated, but the process is simple: you just make five petals individually and assemble them, so it’s a project that older adults may also find approachable.
Origami is a recreational activity you can enjoy while chatting with those around you.
Try folding together with older adults who might find it challenging, and enjoy the conversation as you go.
These three-dimensional peach blossoms are soothing both to make and to display.
[For Seniors] Simple and Fun Hinamatsuri Crafts: A Collection of Ideas Using Various Materials (91–100)
Origami Peach Blossom Wreath

This is a “peach blossom wreath” made with origami, recommended as a wall decoration for March.
It’s a bright and festive wreath perfect for Hinamatsuri (Girls’ Day), so some older adults may feel inspired to make it.
The wreath base is also folded from origami.
Make seven simple base pieces and assemble them into a wreath shape.
For the peach blossoms, crease the origami and fold it into shape, then combine the parts.
Adding a center to each peach blossom makes it look even more realistic.
Once the flowers are finished, attach them to the wreath to complete it.
Origami is a seated activity that allows for conversation with those around you.
Enjoy the process as you create it!