For Seniors: Simple and Fun Hina Matsuri Crafts—An Idea Collection Using Various Materials

As Hinamatsuri approaches, you might feel like adding a touch of springtime brightness to your room.
That’s why we recommend easy Hinamatsuri crafts you can enjoy casually.
We’ll share ideas for items like hanging ornaments and tabletop decorations that you can make using various materials such as felt and pompoms.
Many of them can be finished without sewing, letting you savor the seasonal tradition while keeping your hands busy—a delightful bonus.
Once you display your finished pieces, the space will instantly feel brighter.
Be sure to enjoy some conversation together as you try your hand at crafts brimming with the colors of spring.
- For seniors: Heartwarming and cozy. Recommended handmade Hina dolls
- [Day Service] Excited for Hinamatsuri! Craft ideas to brighten up your room
- [For Seniors] Brighten Up Hinamatsuri: Wall Decoration Ideas
- [For Seniors] Easy and Fun! Tsumami Zaiku Craft Ideas
- [Day Service] Setsubun decorations that bring smiles. Ideas for enjoying them with a variety of materials.
- For Seniors: Recommended Wall Decoration Ideas for March
- [For Seniors] Lovely Crafts Made with Tissue Paper: Ideas Collection
- [For Seniors] Liven Up Setsubun Crafts! Handmade Ideas Using a Variety of Materials
- [For Seniors] Fun to Make, Soothing to Display! Snowman Craft Ideas
- [For Seniors] Have Fun Making Things Based on Today’s Mood! Today’s Recommended Craft
- [For Seniors] Origami Crafts to Brighten Hinamatsuri: A Collection of Decorative, Festive Ideas
- For Seniors: Wall Decorations to Brighten Up February — Festive Ideas for Setsubun, Valentine’s Day, Plum Blossoms, and More
- [For Seniors] February Wall Decorations: Setsubun-Themed! Fun Ideas with Oni Demons and Ehomaki Sushi Rolls
For Seniors: Simple and Fun Hinamatsuri Crafts. A Collection of Ideas Using Various Materials (51–60)
Hina doll chopstick rest
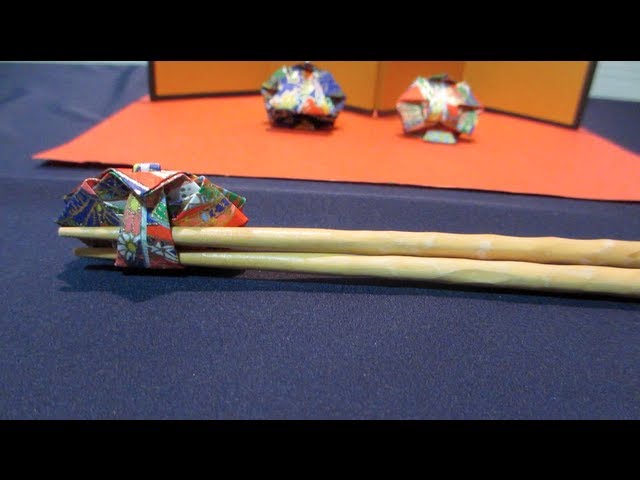
These are chopstick rests made from origami Hina dolls that can also serve as indoor decorations.
Using washi-patterned origami paper brings out even more of the Hina-doll atmosphere.
Origami crafts can be done while sitting in a chair and chatting with those around you.
It’s nice to fold them while talking with seniors about past Hina Matsuri festivals—it might really get the conversation going.
How about using them as chopstick rests for a Hina Matsuri party held at a facility? You can make both the Emperor and Empress dolls and enjoy displaying them as decorations on a small table or shelf.
Three-dimensional Hina dolls made of paper

These Hina dolls are striking for their beaming smiles.
Although they’re three-dimensional, you can make them using tissue paper and construction paper.
Create the Emperor and Empress’s faces and the ornaments above their heads with construction paper.
Draw the facial features with a pen, or make them from construction paper or origami.
Form the base with strips of construction paper and crumpled tissue paper, then attach the face pieces to finish.
Since this craft uses lots of fine hand movements, it’s a fun activity for seniors that also exercises the fingertips and may offer brain-training benefits.
Hina decorations made of felt

This Hina doll decoration made of felt features gently swaying ornaments as its highlight.
By using plum blossoms and traditional Japanese-patterned fabrics, it’s likely to be a piece that will delight elderly people.
Draw a semicircle on copy paper or similar using a compass to create a fan shape.
Cut out thick paper, felt, and fabric to match this pattern to make a backing, then finish it with yarn (a type of cord).
Finally, add decorations such as flowers made from felt and fabric, and attach the hanging, swaying ornaments.
It’s a Hina Matsuri decoration that brightens up a space just by being displayed—give it a try!
Washi-Modern Hina Dolls with Lace Paper

This is a perfect idea for Hinamatsuri! First, cut a sheet of patterned origami paper and a doily in half, then fold both sides inward like a kimono.
Slip the folded doily inside the origami so the lace peeks out from the kimono for extra cuteness.
Once you decide on the placement, glue it down firmly and add the face parts and accessories.
Next, color the backing paper, and stamp around the border with a dauber or a balloon to make it festive.
Finally, attach the hina dolls, and your handmade, modern-Japanese Hinamatsuri decoration is complete.
Its vibrant colors will instantly bring a spring feel to your room, and the making process is fun, too.
[For Seniors] Simple and Fun Hinamatsuri Crafts: A Collection of Ideas Using Various Materials (61–70)
Creating cute and chic Hina dolls for adults

Here’s a simple way to make cute Hina dolls.
First, stick fabric tape in the center of a piece of felt, fold 3 cm from one edge, and make a 2 cm slit in the middle.
Use the slit to neatly shape the collar with a little twist, then fold the felt in half and secure it with double-sided tape.
Next, glue on a bead about 1 cm in diameter to represent the head.
After making two figures, craft small accessories from origami, thread them through a large eye bead, and attach them to the dolls to finish.
By playing with colors and accessories, you can create charming, unique Hina dolls.
The process itself is fun, so it’s highly recommended!
Origami Hina Dolls

Let’s make the parts for the kimono, face, hair, hair ornament, and fan, and complete the Hina doll.
Use Japanese-pattern origami paper for the kimono.
Cut out a triangle at the center, attach the collar on the back, then fold it into a triangle.
Fold up both corners, then fold them back parallel.
Open the origami once and refold so that the bottom corner splits into two layers.
Fold the top of these two layers upward toward the back and pass it through the triangular opening to form the neck.
Next, fold in the left and right sides to make the sleeves, and fold the remaining bottom corner up to the back to finish the kimono! Make the remaining parts and complete your Hina doll.
Hinamatsuri (Doll Festival or Girls’ Day)

I’d like to introduce a torn-paper collage that’s perfect for Hinamatsuri and great to make in March.
First, draw simple, easy-to-understand outlines of the Emperor and Empress on construction paper.
Keeping the outlines simple makes it easier to tear and paste origami paper.
Once the outlines are done, start tearing origami paper and paste it on.
Rather than covering red areas with a single shade of red, mixing several red tones will add depth and give the piece a warm finish—highly recommended.
Using washi or tissue paper will make the artwork even more appealing.
Please use this as a reference!