![[For Seniors] Fun Origami That Also Works as Rehabilitation](https://i.ytimg.com/vi_webp/1DmLifJp1JI/maxresdefault.webp)
[For Seniors] Fun Origami That Also Works as Rehabilitation

Origami is also being incorporated into rehabilitation for the elderly.
The process of folding, which engages the mind and uses the fingertips, appears to provide moderate stimulation to the brain and help activate it.
So this time, we’ll introduce origami that can be expected to have positive effects for rehabilitation.
We’ve gathered pieces with simple steps that are easy for older adults to try, as well as origami you can play with once it’s finished!
Origami offers a sense of accomplishment when a piece is completed, and because it’s familiar to many seniors, it can be enjoyed across generations.
Some older adults may find it difficult at first.
However, once they get used to it, gradually increasing the difficulty should make it even more enjoyable!
[For Seniors] Fun Origami That Also Serves as Rehabilitation (1–10)
Easy Origami Koinobori (Carp Streamer)

Just layer and glue origami paper—so simple, yet the brilliance will catch your eye! This carp streamer craft is made using eight 7.5 cm origami sheets and googly-eye stickers.
First, carefully pick eight sheets of your favorite origami paper and fold each one into a triangle twice.
Pair the triangular pieces in twos, then insert and overlap the corners where two layers meet.
Next, take the four completed parts and, in order, insert and stack them in the same direction to form the shape of a carp streamer.
Add the eye sticker and you’re done! The colors and patterns you choose will bring out your individuality, so make it uniquely yours.
Origami Jumping Frog

This is a cute origami frog that jumps when you press its back.
Fold the paper in half vertically so the edge is on the left, then fold the top-left corner to meet the right edge.
Unfold, then do the same with the top-right corner and unfold.
Fold down along the center line created by the creases, then open and flip the paper over.
Collapse along the creases into a triangle, and fold the corners of the triangle diagonally upward to make the frog’s hands.
Next, fold the lower square section upward to form the body and legs, and you’re done! It could be fun to have everyone compete to see whose frog can jump the farthest.
Tulip wreath

This wreath, which arranges tulips into a circle while highlighting their shape, is an origami piece whose impression changes depending on how the flowers are placed.
Whether you align the direction of the flowers and stems or vary their angles slightly will affect how cohesive the design feels.
By considering color combinations, you can tighten the overall look or steer it toward a softer mood.
Introducing variations in the flowers’ heights helps prevent a flat appearance.
Finally, surveying the whole and adjusting the placement stabilizes the shape and improves how it looks when displayed.
The bright colors of the finished wreath gently stand out in a space and evoke the arrival of spring.
Hanami dango
https://www.tiktok.com/@sachimama_asobi/video/7345872880980299009Let’s make the essential three-color dango for Hinamatsuri out of origami.
Prepare three sheets of origami paper in green, white, and pink, plus a pair of chopsticks.
Fold the origami paper in half into a square twice, then puff it up as you fold it into a triangle.
Next, fold the left and right pointed tips up toward the center to form a balloon shape.
Blow into the small hole to inflate and complete the balloon.
After making three balloons from the three sheets of origami, gently skewer all three onto the chopsticks so they don’t tear, and you’re done.
Place them beside the Empress and Emperor dolls to make a lovely decoration.
Hinamatsuri wreath decoration

Introducing an idea for a Hina Matsuri wreath made entirely from origami parts! The parts you’ll make are the Emperor doll and Empress doll, lanterns, hishi-mochi rice cakes, cherry blossoms, a folding screen, a fan, a ritual baton (shaku), a stand, and a circular base to which all these parts are attached.
The base is made by combining 12 identical pieces.
Each individual part is created through simple steps, so although there are many pieces, it’s a project you can likely finish in a day.
For the Emperor and Empress kimonos, use washi-patterned origami paper—choose your favorite designs while imagining the final look.
Hina dolls made with round origami

Let’s make Hinamatsuri dolls out of chiyogami with a cute, gently rounded shape.
Fold a circular sheet of origami in half twice, then cut a slit at the center to form the neck.
Fold the left and right edges inward to align with the collar area, shaping the kimono.
Fold the Odairi-sama in the same way, then attach the fan, ladle, and crown, draw the faces, and you’re done.
Using round origami enhances the warm feel of the Ohina-sama and Odairi-sama.
Prepare patterned origami and try making your own original Hinamatsuri dolls.
Cone-shaped hina dolls
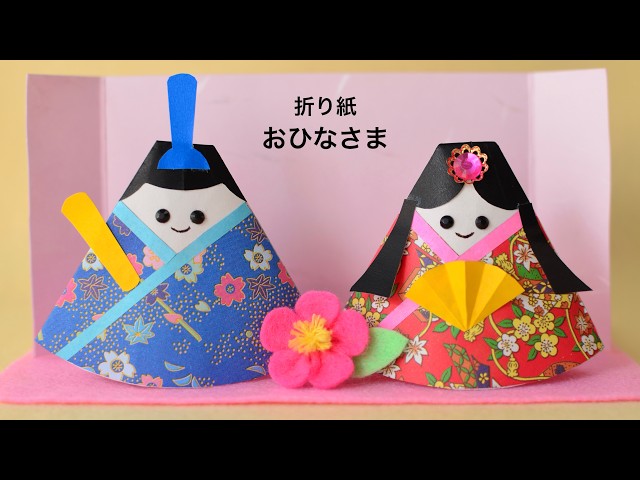
Perfect for Doll’s Day displays! Let’s make cute triangular hina dolls.
First, cut white paper into a half-circle and roll it into a cone.
Then wrap washi-patterned origami around it to represent the kimono.
Use the pointed tip of the cone as the face: add hair with black origami, and use rhinestones for the eyes and hair ornaments.
For the base, glue a U-shaped piece of thick paper upright onto a felt rectangle you’ve cut as the platform.
The look will vary depending on the origami and rhinestones you use, so prepare materials that match your image.