Recommended winter wall decorations for seniors: heartwarming ideas


During the persistently cold winter, many older adults tend to spend more time indoors.
Winter is full of enjoyable events and festivities, such as Christmas, New Year’s, and Setsubun.
Let’s help older adults feel the season even while indoors with winter-themed wall decorations!
In addition to winter events and traditions, there are also decorations inspired by flowers that are at their best during this time of year.
Craft activities that use fine motor skills can help prevent dementia and are also recommended as a communication tool.
Enjoy creating together and have a wonderful time.
- [For Seniors] Recommended Wall Decorations and Crafts for January
- [For Seniors] Heartwarming and Cozy: Perfect Wall Decoration Ideas for Winter in Care Facilities
- [For Seniors] Perfect for winter events! Easy craft ideas
- [For Seniors] Ideas for Winter Wall Decorations and Hanging Ornaments: Introducing Projects That Are Easy to Try
- [For Seniors] Enjoy the Cold Winter! Simple, Recommended Crafts
- For seniors: Decorate the December wall with a tree. Easy ideas using origami and yarn.
- [For Seniors] Let’s Make New Year Decorations by Hand! A Collection of Easy Ideas Using Everyday Materials
- For seniors: Year-round ideas for wall decorations
- Lucky Daruma: Craft ideas for decorating January wall displays for seniors
- For Seniors: Auspicious Handmade Zodiac Ornament Craft Ideas
- [For Seniors] Fun February Crafts: Ideas Inspired by Setsubun, Valentine’s Day, and Other Events
- [For Seniors] Decorate your January wall with rabbits! Packed with ideas like snowball fights, New Year’s festivities, and rice cake pounding
- [Care Facilities] Popular Christmas Decorations: Handmade Ideas to Brighten Up Indoor Spaces
[For Seniors] Recommended Winter Wall Decorations: Heartwarming Ideas (31–40)
Christmas Decorations with Paper Ring Garlands

This is about making a chain garland by turning long, thin strips of paper into loops and linking them together, giving it a Christmas feel.
Imagine connecting large loops with thin loops, arranging it so that only one side of each large loop is visible.
The motifs to create include Santa Claus, reindeer, and snowmen.
Each motif is completed in two segments—one for the face and one for the body—and then connected together.
Since you’ll make several long garlands, it’s recommended to vary the positions of the motifs on each one to achieve a more luxurious look.
Simple Christmas Tree

This is a Christmas tree decoration whose charm lies in the layered, three-dimensional look of the leaves.
The key is how you make the leaves: firmly crease the paper first, then cut it into leaf shapes, and bend them to create a 3D effect.
Next, make the conical base of the tree and layer the bent leaves onto it.
Once the green part of the Christmas tree is finished, add the trunk and decorations to make it even more festive.
It’s also recommended to arrange snowflakes around it to enhance the overall atmosphere.
Paper Plate Santa
https://www.tiktok.com/@peta_peta_anyo/video/7436681167174307079Cut a paper plate in half to make the base for the face.
Snip small cuts along the rim with scissors to create the beard.
Cut a red piece of construction paper into a triangle, add a pom-pom to make a hat, and glue it onto the plate.
Color the center of the plate with crayon to match a skin tone, then draw the nose and mouth.
Finally, make hair with cotton and attach eye parts to complete your Santa Claus.
Feel free to enjoy it by sticking it on the wall or hanging it as a decoration.
It would also look nice attached to a cone-shaped body as a standing ornament.
Christmas lamp tree
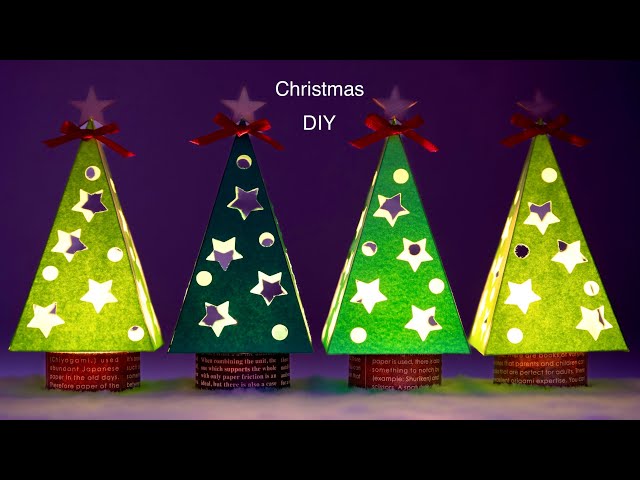
Would you like to try making a handmade, tree-shaped Christmas lamp? Light will shine through star- and circle-shaped holes, making it look as if the tree itself is glowing—a lovely idea.
First, draw a net for a square pyramid on construction paper and cut it out, then use a craft punch to make holes in the four side panels.
Imagine you’re placing ornaments and punch the holes in a well-balanced way.
In the center of the square base, make another hole large enough for the tip of the lamp to pass through.
Assemble the construction paper into a tree and decorate the top with a ribbon and a star.
Decorate the sides of an LED lamp, place the tree over it, and you’re done.
Enjoy it in a dark room.
Wall-mounted Christmas tree made from paper rolls

Let’s use toilet paper rolls to create a wall-mounted Christmas tree.
First, keeping the triangular shape of a tree in mind, lay out the rolls temporarily in rows to form tiers.
If a roll is too short or too long, cut it to size.
Once you have the triangle, glue the rolls together row by row, and attach green construction paper to the sides.
After everything is attached, secure the whole piece with tape or similar.
For the trunk, connect about three rolls and wrap them with brown yarn.
Fix the triangular section and the trunk to the wall so they connect, and finish by placing a star at the top of the tree.
Adding origami ornaments will make it look even more charming!
[For Seniors] Recommended Winter Wall Decorations: Heartwarming Ideas (41–50)
Poinsettia Origami Tree

Poinsettias are known as Christmas flowers.
In this idea, we’ll make a wall tree using origami poinsettias.
After folding the origami paper into a triangle three times, open it back up to the state of having been folded twice.
Starting from the outside toward the center, make cuts along the creases.
To round off the corners created by the cuts, trim in a curved line from both corners of the triangle toward the center to shape leaves.
When you open the paper, you’ll have four leaves; stack two of these to make a set of five leaves.
Finish by placing a yellow round sticker in the center to complete the poinsettia.
Make several and arrange them on the wall in the shape of a tree.
Christmas tree made with ribbons

This is a handmade tree idea that’s completed simply by sticking teardrop-shaped ribbon pieces onto a cone base made from thick paper.
To make the teardrop-shaped parts, cut ribbon to a suitable length and glue the two ends together.
When attaching the ribbon to the base, face the rounded end downward and stick them in a straight line.
If it’s hard to keep them straight, draw guide lines on the base beforehand to help with placement.
Once all the ribbons are attached, decorate the top with a star to finish! Adding small beads for extra sparkle would also look cute.