[For Seniors] Enjoy the Cold Winter! Simple, Recommended Crafts


Here are some recommended winter craft ideas that are perfect for seniors!
Winter brings lots of fun events and occasions, such as Christmas and New Year’s.
You might also think of seasonal foods, games, weather, and the cold.
So this time, we’ve gathered many craft ideas that help seniors feel the winter season.
Why not enjoy some craft activities in a warm indoor setting?
Using your fingers and brain can also provide cognitive training benefits.
If the crafts are practical, you can take them home to use or display and enjoy.
Please make use of these ideas in your daily recreation activities.
- [For Seniors] Perfect for winter events! Easy craft ideas
- Take-Home Craft Ideas for Winter: Perfect for Day Services for Seniors
- Recommended winter wall decorations for seniors: heartwarming ideas
- [For Seniors] Fun to Make, Soothing to Display! Snowman Craft Ideas
- [For Seniors] January Craft Ideas for Day Service Activities
- [For Seniors] Have Fun Making Things Based on Today’s Mood! Today’s Recommended Craft
- [For Seniors] Fun Crafts Recommended for December
- [For Seniors] Practical Crafts to Make in Day-Service Recreation: Idea Roundup
- For Seniors: Simple and Lovely Crafts – A Collection of Take-Home Project Ideas for Day Service
- [For Seniors] Fun February Crafts: Ideas Inspired by Setsubun, Valentine’s Day, and Other Events
- [For Seniors] Easy and Fun! Tsumami Zaiku Craft Ideas
- [For Seniors] January Craft Ideas: Boost Your Luck with New Year Decorations and Good-Luck Charms
- For Seniors: Auspicious Handmade Zodiac Ornament Craft Ideas
[For Seniors] Enjoy the Cold Winter! Simple, Recommended Crafts (141–150)
star

Although stars themselves don’t have seasons, they’re one of the ornaments you often see during the Christmas season.
It would be fun to make stars from various materials to liven up Christmas.
Origami stars are the easiest, and there are even origami stars that can stand upright.
Painting star illustrations on small stones also sounds enjoyable.
Using fluorescent paint enhances the atmosphere, and crafting a giant star out of cardboard could become an eye-catching symbol.
Observing the stars that appear in Super Mario or Disney might spark some unexpected ideas!
Let’s write and display it: New Year’s calligraphy

If you’re looking for something to do in the New Year, I recommend kakizome, the first calligraphy of the year.
Kakizome is a custom that has been enjoyed since the Edo period, in which you write down your resolutions and goals for the year.
Not only is it fun to practice writing beautifully, but deciding on your resolutions and goals can also help you start the year with a positive mindset.
Why not give it a try while pondering which characters to write? After you finish, it would look lovely displayed on the wall.
By the way, it’s said to be especially auspicious to do kakizome on January 2.
Sheep made from a pine cone and natural materials

Sheep are adorable animals covered in fluffy white wool, aren’t they? Their charming, sweet expressions make them popular with everyone.
This time, let’s make a sheep using a pine cone.
Prepare an acorn, a sawtooth oak cap, and tendrils from porcelain berry.
Since everything is made from natural materials, it’s exciting to think how rich in character the finished piece will be.
All you do is glue the materials on, so it’s easy for seniors to try as well.
The pine cone represents the sheep’s wool, giving it an irresistibly simple, rustic appeal.
It would also make a delightful gift for someone special.
Plum blossom decoration
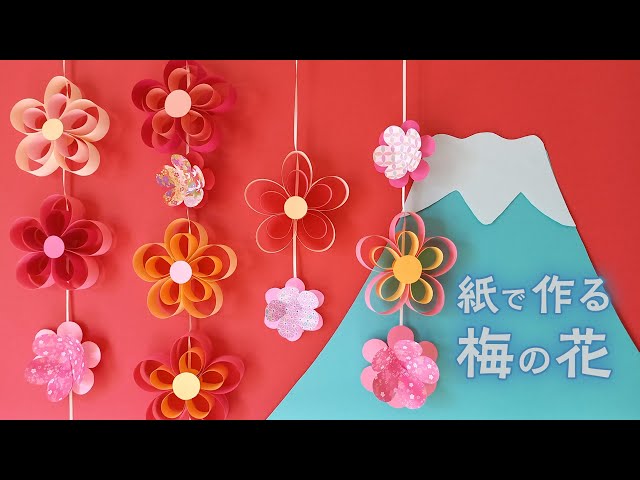
Let’s make some stylish, pop-inspired plum blossom decorations! They’re perfect for January wall displays or hanging ornaments.
Why not enjoy a seasonal craft activity with older adults? You can create two types: simple plum blossoms made by rolling paper strips and stapling them, and 3D plum blossoms made by interlocking two flower-shaped paper cutouts.
Combine both types and string them together for a hanging decoration, or display a single piece like an objet d’art to instantly brighten the room.
You can also have fun customizing them by changing the origami patterns or sizes—feel free to use this as a reference!
Camellia flower wall decoration

A festive-looking camellia wall decoration made with origami! It’s a perfect piece to enjoy the winter season, so give it a try by hand.
To make the camellia petals, fold a circular piece of origami paper, sketch the petal shape, and cut it out with scissors.
For the center of the camellia, cut a strip of origami paper, fold it in half, make fine cuts along the top and bottom, then wrap it around a plastic bottle cap.
The camellia alone is lovely, but pairing it with paper fans made from Japanese-patterned origami or adding strings to turn it into a hanging decoration will make it even more eye-catching.
Ema plaques you can enjoy with cardboard patterns

Let’s use the distinctive hollow structure along the edges of corrugated cardboard to decorate ema plaques like stamps.
Roll the cardboard into tubes or fold it into triangles—shape it so the edges are exposed—then ink those edges and press them onto the ema base.
Because the material is soft, you can’t get perfectly precise straight or curved lines, but that imperfection adds warmth to the design.
It’s also worth noting that you can create originality through color combinations, such as which color you use for the base and which colors you use for the stamping.
Setsubun crafts using a milk carton and origami

This is a small container decorated with a cute ogre (oni) mascot made by combining a milk carton and origami.
Since it’s a box inspired by Setsubun, putting roasted soybeans inside would enhance the atmosphere.
Cut off the bottom of the milk carton, wrap it with origami and glue it on to make the base, then create the mascot and attach it.
If you assemble an oni from cut parts, it’s quick and easy; if you attach an oni made from a single sheet of origami, you can enjoy a more three-dimensional look.
It’s important to balance the color of the base with the color of the oni you attach.