[For Day Service Centers] February Craft Ideas: Decorations for Setsubun, Valentine’s Day, and the Feeling of Spring


February is a month when you can feel the arrival of spring even amid the cold.
For crafts at the day service, let’s choose activities that engage the hands while reflecting the changing seasons.
Seasonal crafts may make you look forward to spring and spark lively conversations.
February’s unique motifs—Setsubun ogres and ehomaki rolls, camellias and daffodils that bloom beautifully despite the cold, and Valentine’s heart decorations—are all heartwarming.
Crafts made with familiar materials like origami paper, Yakult containers, and felt are easy for anyone to try and bring great joy when completed.
Shall we enjoy creating warm pieces together that help us forget the winter chill?
- [For Seniors] Fun February Crafts: Ideas Inspired by Setsubun, Valentine’s Day, and Other Events
- For Seniors: Wall Decorations to Brighten Up February — Festive Ideas for Setsubun, Valentine’s Day, Plum Blossoms, and More
- [For Seniors] Liven Up Setsubun Crafts! Handmade Ideas Using a Variety of Materials
- Take-Home Craft Ideas for Winter: Perfect for Day Services for Seniors
- [For Seniors] Recommended for day services! Simple and cute small craft ideas
- For Seniors: Fun Activities in February — Celebrate Setsubun, Valentine’s Day, and Snow
- [For Seniors] February Wall Decorations: Setsubun-Themed! Fun Ideas with Oni Demons and Ehomaki Sushi Rolls
- [For seniors] A handmade calendar you’ll want to make in February
- [For Seniors] Enjoy the Cold Winter! Simple, Recommended Crafts
- [For Seniors] Have Fun Making Things Based on Today’s Mood! Today’s Recommended Craft
- [For Seniors] Recommended Events for February: Fun Ideas to Fill Everyone with Smiles
- For Seniors: Auspicious Handmade Zodiac Ornament Craft Ideas
- [For Seniors] Color Your Care Facility’s Spring: Wall Decoration Ideas
[For Day Service Centers] February Craft Ideas: Decorations for Setsubun, Valentine’s Day, and the Coming of Spring (41–50)
Oni Origami Calendar
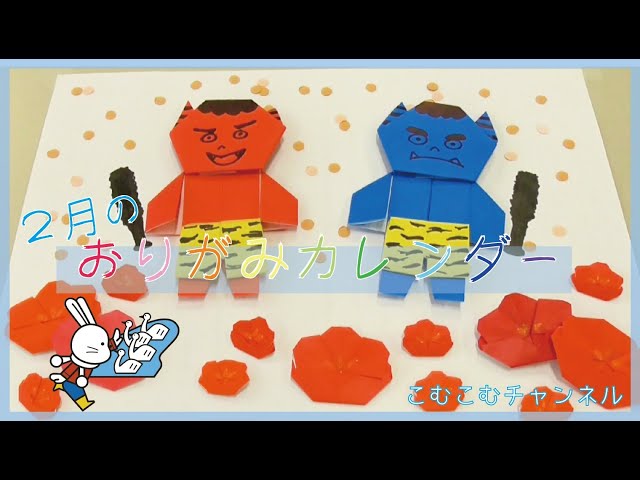
Let’s fold motifs related to February with origami and make a February calendar! Speaking of February, there’s Setsubun.
You can’t leave out ogres, their striped pants, and a club.
It’s also the coldest time of year, but the plum blossoms are just beginning to bloom.
While looking forward to the arrival of warm spring, it’s fun to fold plum blossoms in both large and small sizes.
Once you’re done folding, paste them onto a backing sheet, write in the dates, and you’re finished.
We see calendars every day, but when it’s a handmade calendar filled with warmth, you can’t help but stop and take a long look at it.
[For Day Service] February Craft Ideas: Decorations for Setsubun, Valentine’s Day, and the Feeling of Spring (51–60)
Blue Oni made with a toilet paper roll core

This is a cute blue ogre craft made with a toilet paper roll and origami.
Cut the roll in half, then wrap the lower half with a piece for the ogre’s pants—yellow origami decorated with patterns drawn in black pen.
Cover the upper half, which will be the face, with light blue origami.
Draw the eyes and mouth with a black pen, then finish by attaching cheeks, hair, and horn pieces cut from origami.
It’s rounded but very stable, making it perfect for display! It’s also lovely to make ogres in various colors and line them up.
Oni roly-poly doll

In February for Setsubun, let’s make an ogre-themed roly-poly toy.
Inflate a balloon to the size you want, then use diluted glue to stick torn pieces of shoji paper onto the surface.
Layer the paper so it’s three to five sheets thick, then brush on more glue and let it dry.
Once it’s completely dry, pop the balloon and drop some glue and a marble into the hollow shell to weight and fix it.
Finally, decorate it with hair and horns to make it look like an oni, and you’re done.
It takes time to dry, so it’s nice that you can enjoy the process at a relaxed pace.
Mini Oni Pen Remake

Let’s remake your everyday pen with a little oni (demon) decoration! You’ll need a pen with a clip, thick paper (cardstock), felt, chenille stems (pipe cleaners), yarn, and a rubber band.
First, cut the cardstock and felt into rectangles sized to fit your pen.
These will become the oni’s face, and you’ll use them folded in half.
Next, cut a chenille stem short and fold it in half to make one horn; make two of these.
Sandwich the horns between the folded cardstock, stack another chenille stem on top, then tie everything together with a rubber band to secure it.
Wrap yarn over the rubber band to create the oni’s hair, and finally draw the face on the felt to finish.
Clip the pen’s clip into the yarn when you use it!
Daffodil wall decoration

How about brightening up your winter interiors with origami daffodils? The steps are simple, making this a great project for seniors to try.
Start by making three petal pieces from white origami paper.
The creasing steps are important here, so take your time and fold carefully.
Once the folding is done, draw the petal shapes and cut them out with scissors.
Punch a hole in the center of each of the three petal pieces, then insert a yellow origami cone (the corona) to complete the daffodil.
You’ll need two sets of petal pieces for each daffodil, so prepare as many as you need for the number of flowers you want to make.
Create the stem from green origami paper, and finish by arranging the daffodils on a frame base made of origami.
String Art of Oni for Setsubun

String art is an art form where you create pictures and patterns using nails hammered into a wooden board and thread.
First, decide on a design and sketch it on paper to determine where to place the nails.
Then align the sketch with the wooden board, hammer in the nails, and wrap the thread to create an oni (ogre/demon) motif.
String art can also depict letters, so it might be nice to make the word “Setsubun” to go with it.
Display the finished piece in your room to enhance the Setsubun atmosphere.
Because it uses fine motor skills and encourages focused work, string art is perfect for indoor activities during the cold season.
Pop-up 3D chocolate card

Let’s handmake a message card for Valentine’s Day that’s so tempting it makes you want to take a bite.
First, fold a piece of brown construction paper in half to use as the base of the card.
Next, cut out a chocolate base sized to fit the cover, and, imagining a chocolate bar, cut out as many small block-shaped chocolate pieces as you need.
Use thick double-sided tape to attach the block-shaped chocolates to the chocolate base, then wrap aluminum foil over them so that the chocolates are about half covered.
Wrap your favorite patterned origami paper over that to represent the wrapper, add a ribbon, and attach it to the card’s cover to finish.
Inside the card, glue a piece of white paper and write your message.