[For Kids] Simple and Cute Origami Ideas to Enjoy in February


Are you enjoying February origami with your kids? This season is full of special motifs like Setsubun ogres, Otafuku masks, and Valentine’s hearts.
It’s perfect for cozy days at home—an activity that keeps little fingers busy while learning about seasonal traditions.
In this article, we’ve gathered cute origami ideas that are just right for February.
They’re all easy to fold, so both children and adults can jump in without stress.
Display your finished pieces to instantly brighten up your room! Enjoy some origami time together.
- Simple origami that can be folded from a single sheet
- Recommended in February! A collection of easy origami ideas perfect for childcare to enjoy the season.
- [For Kids] Let's Fold! Today's Origami Idea Collection
- [Origami] She’ll love it if you fold these! Simple ideas for girls
- [Origami] Have fun with kids! A collection of easy snowman origami ideas
- [April] Spring Origami for Kids: A Collection of Simple and Cute Ideas
- [Easy] Let’s make a snake with origami! A toy you can play with and a zodiac decoration
- [February] Perfect for Valentine’s Day! Cute wall display ideas
- Children’s Origami: Easy Single-Sheet Flower Ideas
- [Childcare] Fun to Make! February Craft Ideas Collection
- Let's make it with origami! Ideas for simple 3D creations
- Cool origami that boys will love and want to fold
- It moves! You can play with it! Fun origami. How to make origami toys.
[For Kids] Simple and Cute Origami Ideas to Enjoy in February (31–40)
Heart paper balloon

You’ll want to make lots of them! Here’s how to fold a cute heart paper balloon.
First, fold the edge toward you, flip the paper over, and slightly fold up the edge closest to you.
Fold that lifted edge up to meet the top edge.
With the side that forms a loop at the top, fold the two bottom corners up to the center.
Then fold those raised corners down toward both side edges to crease, and fold the corners down along those crease lines.
Fold the corners down further, open the pockets, and tuck the corners inside.
Next, slightly fold the four corners with a heart shape in mind.
Finally, blow air into it to inflate, and your heart paper balloon is complete!
How to fold a heart box
Some people make paper boxes to use as trash bins, right? I think a heart-shaped box like this would be super cute! In this idea, you start by creasing the paper to make a 4-by-4 grid of 16 squares.
Once you’ve made the creases, place the origami with the white side up, fold the left corner toward the center, and make a crease.
Then turn the paper over so the colored side is up, and, while folding the bottom and left edges inward along the creases, fold the left corner into a square shape.
This folded section will form the heart.
From here, you’ll add more creases to shape it into a box, so take it step by step and proceed carefully.
Love Cats Pocket
If you’ve been thinking, “I wish there were a simple heart-shaped origami to hold Valentine’s chocolates…,” this is the one for you.
First, place the origami paper front side up with one edge facing you.
Fold it in half, then fold the left and right edges to meet at the center.
Fold the two corners on the closed side up toward the center and open them back up.
Use the creases to make mountain and valley folds to set the lines.
Open it up and fold in sequence so it forms a heart shape.
Next, fold the white section down.
The bottom edge will become the ears, so fold diagonally with that in mind.
Do the same on both sides.
Fold the top up and the cat is complete! If the chocolate is thin, you can tuck it into the pocket, so this is recommended.
For kids! Cute heart origami

Place the origami paper face up with an edge closest to you.
Fold it in half into a square twice to make crease lines, then fold the front edge up to the center twice to make creases.
Fold the front edge up to meet the front crease line, then rotate the paper and do the same on the opposite side.
Flip it over and fold both edges to the center line.
Flip it over so the longer side is closest to you, fold the front edge to the center to make a crease, then pull the center area and collapse it.
On the opposite edge, align with the topmost line to make a crease.
Fold along the bottommost crease to make another crease, then open both corners and flatten them.
Flip it over, apply glue on the triangular parts, refold, and shape it into a heart to finish!
A cat-shaped box

If you want to add a creative touch to a small container, how about making it cat-shaped? First, fold all the corners of the origami paper toward the center, then flip the paper over.
Fold two opposite corners toward the center, then fold once more to make a rolled fold.
Fold the remaining two corners inward to form a box shape, and you’re done.
When folding, leave one outer flap unfolded to create cat ears, finishing it as a cat-shaped box.
Instead of making the box square, aim for a round shape to make it look even more cat-like.
How to fold a long, slender heart
A long, slender heart you can enjoy making with kids.
Fold 5 times to form the heart shape, then fold 4 more times to round it out.
First, fold the origami paper into a triangle.
Flip the triangle upside down, reposition the paper, and fold the left and right edges to meet the center crease.
Next, turn the paper over and fold the protruding tip into a small triangle.
After that, tuck in the top and the left and right corners slightly to finish! If you fold it 3 more times, you can turn it into a regular rounded heart, so shape it into the style you like.
How to fold a winged heart
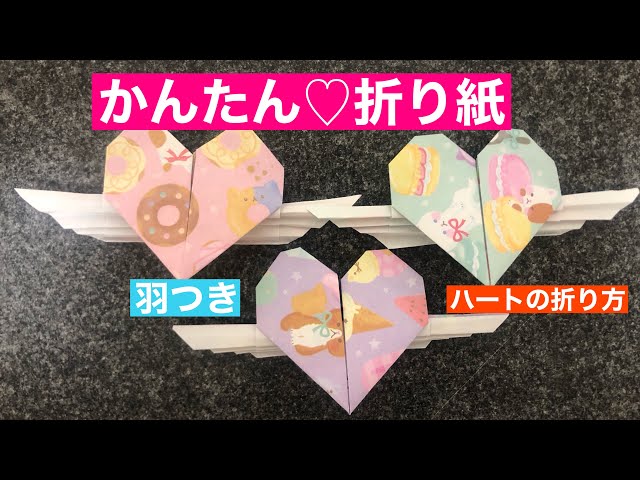
A simple heart with wings design boosts the cuteness and playfulness in no time! First, fold the paper in half twice to make creases.
Fold the near edge up to the center.
Flip it over, fold the left and right edges to the center, then fold the near edge like making a boat, pressing in fine folds to set the lines.
Open it and continue folding in an accordion style.
Next, fold both bottom corners up into triangles.
Shape the corners into a heart, and your winged heart is complete! By changing the angle and size of the wings, the look changes, so you can enjoy creating your own original design.
How to fold a two-color heart
Let’s make a larger heart that can be displayed on a wall using two colors of origami paper! First, align the top and bottom edges of the paper and make a crease mark by pressing only the left edge.
Unfold the paper, then fold the bottom edge up to meet the mark and make another crease in the same way.
Next, fold the top edge down to align with the second mark you made.
Fold both sheets the same way, and on just one of them, fold the left corner up to meet the crease made by folding the top edge.
Stack and combine the two sheets, then fold the corners to shape the heart.
demon’s face

Many children look forward to Setsubun in February.
So let’s introduce a cute oni (demon) origami.
With this idea, you can use just one sheet of origami paper to create the oni’s face, horns, and even facial patterns.
Once it’s folded, just draw your favorite expression to finish.
It would be fun to prepare red, blue, and yellow paper and make several oni to display together.
It’s also recommended to pair the oni with traditional elements like Otafuku (Okame), beans, or a masu box to create a wall decoration.
bean-throwing masu (wooden measuring box used for Setsubun bean scattering)

Let’s try folding a masu (box) to hold beans for mamemaki.
This version makes a flat masu, so once it’s done you can have fun sticking it onto illustrations or on the wall.
You can also cut out drawings of beans and paste them onto the masu, or add letters and messages to make it your own.
The more you personalize it, the more attached you’ll feel.
By the way, using a masu for Setsubun is considered sacred—it’s thought to be an item that increases good fortune.
Displaying it might bring you some good luck.