

Lanterns that enchantingly color the night of Halloween.
Thinking of making your own but not sure how to start? In this article, we’ll introduce ideas for handmade Halloween lanterns using familiar materials.
They’re all simple crafts that are safe and fun for everyone from kids to adults.
The gentle, flickering light in the dark is perfect for your home decor! For a Halloween party with friends or decorations by your front door, why not create a special atmosphere with handmade Halloween lanterns?
- Halloween in childcare gets exciting! Dance ideas for moving and having fun
- Cute Halloween Song Collection! A carefully selected lineup of adorable tracks that both kids and adults can enjoy
- [Easy Halloween Vibes] Perfect BGM and Theme Songs for a Halloween Party
- Recommended for daycare activities! A Halloween song you can sing and play with
- A Halloween song for children. A fun Halloween song.
- Halloween songs for seniors to enjoy at events: from nostalgic classics to exciting new favorites
- [From Kids to Adults] Dance Songs You’ll Want to Groove to at a Halloween Party
- When it comes to Halloween songs, this is the one! A special feature on Japanese tracks that hype up the karaoke crowd
- Heisei-Era Halloween Songs | A roundup of classic tracks to elevate the party mood!
- Songs that amp up Halloween: a roundup of perfect tracks for party BGM!
- [For Seniors] Have Fun Moving with Halloween Exercises! Introducing Songs You Can Dance To
- Halloween songs released in the Reiwa era | Perfect as party BGM too!
- Handmade ideas for a welcome board
Handmade Halloween lanterns with everyday materials! Revealing super easy ideas (1–10)
A lantern where you can meet ghosts
You can meet ghosts on Halloween! Want to boost the Halloween fun by making a mysterious lantern like that? First, take a piece of black construction paper cut into a half-circle and draw the ghost you want to meet.
Cut out the drawing with a craft knife, then attach colored cellophane in your favorite color.
If you want a white ghost, transparent cellophane is recommended.
Next, add the ghost’s face as you like, then roll the paper into a cone shape—and you’re done! Put a light inside and turn off the room lights, and you’ll have lots of ghosts appearing all around the room!
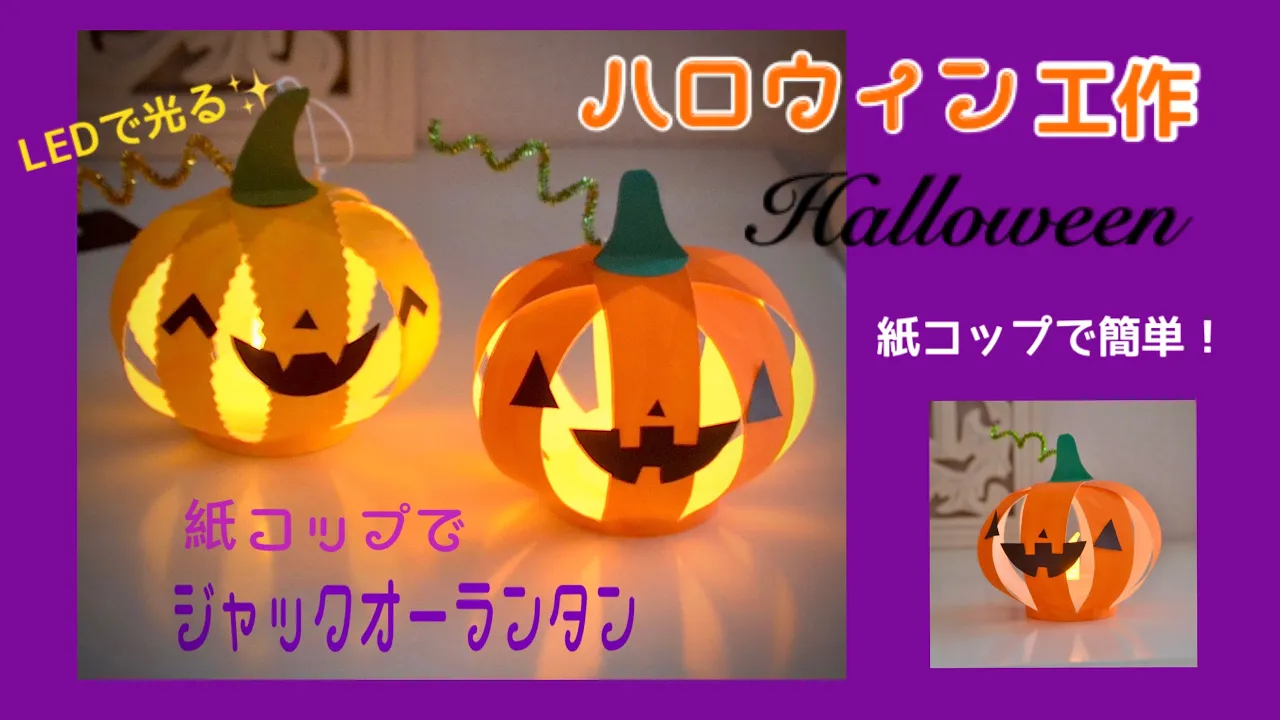
Paper cup jack-o’-lantern

Surprisingly, you can make this easily using a paper cup! Cut off the rim of the paper cup and paint it orange.
Next, cut the cup into eight equal sections and spread them open.
Use a pen or similar tool to curl each strip, and staple them together to form a lantern shape.
Add a mouth, eyes, and a stem for a cute finish.
If you use an LED candle light, you can enjoy it safely.
Turn off the lights and get into the Halloween spirit with family and friends!
Lantern made from an aluminum can
@petrel_jp Make It With Friends! DIY Original Lanterns 🎃 / We tried making the perfect Halloween lanterns out of aluminum cans 👻✨ <Materials> • Aluminum can • White paper • Pen • Clear tape • Safety pin • Utility knife or scissors • Small light <How to Make> 1) Draw the shape you want to light up on white paper. 2) Cut open the top of the can with scissors or a utility knife so the light you prepared can fit inside (be careful not to get hurt ⚠️). Wrap tape around the cut edge so you don’t cut your hands. 3) Tape the white paper with your drawing onto the can using clear tape. 4) Using a safety pin, poke holes along the lines of your drawing. 5) Once you’ve poked all the holes, remove the paper. 6) Place the light (turned on) inside the can. 7) Cover the top with white paper and you’re done. Isn’t the glow in the shape of your drawing just the cutest? 🫶🏻 Make these with friends for your Halloween party and you’re guaranteed to have a great time 🥹💖 Everyone, give it a try! Add hashtags to photos of trendy items and spots.#petrel_jpAdd #petrel_choreo or tag @petrel_jp ❤︎#petrel_arrangementHalloween#halloweenHalloween Party#HalloweenGoods#Halloween decorationslantern#Jack-o'-lantern
♬ Crazy Party Night – Kyary Pamyu Pamyu
This project creates a spooky, glowing picture that emerges from an aluminum can—perfect for a full-on Halloween vibe.
First, sketch the picture you want to illuminate with the lantern onto white paper.
Next, tape the sketch onto the side of an aluminum can and use a safety pin to poke holes along the lines, tracing the drawing by making tiny perforations in the can.
Then, open up the can’s drinking spout area to make a larger opening, wrap tape around the cut edge to avoid injury, place a light inside, and cover the top with paper to finish.
Try making different designs and sizes, and display lots of them!
Color wrap Halloween lantern
https://www.tiktok.com/@hoikushisatomi/video/7283048780222516488If you want to do a Halloween craft with your child, this lantern is a great pick! First, stick double-sided tape to the bottom of a clear cup.
Next, wrap colored plastic wrap around the entire cup as if covering it.
If you want to make a Jack-o’-lantern, layer two sheets each of yellow and red wrap to create orange.
Tidy up the edges of the wrap, stick on the face parts, and place a light inside to finish.
Adding a witch’s hat or ribbon made from construction paper makes it even cuter, so feel free to customize it however you like!
Garland-style lantern
@chii_1514m [Halloween Craft] Stick-on Tissue Paper Halloween Garland 👻 Add a light and it becomes a Jack-o'-Lantern 🎃#Production video#Kindergarten#Nursery schoolHow-to videoWall decoration# Halloween Craft#Autumn Productionlantern#Garland#CapCut
♬ Happy Halloween – Junky
This garland-style one will instantly transform your room into a spooky Halloween atmosphere! First, inflate a small balloon, then tear tissue paper into ragged pieces and randomly paste a mix of different colors onto the balloon using liquid starch or laundry glue.
Once the glue dries, remove the balloon from inside, then trim the opening into a neat circle.
Next, attach jack-o’-lantern face pieces made from construction paper, and you’re done.
String several of these together with thread, and place lights inside—now you’ve got a garland-style lantern.
A lantern made from a soft-serve ice cream lid
@mie_kidsart With that thing we ate a lot of in summer! Easy Halloween lantern 👻🎃 Free materials available♪# Halloween Craft#Halloween decorations#Halloween craftsTranslationScrap Material Crafting#ScrapMaterialPlay#UpcycledMaterials#I tried making it with 100-yen store items#100-yen shop DIY#100-yen shop
♬ Happy Halloween – Junky
When you buy store-bought soft-serve ice cream at supermarkets or convenience stores, it often comes with a clear lid.
A lantern using this lid is easy to try, so be sure to make one with your child.
First, draw Halloween-themed illustrations—like jack-o’-lanterns or ghosts—on construction paper or origami paper and cut them out.
It’s best to keep each drawing on the small side.
Then simply stick the drawings to the inside of the lid, and you’re done.
Put a light inside and display it in your room!
Lantern made with a plastic bottle and a balloon
@sapi_mama_asobi Let's make a Jack-o'-lantern with a plastic bottle#AtOurPlacePlay#ParentChildTimePlastic bottle craftsCraft PlayHalloween
♬ Exciting, exciting, cute songs(1283711) – Korepoi
Use a plastic bottle as if you were inflating it.
Choose a bottle that’s as soft as possible.
Make about nine slits along the sides, then insert a balloon through the bottle’s mouth.
In this state, inflate the balloon.
The slits in the bottle will work nicely to create a pumpkin-like shape.
Use a balloon with a built-in light, such as those sold at 100-yen shops.
Tie the balloon’s neck, screw the bottle cap back on, and stick on the Jack-o’-lantern face pieces to finish.