

How about making your own ema to fill with wishes for the New Year? These traditional New Year’s plaques can be easily crafted using familiar materials like origami paper, construction paper, or cardboard.
In this article, we’ve gathered a variety of handmade ema ideas—from projects you can enjoy with children to stylish designs using washi-style origami and resin.
Display them on the wall or attach them to a bag—the possibilities are endless.
Why not create a one-of-a-kind ema filled with your resolutions for the year or wishes for someone special?
- For Exam Takers: Handmade Good-Luck Charms to Wish for Success — Heartfelt Ideas That Truly Convey Your Support
- Handmade omikuji ideas: DIY crafts you can make and play with
- Let's make New Year’s decorations by hand! A collection of ideas you can create with everyday materials.
- Handmade New Year’s wreaths: A collection of festive ideas using shimenawa and mizuhiki
- Let's make a handmade hagoita! Fun ideas using milk cartons and cardboard
- Simple yet amazing! Handmade New Year’s card ideas that will delight
- [Birthday] Handmade decoration ideas using construction paper
- New Year’s card ideas to make with children: simple designs using stickers and stamps
- Enjoy traditional games with your kids! A collection of DIY stilts (made from bamboo) ideas
- Handmade celebration card ideas. How to make a message card.
- Let's make our own shimenawa! A collection of stylish ideas you can create with paper and artificial flowers
- [Handmade] A collection of hat ideas made with construction paper
- Handmade New Year’s cards with horse motifs! A collection of ideas you can make with common materials
Collection of handmade ema ideas: simple crafts perfect for New Year (1–10)
Ema plaque with an origami horse
It’s an eye-catching ema that incorporates an origami horse into the design.
It’s very easy to make, so it’s great for a winter break craft time! First, cut construction paper into the shape of an ema, then make the horse with origami.
Fold the origami paper into a triangle and fold down the top corner about 2 cm.
This will be the nose, so fold just the top layer you folded down back to the reverse side so the white side shows.
Next, flip the origami top-to-bottom and fold up the left and right corners to make the ears.
Fold the corners on both sides of the ears inward to slim the shape, then tuck in the nose corner to round it off, and you’re done.
Draw in the eyes, paste the horse onto the ema, and finish by sprinkling flower decorations.
Stable-style ema (wooden votive plaque)
Here’s a cute idea: decorate an ema (votive plaque) as if it were a horse stable.
Even children who aren’t familiar with ema will likely enjoy this.
First, cut out from construction paper the base ema shape, the stable’s roof, windows, and door, as well as pieces like a horse and flowers—everything you’ll need.
Once you’ve cut them out, glue the stable parts onto the base, then decorate it adorably and brightly with the horse and flowers.
Finally, attach a pipe-cleaner ribbon, write your wish, and it’s complete! If you want to capture your child’s growth, we recommend adding a handprint or footprint on the back of the ema.
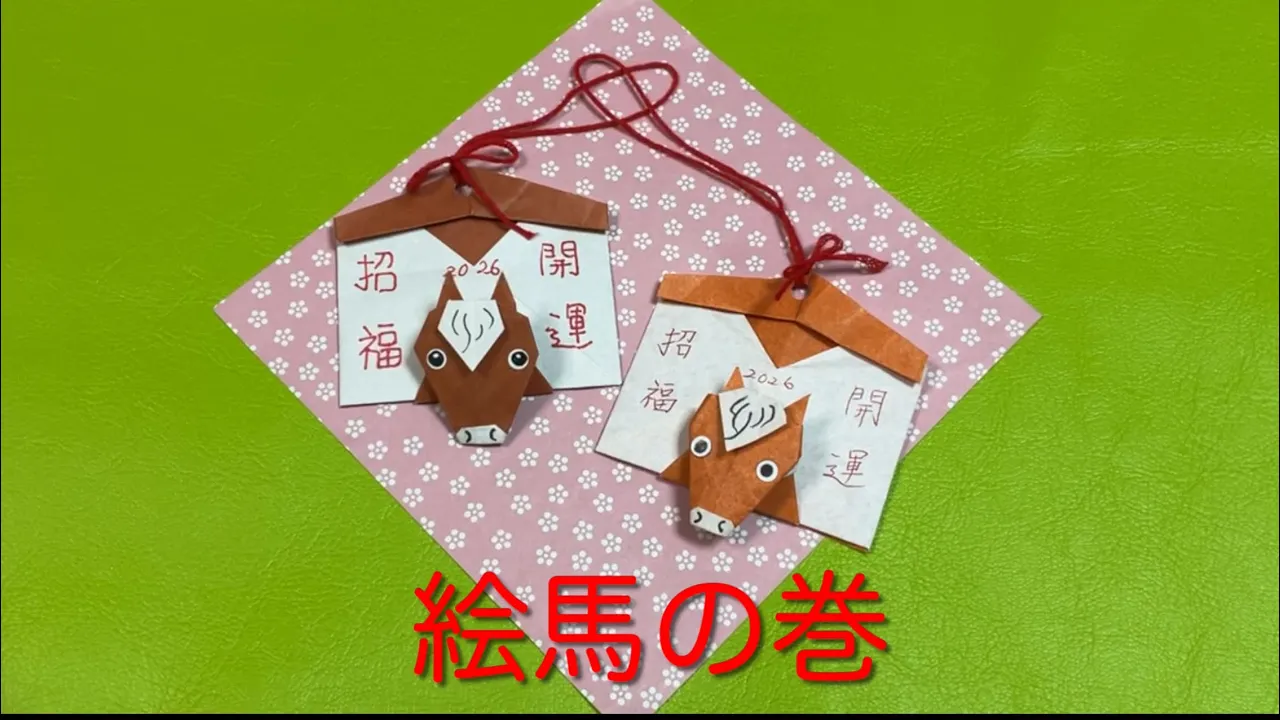
Horse ema made from a single sheet of origami paper

Easy to try! Here are handmade ema ideas perfect for the Year of the Horse.
In this idea, you’ll use just a single sheet of origami paper to create both the ema plaque and the decorative horse.
The finished piece is palm-sized, so if you want a standard ema size, please use a larger sheet of origami paper.
Once you’ve finished making the creases, cut along the fold lines with scissors to separate the ema and the horse, then fold each part.
The horse has a few fine details, so proceed carefully, one step at a time.
An ema (wooden plaque) with a horse design on which you can write your wishes

Let’s handcraft a horse-shaped ema plaque where you can write and hang your wishes.
First, cut thick paper into the shape of an ema and cover it with colored construction paper.
Then, cut out a horse’s profile from colored paper as well, and attach a coffee filter to the back to create the mane.
By making fine slits in the round part of the filter and gently brushing it, you can mimic the texture of hair.
Glue the horse onto the ema, add an eye and a floral decoration, and you’re done.
Punch a hole, thread a string through, write your wish on the back of the ema, and display it.
[Resin] Ema-shaped amulet
![[Resin] Ema-shaped amulet](https://i.ytimg.com/vi/2nXSK_2j2Ts/sddefault.jpg)
Why not try making an ema (votive plaque) using resin? There’s an ema-shaped mold available, which makes the process easy.
After making the base with the mold, place the characters for “certain victory” (必勝) on top, cure it, and decorate with cherry blossom parts.
You can make this idea in any color you like, and it’s easy to customize by mixing in glitter or sequins.
You could also use the characters for “success” (合格) instead of “certain victory” to create a supportive item for students taking exams.
The materials are easy to purchase from online shops, so give it a try!
Ema made with interlocking mats

Let’s make handmade ema plaques using interlocking foam mats, which also help prevent injuries for children.
Simply cut the mat into the shape of an ema and attach a yarn daruma to finish.
For the daruma, wrap yarn around your fingers to make a loop, tie it in the middle, and stick it onto the ema with double-sided tape.
Then cut the looped ends with scissors and trim it into a round shape.
Make the face and patterns with felt.
Draw the daruma’s facial features with a pen, twist red and white chenille stems to make a cord, and thread it through a hole punched in the mat—and you’re done!
Ema that can also be used as small gift envelopes or candy bags

This ema is shaped like a little pouch, so you can tuck in New Year’s gift money or sweets! If you like, why not make it as a present for kids? Fold origami paper to create the ema pouch, then decorate it with flower pieces and washi-patterned origami.
Once you’ve finished decorating, put the goodies inside, punch a hole at the top of the ema, thread a string through, and you’re done.
You can customize the design however you like, so try using New Year–themed stickers.
If you want a more luxurious feel, we recommend using plain textured origami as the base.