![[Children’s Day] Let’s make a handmade samurai helmet! A collection of fun, easy crafting ideas](https://i.ytimg.com/vi_webp/RWRAhwjynrk/maxresdefault.webp)


As Children’s Day approaches, you naturally want to prepare a cool helmet to celebrate your child’s growth.Store-bought ones are lovely, but handmade pieces have a special warmth.From items made with familiar materials like origami and felt to projects that follow more authentic crafting methods, there are actually many ways to make a kabuto by hand!Some are meant for display, while others can actually be worn—there’s a wide range of finishes.In this article, we’ll introduce handmade kabuto ideas that make use of various materials and techniques.There are also projects you can try together with your child, so be sure to use them as inspiration!
- Handmade ideas for Koinobori: easy projects using everyday materials
- [Handmade] A collection of stylish DIY koinobori (carp streamer) ideas
- [For Kids] Easy Origami Ideas to Enjoy in May
- [For Kids] Recommended in March! Easy Origami Ideas for Hinamatsuri (Girls’ Day) and Graduation Ceremonies
- [Handmade] Let's play with shuriken! A collection of homemade target practice ideas
- Ideas for games and crafts to enjoy on Children’s Day: a roundup of fun activities
- Cute homemade cake to make for Children's Day
- [For Kids] Handmade Ideas for Hanging Hina Decorations You’ll Want to Display for the Hina Festival
- [Handmade] A collection of hat ideas made with construction paper
- Handmade hair accessories for Shichi-Go-San! Ideas using tsumami-zaiku and artificial flowers too
- Enjoy with your kids! A roundup of DIY Kamen Rider transformation gear ideas
- Handmade gifts to give on Mother’s Day: a collection of heartfelt ideas
- [Hinamatsuri] Handmade Costume Ideas: Perfect for First Festival and Girls’ Day Celebrations!
[Children’s Day] Let’s Make a Handmade Samurai Helmet! A Collection of Fun Craft Ideas (1–10)
paper plate samurai helmet
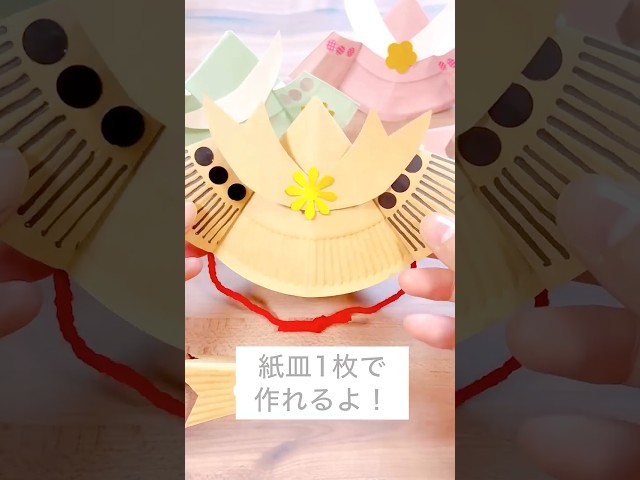
Let’s make a kabuto (samurai helmet) ornament for Children’s Day using a paper plate.
Cut the paper plate in half, place it with the cut edge at the top, then fold it in half to make a crease.
Fold both sides toward the crease to form a triangle, then glue on decorative parts cut from the paper plate to finish.
Draw patterns with pen lines or use round stickers.
Adding a red yarn chin strap will give it a more authentic look.
The steps are very simple, making it perfect for kids or a parent-child craft time!
newspaper samurai helmet

Let’s make a newspaper samurai helmet you can actually wear and enjoy.
First, cut a rectangular sheet of newspaper into a square.
Once cut, fold it into a triangle, then fold both bottom corners up toward the top corner.
Flip the newspaper top to bottom, and fold those two corners up to the top corner again.
Next, open out the folded-up corners to the sides to form the crest.
Then, take the top layer of the bottom edge and roll-fold it upward to secure the crest so it doesn’t open, and finally fold the remaining bottom layer up inside the helmet—and you’re done!
cool helmet
@kantan_origami Introducing an easy way to fold a cool samurai helmet using a single sheet of origami paper. It’s perfect for Children’s Day decorations or as a gift. Using double-sided origami paper in colors like gold or silver, or traditional chiyogami, will make the piece even more distinctive and striking.Origamiorigami#origamiOrigami creations#Indoor PlayHelmetKabuto#kabuto#Japanesehelmet#samuraihelmet#helmet
♬ เสียงต้นฉบับ – Bird – BIRD_
Some of you may have folded the usual origami samurai helmet many times, but this one is a cooler design with a slightly different shape.
First, crease a cross and an X, then fold one edge into a long, narrow strip and fold the whole sheet into a triangle.
Add fine, radiating creases, open it up, and fold it back into a triangular shape from a different angle.
While adding fine creases around the center, make decorative folds to raise the horns.
Finally, curl both sides using a pen or similar tool, puff out the whole piece to shape it, and you’re done.
Bear Helmet
@hoiku_is For Children’s Day, let’s make and wear this! A bear helmet you can craft using just construction paper 🐻Nursery teacher / Childcare worker#HoikuisTranslationProductionChildren's Day
Oria – niKu
Cool samurai helmets are great, but when you want a cute one to wear, this is our recommendation! Prepare two sheets of B4 construction paper, place them together, and fold them in half to make a crease.
Fold both top corners down toward the center along that crease to form triangles.
Take the single bottom layer of the excess lower section and fold it up twice.
Attach parts you’ve made from another sheet of construction paper—like bear ears and eyes—to finish! Open the whole piece into a bag shape to wear it; if the leftover back portion bothers you, tuck it inside.
knitted wool helmet
@yukidaruma_kagibari A must-see for boy moms 🎏💗 Save this post so you can easily revisit it later 💗 . Good evening ◡̈♡ It’s Yukidaruma ☃️🤍 This one’s a must-see for boy moms◎ I simplified and made last year’s wearable samurai helmet pattern even cuter 🎏🩵 . You can make it with basic crochet stitches, so if you start now, I’d love for you to make it for Children’s Day 😊💗 . Materials for the helmet: *Cando / Seria Kirameki Cotton: Blue 3 balls, White 1.5 balls ※ If holding two strands together, it’s safer to have double the yarn◎ *Chatti Cotton Details are introduced in Stories / Highlights◎ *Crochet hook sizes: 3/0–4/0 If holding two strands together: 6/0–7/0 . How to crochet: 1) Start with the blue yarn using a magic ring Round 1: 7 or 8 double crochets (US terms) ※ 7 sts makes a smaller, shallower helmet like the right thumbnail◎ 8 sts makes a deeper helmet like the left thumbnail◎ ※ This also varies by yarn thickness, so I hope this helps as a reference 😊💗 . 2) If Round 1 has 7 sts: Round 2: 14 sts Round 3: 21 sts … Increase by 7 sts each round If Round 1 has 8 sts: Round 2: 16 sts Round 3: 24 sts … Increase by 8 sts each round Continue to your preferred depth◎ ※ The left sample in the post is worked to Round 19 / the right to Round 12◎ . 3) Switch the yarn to white and crochet the edging◎ After changing to white, do not increase or decrease; work one double crochet into each double crochet below◎ After 3–4 rounds of edging, weave in ends to finish the helmet body◎ . How to make the parts: *Triangle parts 1) Chain 21, then starting from the back bump of the 2nd chain, single crochet 20◎ . 2) Round 2: 18 sts Round 3: 16 sts Decrease at both sides each row with single crochet decreases until Round 11: 1 st◎ Finish with ch 1 to complete the part◎ Weave in ends and attach to the body◎ . *Horn parts 1) Chain 11◎ Ch 2 to turn, work 11 double crochets into the back bumps of the chain◎ . 2) Round 2: 9 sts Round 3: 7 sts Round 4: 5 sts Decrease at both sides each row with double crochet decreases◎ ※ For double crochet decreases, see the “Double Crochet Beret” post 😊 . 3) From Round 5 onward, ch 2 to turn and work 5 double crochets per row; continue until the horns reach your desired length, then finish◎ Weave in ends on both and attach 🩵 . How to adjust size: If the helmet is too deep, or if you want it to fit like a snug hat, pinch the sections shown in the post with clips and whipstitch them together with a tapestry needle—this helps prevent slipping off and is recommended 🤍🩶 . I answer questions about the post in Stories, so please check there as well ⛄️🤍 . Thank you for reading ◎ .Knitting#crochetHow to Start KnittingKnitting yarnSeria#CanDoKnitting BeginnerKnitting classYarn Plaza IchikawaYarn Zakka StoresGosho IndustryChildren's Day#🎏Helmet
♬ Little Devil LOVE♡ – Nijigasaki High School Idol Club & Shizuku Osaka (CV: Kaori Maeda)
This is a yarn kabuto (samurai helmet) that can be worn for Children’s Day outings.
Use your favorite color of yarn and finish it with crochet.
Since it’s made using basic crochet stitches—double crochet and single crochet—it’s easy for beginners to try as practice.
First crochet the overall shape of the helmet, then crochet the triangular piece in the center and the horn-like pieces separately and assemble them.
The cute finish makes it a design that’s easy for not only boys but also girls to wear.
Adjust the size to fit the child’s head who will be wearing it!
cloth helmet
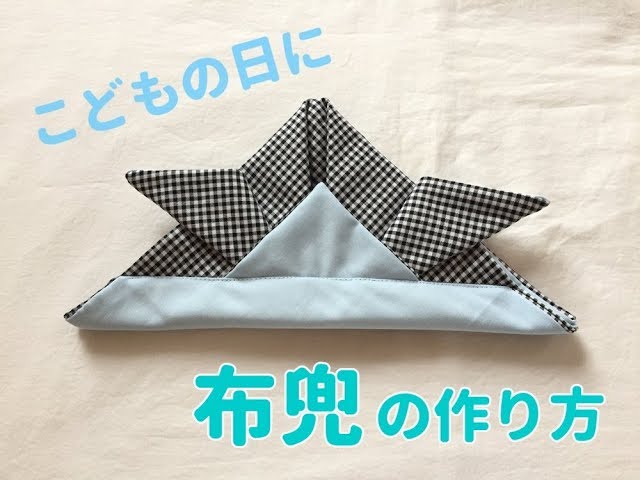
Kabuto helmets can seem “cool but a little scary” to many kids, but if you make a cute one out of fabric, they might be happy to wear it.
Sew a solid-colored square of fabric and a patterned square right sides together to make a single piece of fabric.
Next, fold it into a triangle, then fold both ends up toward the top point, shaping it like a kabuto as if you were doing origami.
Hold it with clips and sew with a machine, and you’ll have a wearable fabric kabuto! Try making it to fit your child’s head size.
PET bottle cap helmet

It’s a highly polished miniature samurai helmet you’d never guess was made from a plastic bottle cap! Wrap the cap with black tissue paper, then create the base of the helmet by crossing thin strips of gold origami paper and attaching the parts.
After that, make each helmet component using red, gold, and black origami paper and gold beads, and glue them together to finish.
It requires fine, detailed work, but seeing the finished piece will surely delight your child! Use tweezers and an adhesive that dispenses in small amounts to help you along, and give it a try.