[Handmade] Birthday presents for Mom: A collection of heartfelt ideas


Here are some handmade gift ideas I’d love to recommend for anyone who wants to express everyday gratitude to their mom on her birthday and is thinking of making a DIY present.
Even if you feel clumsy and think crafting is hard, once you get the hang of it or watch a video, you might find yourself thinking, “Huh, maybe I can make this!” These are all ideas like that.
Some are such high quality you’ll be surprised they’re handmade.
Choose materials, colors, and patterns to match your mom’s tastes, and make her happy with a one-of-a-kind handmade gift just for her!
- Made with 100-yen shop materials! Handmade birthday gift ideas that middle schoolers will love
- [For Elementary School Students] A Collection of Simple Handmade Gift Ideas
- Mother’s Day gifts are best when handmade! A collection of heartfelt ideas
- Handmade accessory ideas that will delight the recipient! Easy DIY with everyday materials
- [Handmade] Delightful Handmade Fabric Accessories to Receive
- Handmade gifts to give on Mother’s Day: a collection of heartfelt ideas
- [All from 100-yen shops!] Birthday goods you can buy at 100-yen stores
- [Birthday] Handmade decoration ideas using construction paper
- [Father’s Day] Heartfelt DIY gift ideas
- [Korean Sonmul] Handmade birthday presents: A roundup of saeng-il gifts
- Cute! Handmade Birthday Card Ideas [Birthday]
- Handmade birthday plate ideas: make birthdays extra special!
- [For Kids] Collection of Handmade Message Card Ideas
[Handmade] Birthday gifts for Mom: A collection of heartfelt ideas (21–30)
handkerchiefNEW!
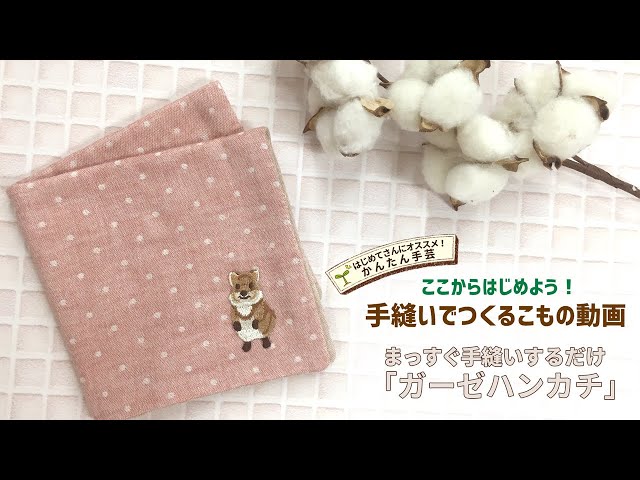
A simple gauze handkerchief that you can make just by hand-sewing straight lines is a perfect item for everyday use.
How about making an adorable handkerchief that you’ll want to carry every day and delighting your mom with it? Prepare two 30-centimeter square pieces of gauze fabric, one for the front and one for the back.
If you mark a 1-centimeter seam allowance on the inside, the work will go more smoothly.
After aligning the two pieces of fabric and securing them with pins, sew along the seam allowance line with a needle and thread.
Don’t forget to leave an opening for turning it right side out.
Using a ladder stitch to close the opening will give you a neat finish.
It’s an easy method for beginners, so give it a try.
Patchwork quilt coasterNEW!

These are coasters made from small fabric scraps.
Because they’re done in patchwork, they have a warm feel and make a great gift for Mom.
Prepare scraps in 10 cm squares and 4 cm squares, two pieces measuring 10 cm by 4 cm, and a 12.5 cm square.
Cut fusible batting to 12.5 cm square as well.
Sew the four small pieces together with a 0.7 cm seam allowance, then fuse the batting with an iron.
After quilting, stitch around the edge with a 0.5 cm seam, align with the backing fabric, and shape to finish.
Topstitch around the edge to give it a neat look.
It’s a gift that will warm the heart every time it’s seen at mealtime.
Book coverNEW!

How about a handmade book cover as a gift for someone who loves reading? You can make one with outer fabric, fusible interfacing, lining fabric, ribbon for a bookmark, beads, and a 1 cm-wide cord.
First, iron the fusible interfacing onto the outer fabric.
With the interfacing side facing up, fold the left edge of the outer fabric inward by about 1.5 cm and sew it.
Then turn the fabric inside out, fold the left edge inward, and temporarily hold it in place with clips.
After you’ve also pinned the ribbon threaded with beads for the bookmark and the 1 cm-wide cord in their designated positions, place the lining right sides together with the outer piece and sew all the way around except for the left edge.
That’s all it takes to complete your book cover! Try making it to fit the size of your book.
Shrinky-dink keychainNEW!

Introducing a cute keychain you can make using stickers from a 100-yen shop! Since we’ll reinforce it with resin at the end, please prepare UV resin and a UV light.
Once you have two stickers of the same size, stick them on the front and back of a plastic sheet.
Then cut away the excess plastic around the design.
Next, cover the entire piece with mending tape, apply resin on top, and cure it.
Drill a hole with a pin vise, attach the hardware, and you’re done! Find some lovely stickers and give it a try.
box tissue caseNEW!

Great for sewing beginners! Here’s an idea for a box tissue cover that’s finished after sewing four straight lines.
For the fabric, the width should be the full circumference of the tissue box plus 14 cm, and the height should be the height of the tissue box plus its vertical length plus 4.5 cm.
First, single-fold the left and right edges by 1.5 cm and sew.
Next, single-fold the same edges by 2 cm, then align them at the center and temporarily clip them in place.
At this point, overlap them with a twist: on the top piece, place the right edge over; on the bottom piece, place the right edge under.
After that, sew the top and bottom into a tube, turn the fabric right side out, and you’re done.
Adding a wall-hanging hook makes it even more convenient!
Jewel soapNEW!

Here’s how to make gemstone soap that also makes a lovely interior accent.
Prepare 120 g of MP soap, essential oil, mica, and a square mold.
First, finely chop 10 g of soap and divide it between two opposite corners of the mold.
Melt the remaining 110 g in the microwave until liquid.
Pour a little of the melted soap into the mold, then sprinkle an appropriate amount of mica.
When the soap starts to set slightly, peel it away from the mold and push it toward the opposite corners where the 10 g pieces are.
Repeat this twice, then color the remaining liquid soap and pour it into the mold.
Spray the surface with anhydrous ethanol, let it set at room temperature for about 30 minutes, and remove from the mold.
Finally, cut it into your desired shapes and dry the surface with warm air, and your gemstone soap is ready.
obi-domeNEW!

If you’re giving a gift to a woman who loves kimono, how about an obidome made from a chopstick rest from a 100-yen shop? You’ll need a sanbuhimo (narrow obi cord), a cord hook, and a chopstick rest.
First, thread the cord hook that will serve as the base onto the sanbuhimo, then bend the hook section to secure it so it won’t come off.
Once you’ve confirmed it stays on the sanbuhimo, attach your chosen chopstick rest to the front surface of the hook with adhesive.
That completes your original obidome.
If you can’t find a chopstick rest you like, you could also make one from scratch using clay or similar materials.