Let's make New Year’s decorations by hand! A collection of ideas you can create with everyday materials.


As the New Year approaches, are you thinking about brightening up your space with handmade New Year’s decorations? Store-bought pieces are lovely, but decorations you craft yourself carry a special warmth and sense of attachment.
In this article, we’ll share easy, DIY New Year’s decoration ideas you can try using familiar materials.
From yarn and felt to origami paper, you can create a wide variety of projects with items that are easy to find.
Try making them with your children, or finish them with your own favorite designs for decorations full of originality.
How about preparing for the New Year with heartfelt, handmade items?
- Handmade New Year’s wreaths: A collection of festive ideas using shimenawa and mizuhiki
- Let's make our own shimenawa! A collection of stylish ideas you can create with paper and artificial flowers
- Welcome the New Year! Ideas for Handmade Kadomatsu
- For New Year’s! A collection of fun origami ideas to make, decorate, and play with in childcare
- A collection of handmade ema ideas: easy crafts perfect for New Year’s
- Handmade winter garlands: cute ideas that are easy to make
- Handmade spinning tops with everyday materials! Easy ideas you can enjoy for New Year’s too
- [Handmade Winter Decorations] A collection of stylish, heartwarming creations you can make with everyday materials
- Christmas crafts for adults: stylish project ideas you'll want to display
- Let's make a handmade hagoita! Fun ideas using milk cartons and cardboard
- A roundup of handmade Daruma ideas: making Daruma with various materials
- Simple yet amazing! Handmade New Year’s card ideas that will delight
- [Easy] Practical craft ideas. Great for beginners too!
Let's handcraft New Year decorations! A collection of ideas made with familiar materials (71–80)
Festive sea bream decoration
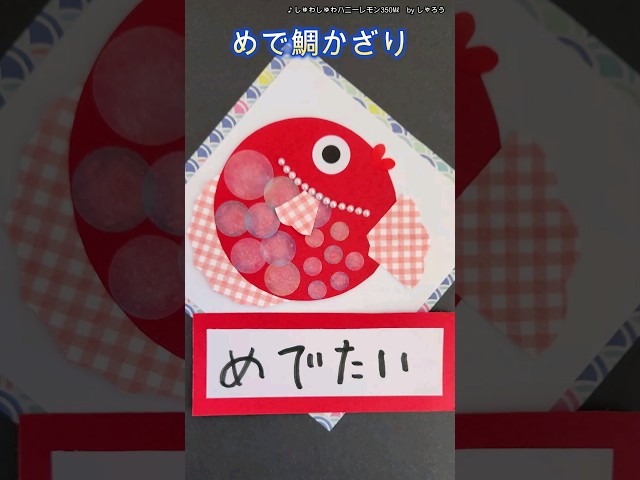
Chic and celebratory! Let’s make a decoration featuring a sea bream motif.
Using red construction paper, cut one circular piece for the body and two small teardrop-shaped pieces for the mouth.
From patterned origami paper in the same color family, make one pectoral fin, one dorsal fin, and one tail fin.
Attach the tail fin to the circular body piece, then add round stickers of various sizes to create the scales.
Gradient stickers that add a 3D effect are recommended.
After the scales are on, attach the dorsal fin and use rhinestones to represent the gill.
Glue on the pectoral fin, and add eyes with white and black round stickers.
Finally, attach the mouth and glue the sea bream onto the base to finish.
Shimenawa wreath made with 100-yen shop materials

Starting with a simple shimenawa decoration as the base, let’s add embellishments to make it even more festive.
Carefully remove the ornaments so that only the rope remains, then attach artificial flowers—such as nandina—and other accents to enhance its glamor.
If you want to highlight the knot of the rope, attach decorations to the other areas; if you prefer to conceal the knot, place them over the knot.
You can also keep some of the original parts and add new decorations while considering the overall balance.
New Year wreath made with an ornamental base

Attach artificial flowers and New Year’s ornaments to a round base and finish it like a wreath.
By being mindful of the spacing between each ornament as you attach them, you can also showcase the base’s pattern clearly.
If you’re aiming for a wreath, place decorations with a hanging loop at the top, and attach the remaining ornaments along the outer frame—this is recommended.
Pay close attention to the choice of decorations and artificial flowers, as well as the balance of their placement, and create a wreath that reflects your personal style.
New Year wreath made of craft tape

This is a beautiful wreath woven by twisting craft tape, featuring striking color gradations and a three-dimensional look.
Choosing auspicious color combinations like red and white, or attaching lucky motifs such as fans or mizuhiki cords, can give it the feel of a traditional shimenawa.
For this decoration, the most important step is creating the rope by repeatedly using the ishidatami (stone-paving) weave.
Learn the sequence and focus on weaving firmly.
Because the base has a three-dimensional structure, it’s recommended to emphasize that depth in the decorations as well—using items like chirimen (crepe) crafts to bring out the dimensionality.
Two-colored Crane

When you want to celebrate the New Year with a lucky decoration, this two-colored crane is highly recommended! Make it in red and white and you’ll have a splendid good-luck charm.
All you need is a single sheet of origami paper.
Just a small twist on the usual crane-folding method and you’re done! When you let go of the fixed idea that “this is the only way to fold a crane,” you can create something this wonderful.
Make lots of them and place them in your living room or entryway to instantly boost the New Year mood.
Give it a try with your family!
Wall decoration kadomatsu

Let’s welcome the New Year in style by making a kadomatsu wall decoration! If you place large kadomatsu pieces on a bright red backing that evokes the New Year, it will turn out wonderfully colorful.
In addition to the kadomatsu, adding decorations inspired by that year’s zodiac animal or plum blossoms will make it even more festive! All the parts can be made with origami or construction paper, so it should be easy to try even for first-time crafters.
Give it a try!
Shishimai decoration

I’ll show you how to make a cute shishimai (lion dance) decoration that’s easy to create.
First, prepare two sheets of origami paper in any colors or patterns you like.
Tear them into pieces and glue the pieces onto a white sheet of paper.
Next, cut a red origami sheet into a square one quarter the original size, and paste it onto the paper at a diamond angle.
Make the mouth, eyes, nose, eyebrows, and ears from construction paper or origami and glue them on.
Finally, use glue to attach cotton to make the hair, thread a bell onto a red-and-white pipe cleaner, twist it, and attach it as a necklace to finish.
This time we used origami, but using fabric for the kimono part is also recommended.
Give it a try!